Vegetable Insects
BLACK SOLDIER FLY COMPOSTING GUIDE
Catherine Terrell and Laura Ingwell, Department of Entomology
If you want to view as pdf, click here
WHAT IS A BLACK SOLDIER FLY (BSF)
Black soldier flies are one of the most versatile insects that can be used to upcycle organic waste materials. This non-pest insect is native to the neotropics, commonly found throughout the southern portions of the US and now globally. The adult flies are harmless and do not feed, but they mimic the appearance of wasps (Fig. 1). The immature leggless stage of the fly, called larvae or maggots (Fig. 2), are decomposers. They feed on a wide range of organic materials, including manure, spent grains from brewing, household food waste, grocery or restaurant waste, paper mill sludge, and carrion (dead animals). BSF can be used to compost organic waste, creating nutrient-rich soil amendments by harvesting the digestate and serving as feed for animals by harvesting the immature flies (larvae or pupae).
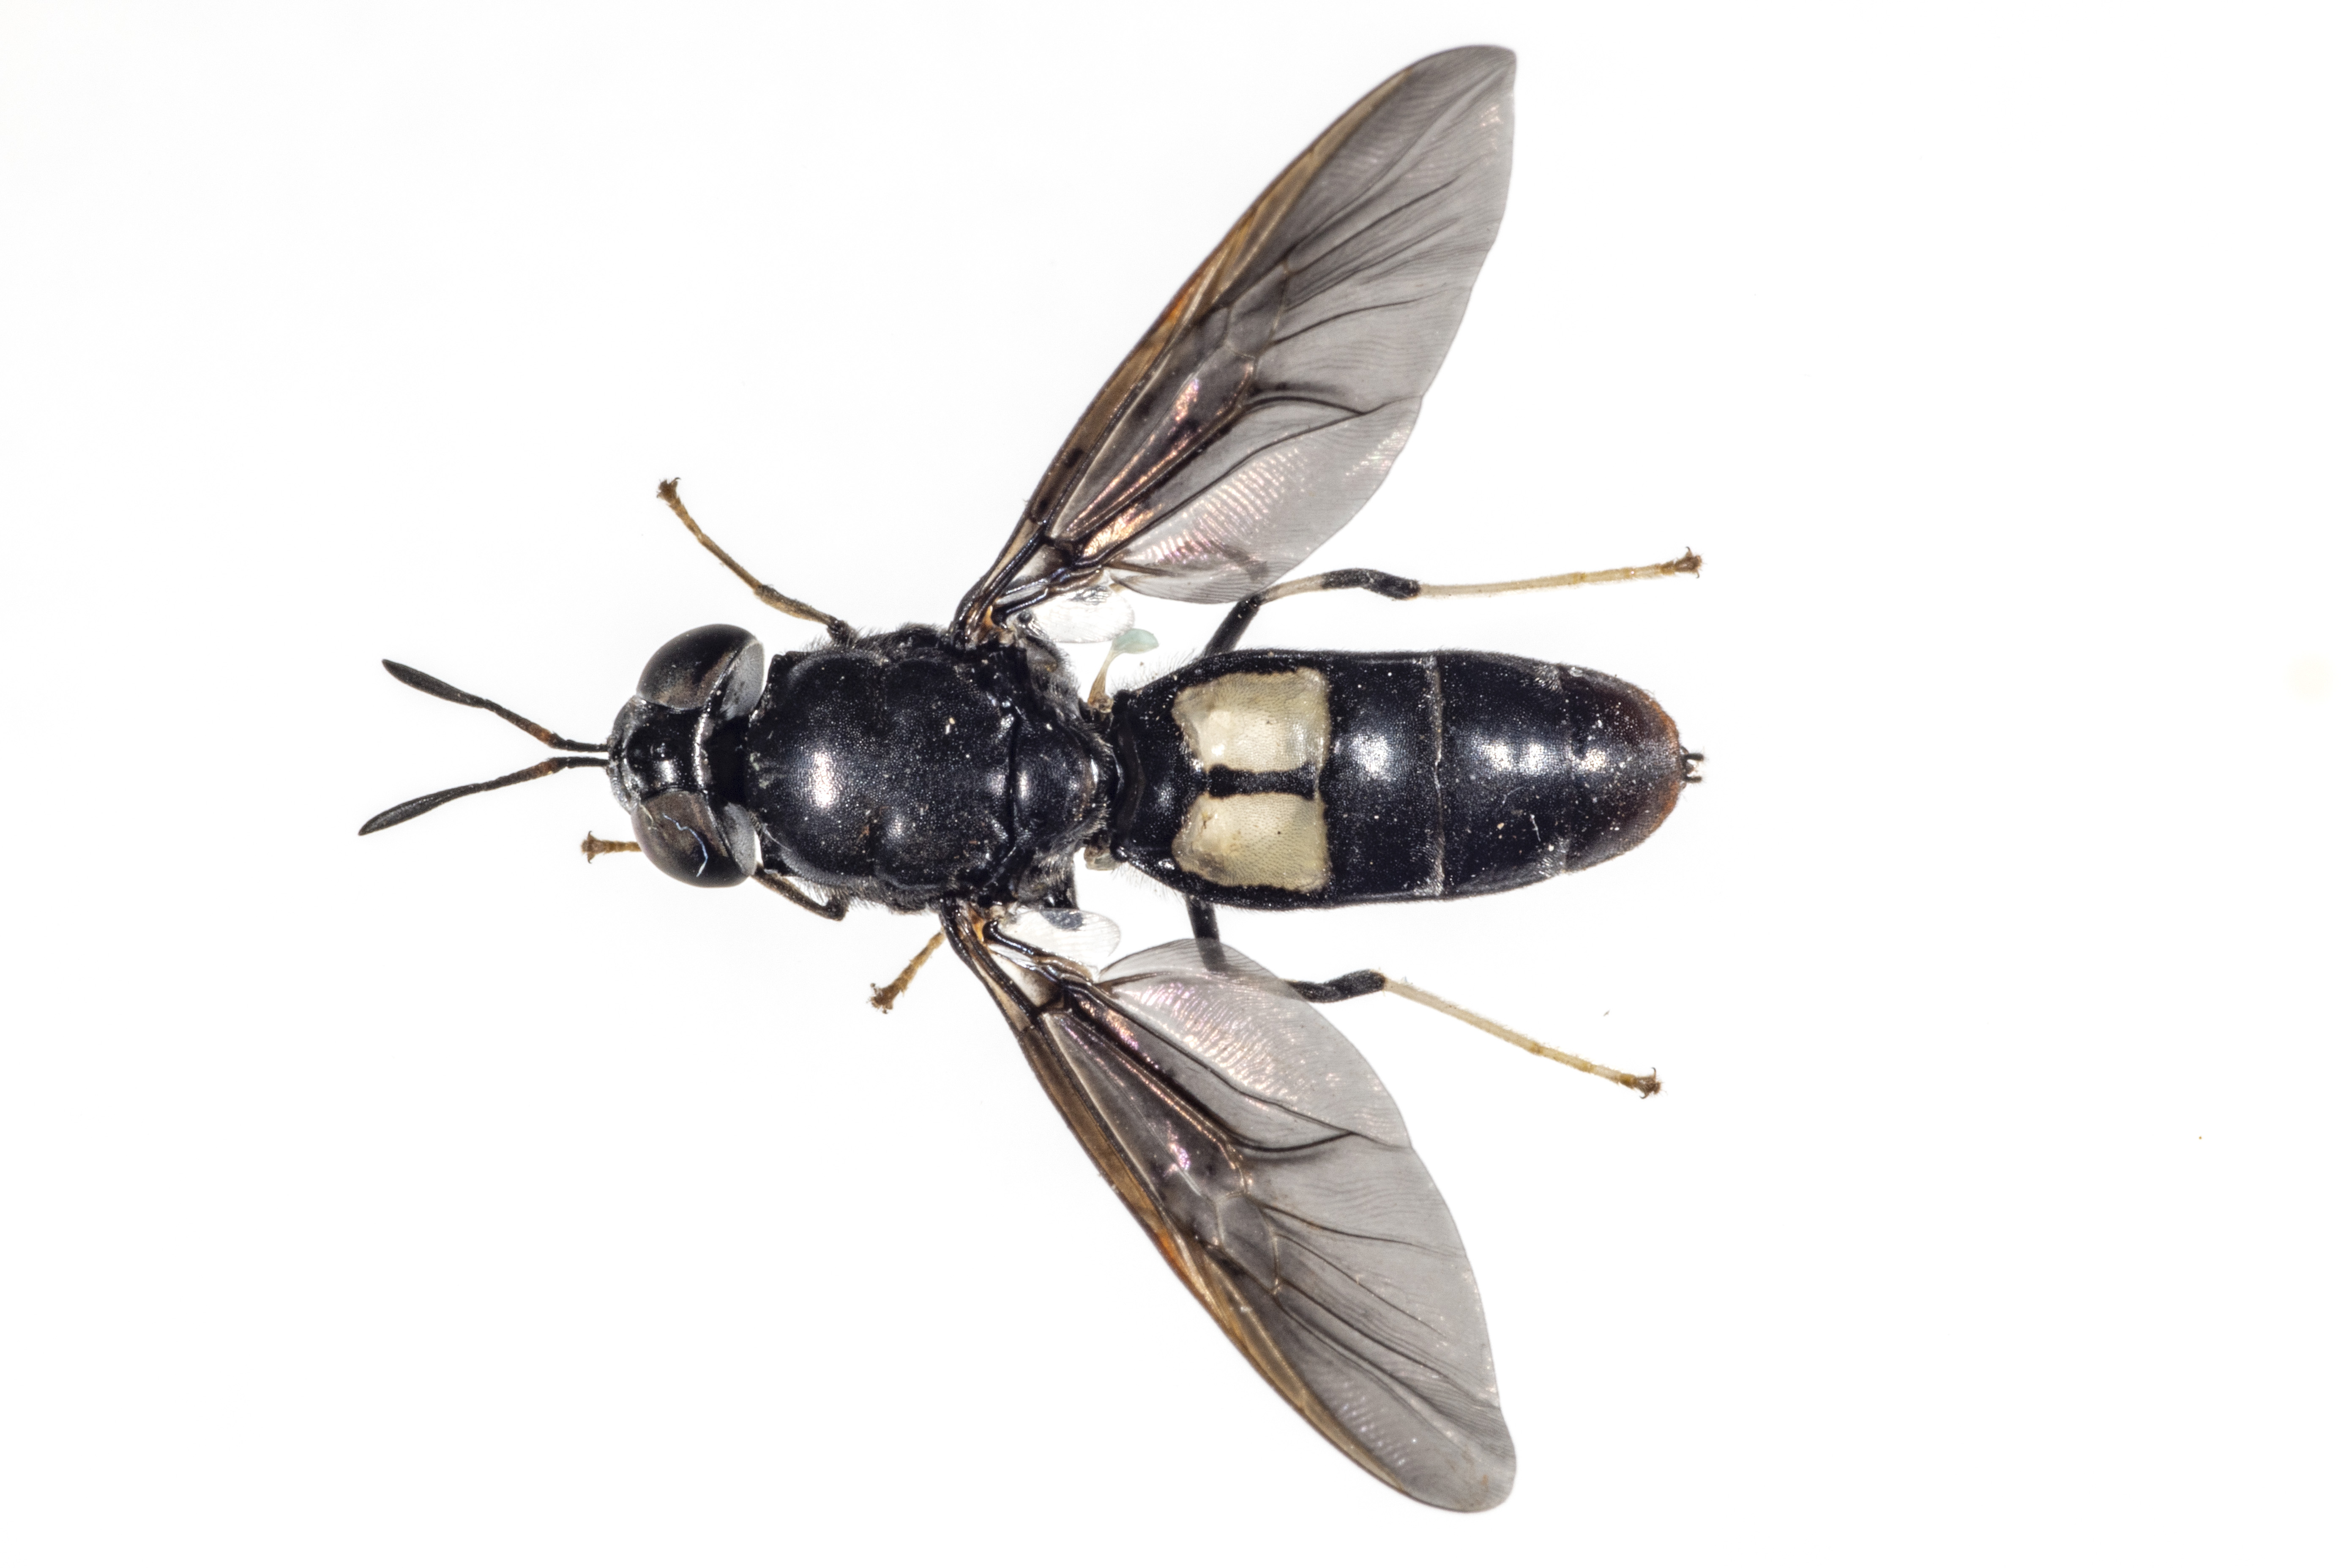
Figure 1. Adult black soldier fly mimics a wasp with the clear
cells on their abdomen. (Photo credit: John Obermeyer, Purdue Entomology)
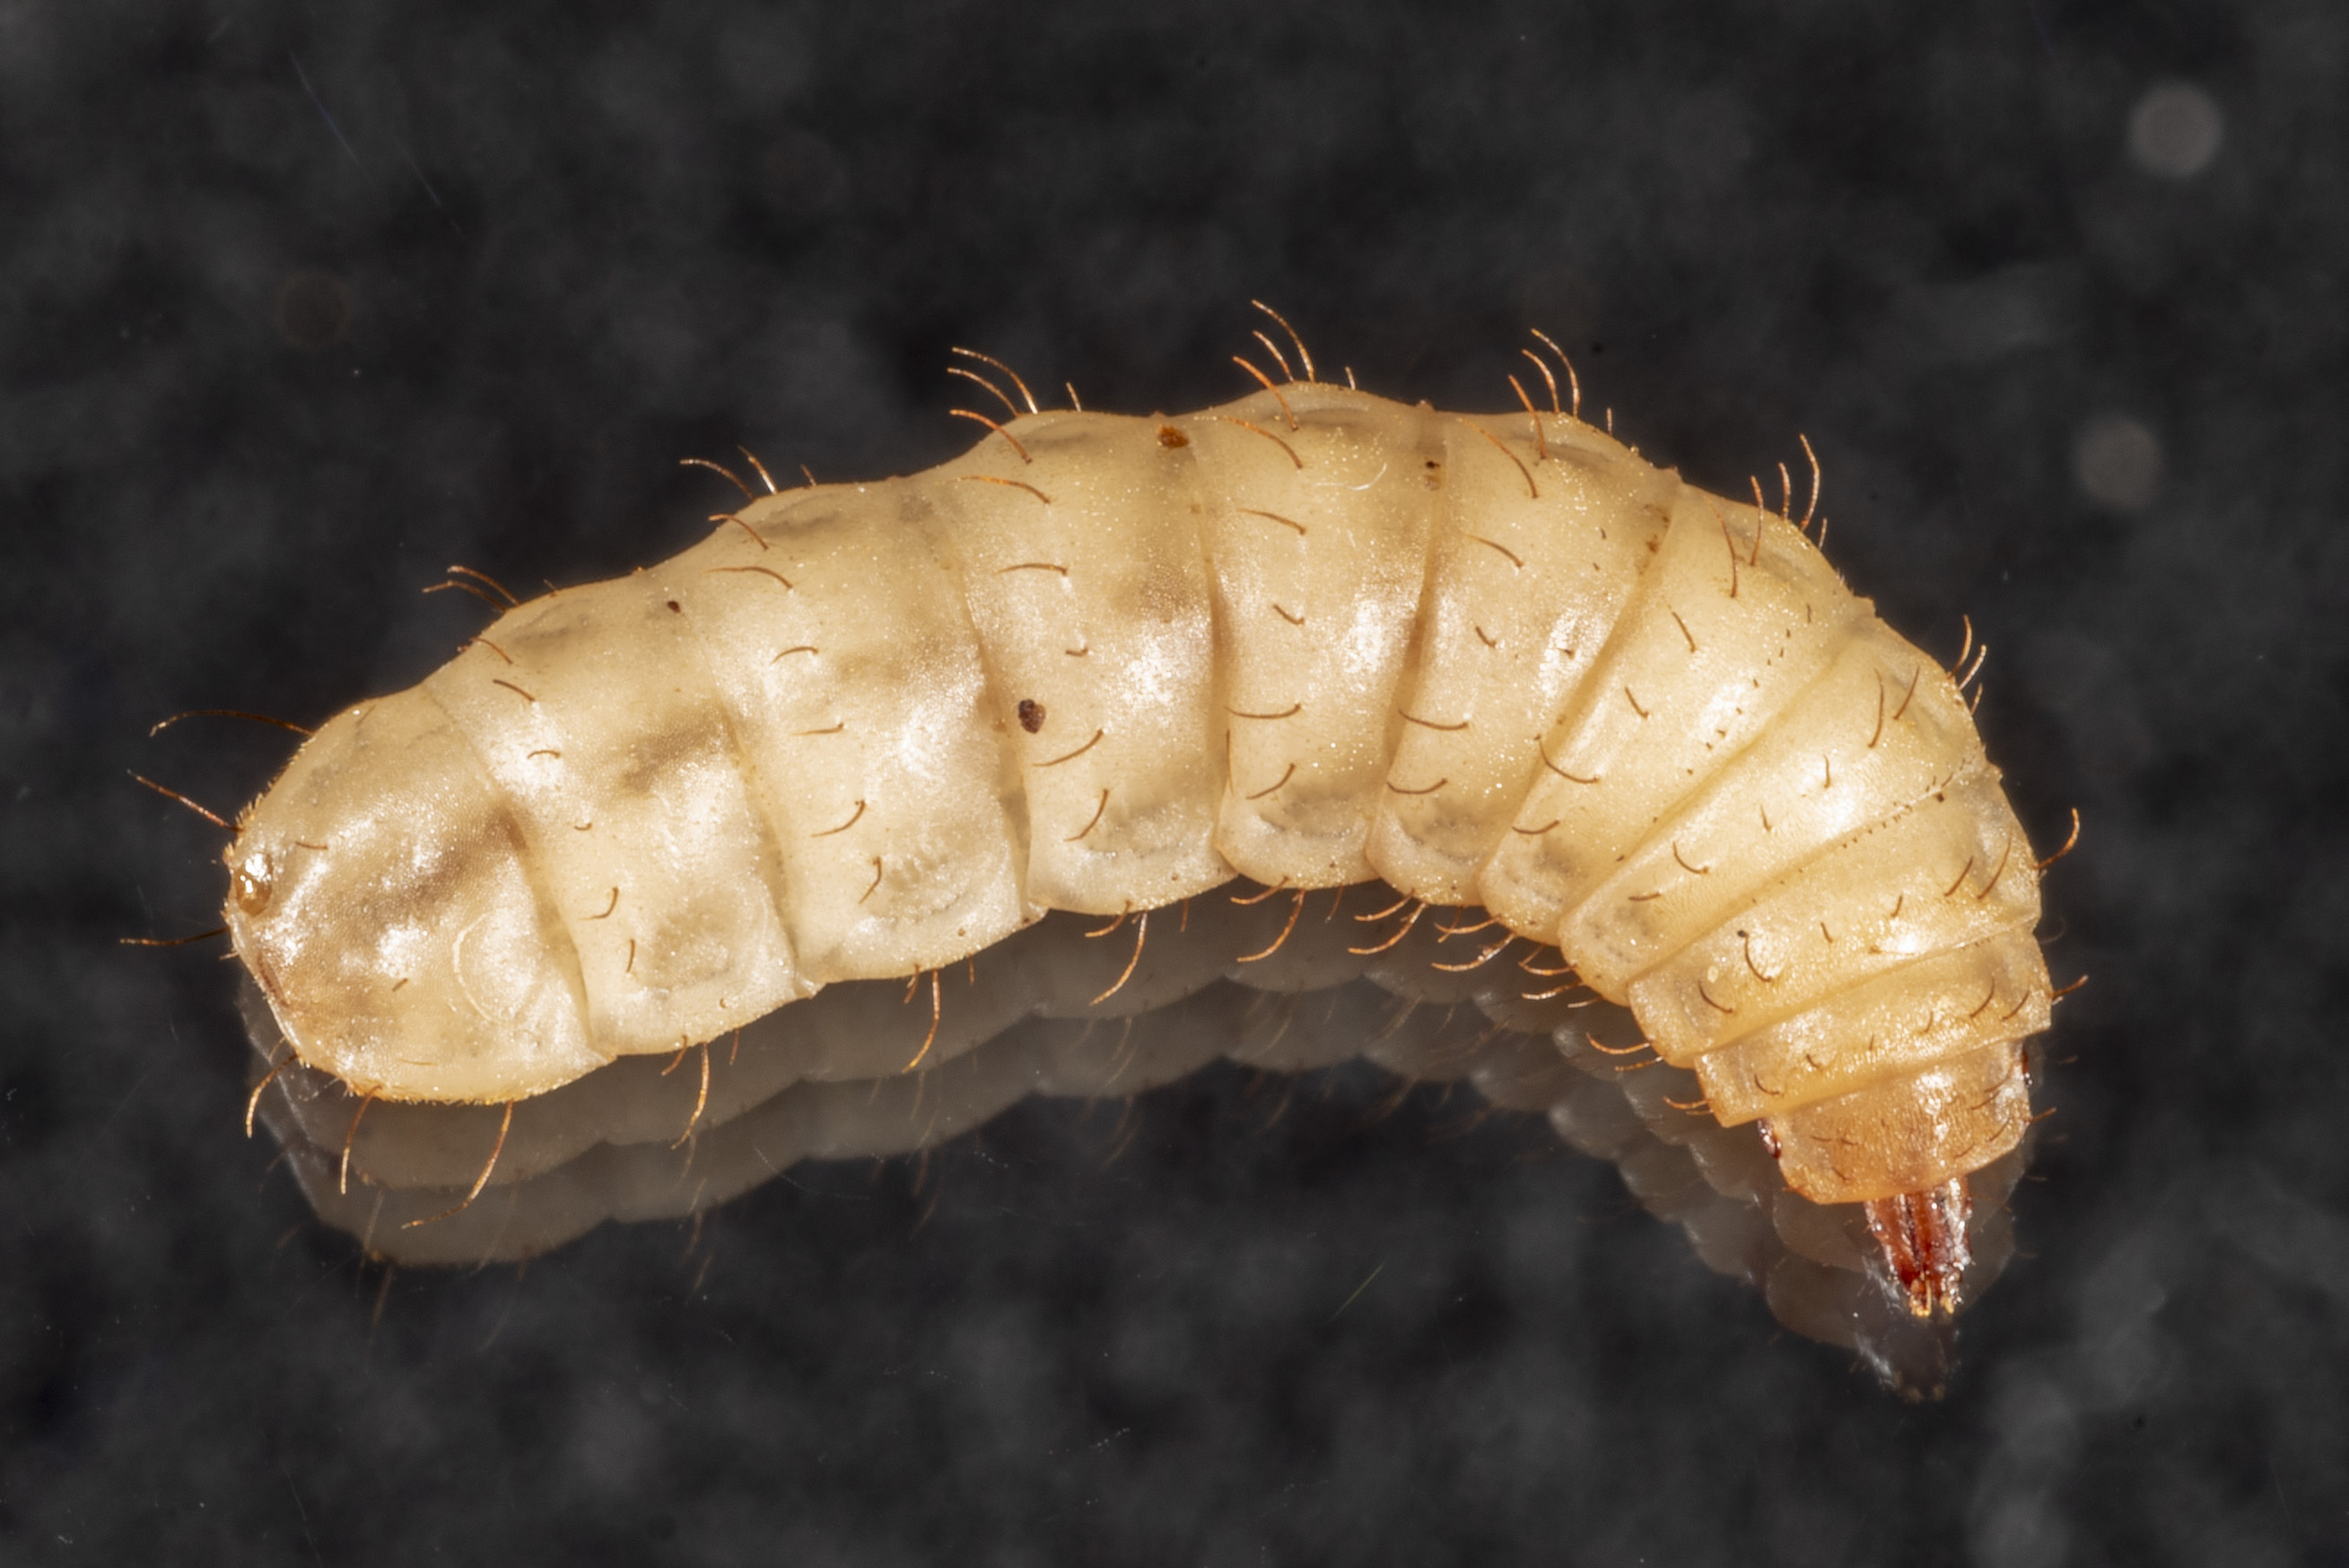
Figure 2. Late instar black soldier fly larva. (Photo credit: John Obermeyer, Purdue Entomology)
The entire life cycle of the black soldier fly is approximately 38 days (Fig. 3). Larvae hatch from eggs, transition through five larval instars, pupate and then emerge as adult flies (Hall and Gerhart, 2002). When incorporating BSF into your composting process, you can harvest the compost in as little as 21 days. We encourage you to start the process by purchasing BSF larvae early in the spring to initially stock your bin because they do not successfully overwinter. The best way to keep adults coming back to your bin is by providing an egg laying substrate, such as cardboard, suspended within your compost bin. The adults are attracted to the smell of the bin contents and the presence of other BSF. They prefer to lay their egg near, but not on, the food (Fig. 4).
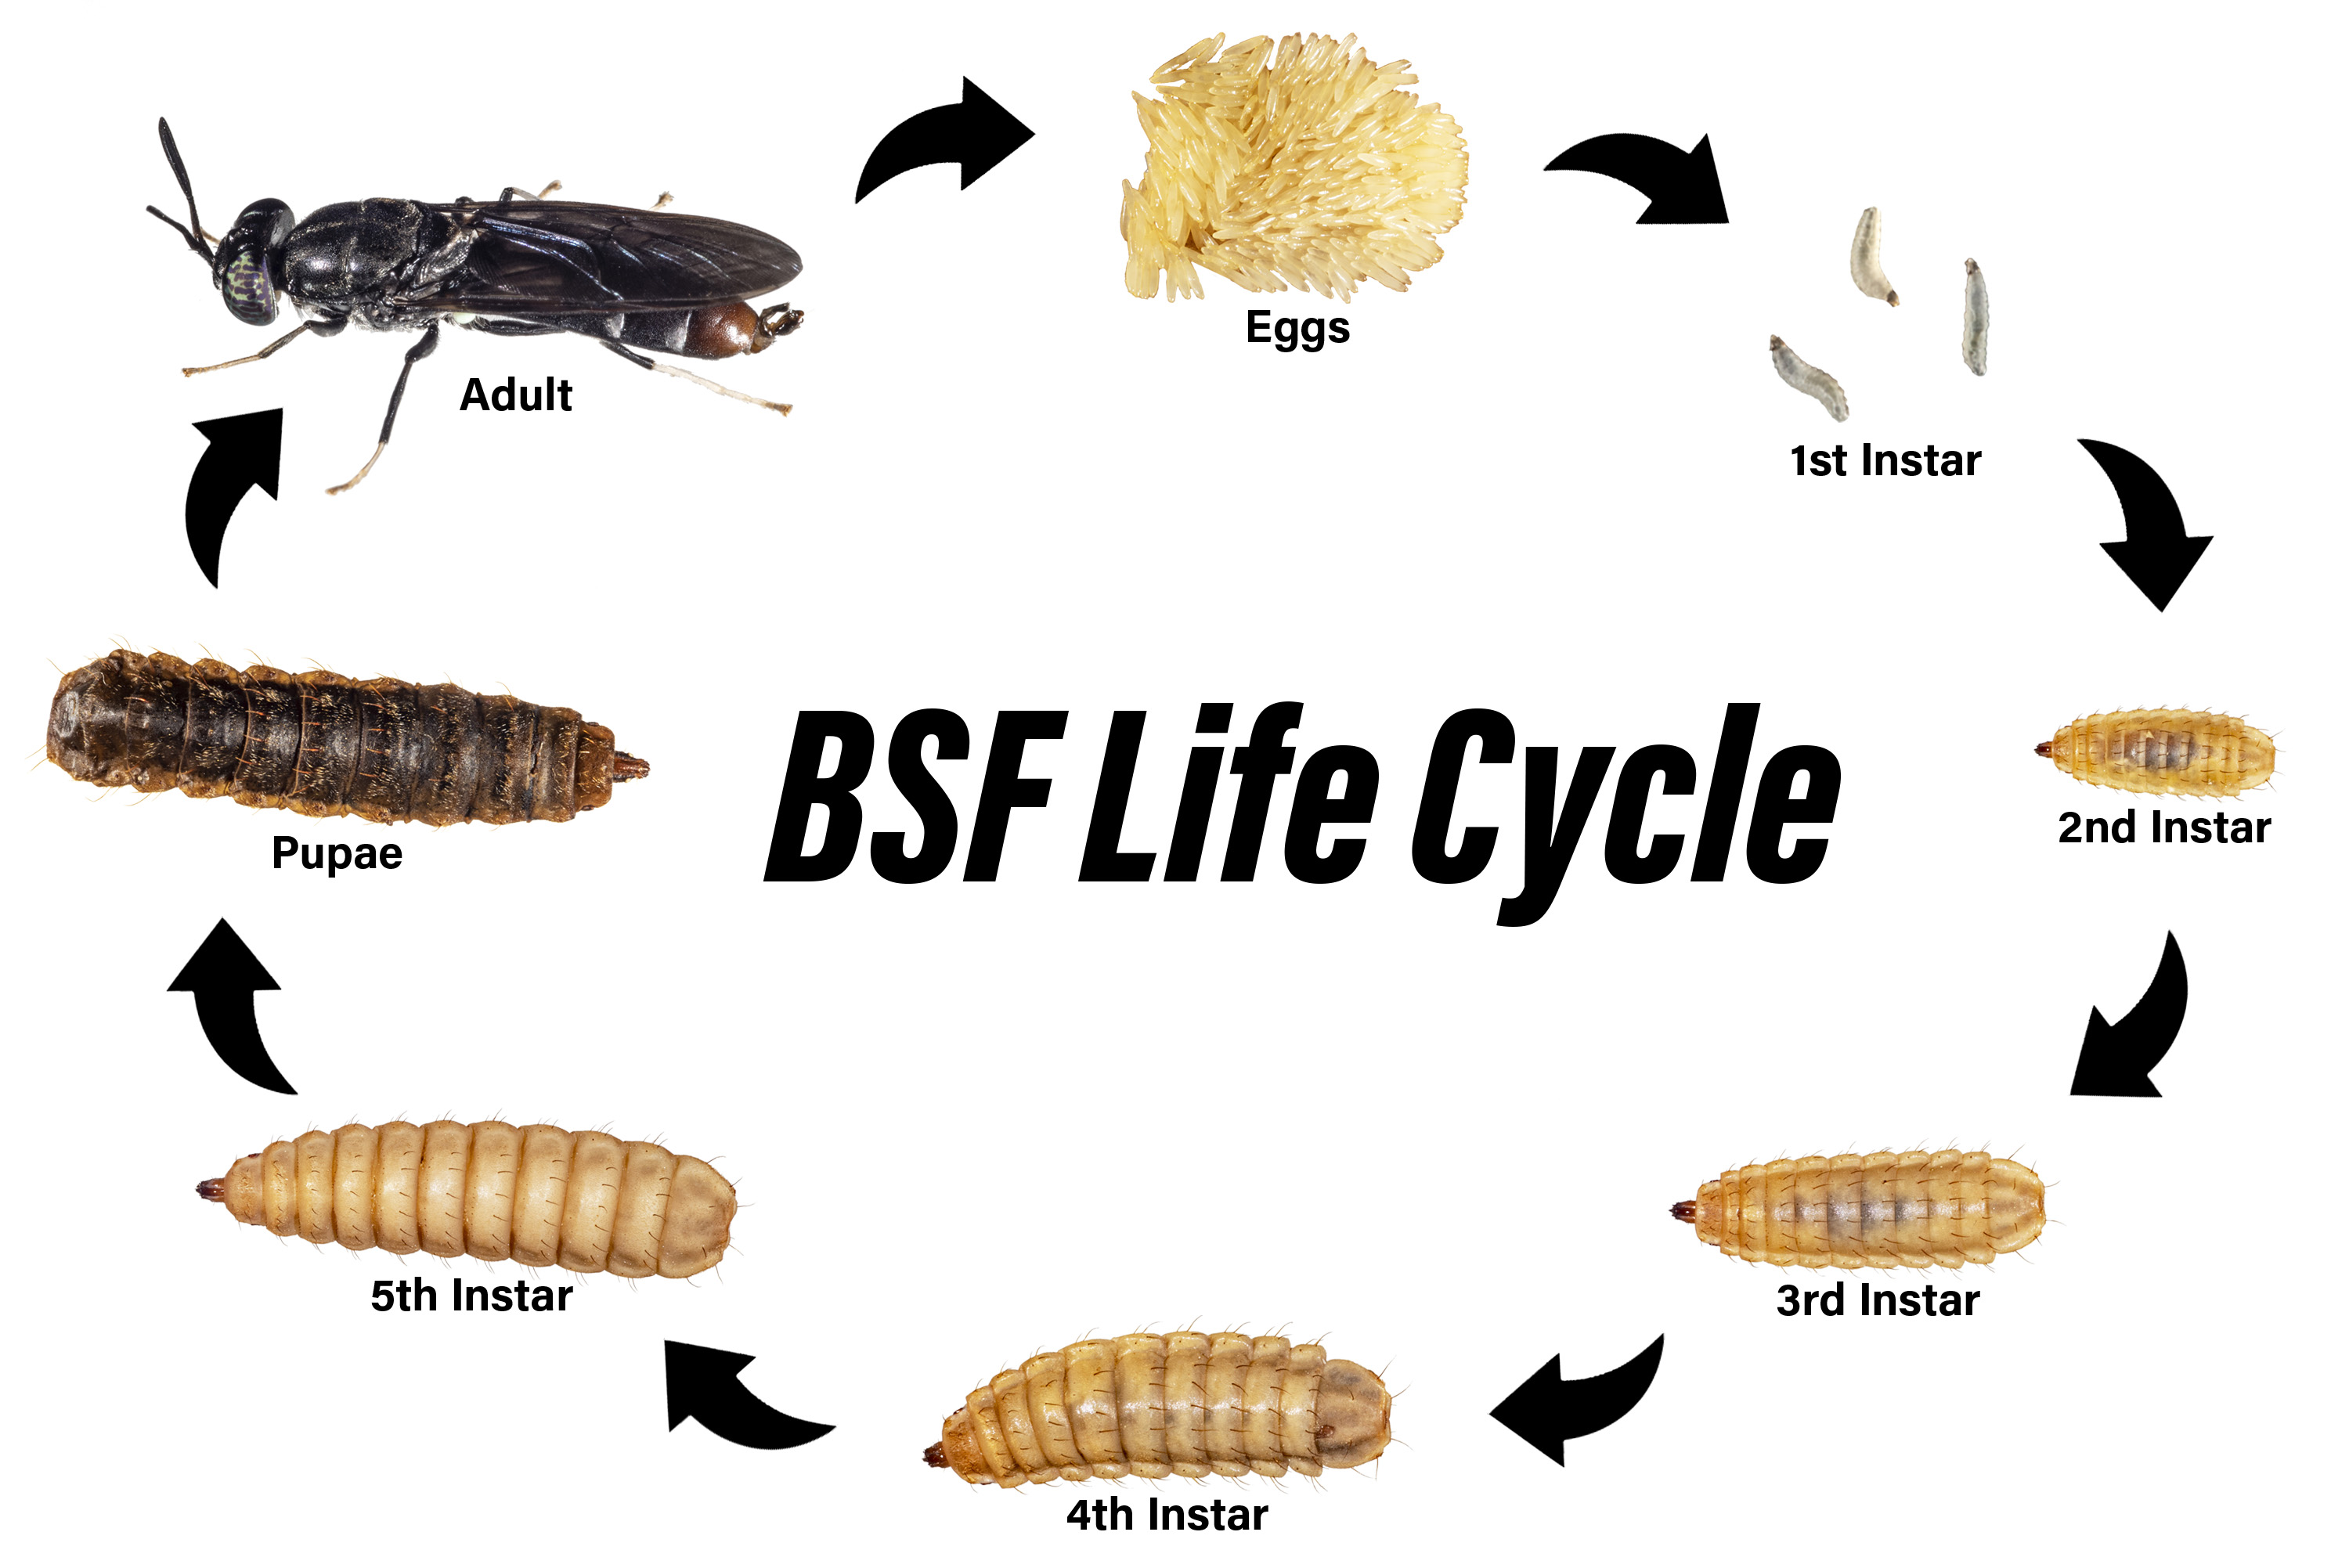
Figure 3. The complete life cycle of a black soldier fly. (Graphic Credit: Bransen Shidler)
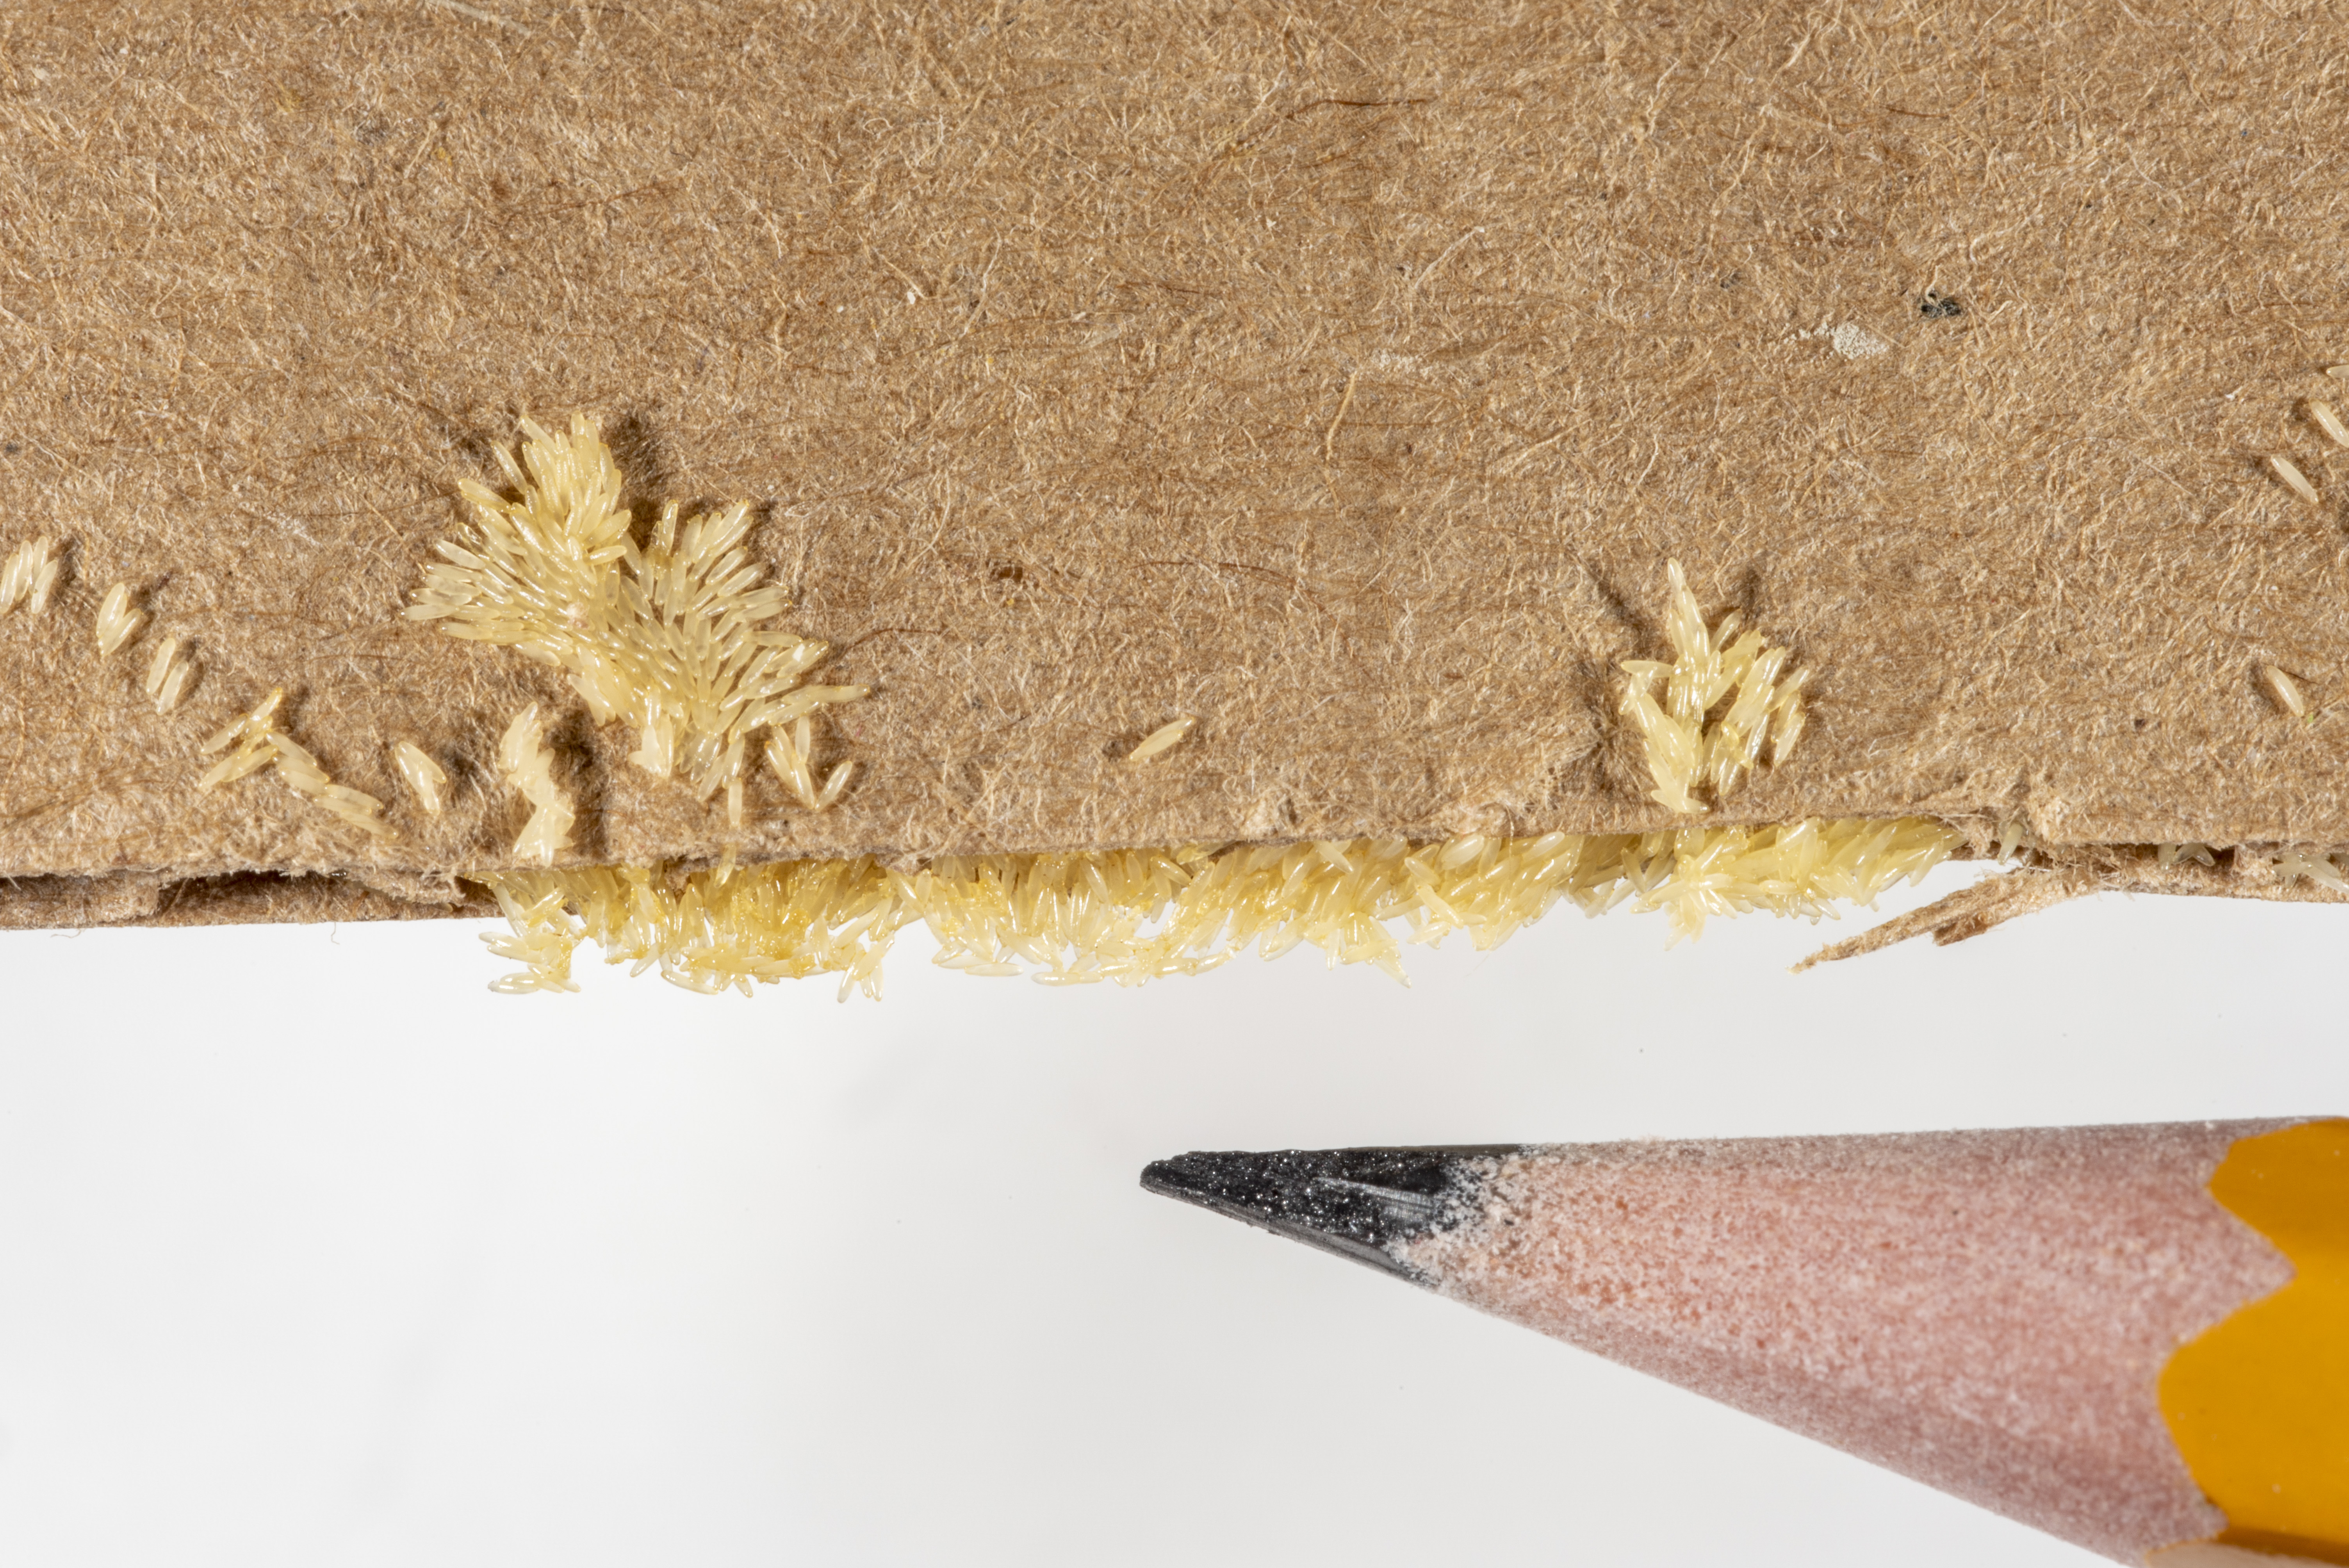
Figure 4. Black soldier fly eggs deposited on a piece of corrugated
cardboard. (Photo credit: John Obermeyer, Purdue Entomology)
How To Care For BSF Larvae
- The first step for caring for your black soldier flies is to build them a home. You can build a BSF rearing bin (instructions provided below) or simply add them directly to a traditional composst bin or pile in your yard.
- If you’re starting with an empty bin, provide them with a bit of substrate. Use a small amount coconut coir, coffee grounds or soil to help maintain moisture.
- Feed your maggots well by providing a balanced diet; avoid using just one or two inputs. Maggots will be developmentally delayed and the compost will take longer to mature if they are provided a single food type. The recommended feeding rate is 4 pounds of material per day for 10,000 maggots. Additional feeding rates are displayed in Table 1. Monitor the rate of consumption in your bin. As the larvae reach maturity, they eat less. To minimize odor, other insects and microorganisms from colonizing your bin you do not want to overfeed the larvae. Be sure what you placed inside the bin breaks down before you add more. Under-feeding will result in delayed maturation but does not lead to death. They are hardy little larvae!
- The last step, and likely the most difficult, is monitoring the relative humidity (RH). The ideal range is 50-70% RH which can be difficult to maintain in an outdoor bin or pile. You’ll look for a moist substrate with light condensation on the insides of a sealed bin to get close to this range. If the moisture level gets too high or your bins gets flooded from a rain event, drain the water off and dry them out by either leaving the lid off or adding more brown material like shredded cardboard, old bread or flour/grains. The larvae can survive this moist environment, but the decomposition will be slowed and your bin will begin to smell as a result of microbial decomposition.
| Table 1. Table 1. Black Soldier Fly Larval Feeding Guidelines |
|---|
| Number Of Maggots | Pounds Of Food Per Day (Item Weight Reference)* |
|---|
| 250 | 0.09 (1/2 cup of rice) |
| 500 | 0.18 (1 cup of rice) |
| 1,000 | 0.36 (2 cups of rice) |
| 5,000 | 1.79 (1 pineapple) |
| 10,000 | 3.59 (a standard bag of apples) |
| 20,000 | 7.17 (two bags of apples) |
| 50,000 | 17.93 (about a peck of tomatoes) |
What Can I Feed The BSF?
Black soldier fly composting is a bit different from standard composting. For traditional composts you want a roughly equal mix of carbon and nitrogen, commonly referred to as browns and greens, respectively. With BSF compost, you can supply more processed materials and animal products into the mix, resulting in more variety. Some examples include prepared food (table scraps, restaurant leftovers, fast food), produce, livestock manure, plant waste (weeds from your garden), spent coffee grounds or brewing/distillery grains (Fig. 5). We encourage you to reach out to your neighbors and/or local businesses to collect organic wastes to add to your bin.
Figure 5. Black soldier fly larvae feeding on spent brewery
grains. (Photo credit: John Obermeyer, Purdue Entomology)
HOW DO I HARVEST MY BIN?
What Do I Do With My Compost And/Or BSF Larvae?
BSF larvae make a great protein supplement for livestock, such as chickens, or reptile pets. They have high amounts of calcium which aids in eggshell production. You can harvest the larvae or pupae as they exit the bin and use them for feed, Table 1. Black Soldier Fly Larva Feeding Guidelines Number Of Maggots Pounds Of Food Per Day (Item Weight Reference)* 250 0.09 (1/2 cup of rice) 500 0.18 (1 cup of rice) 1,000 0.36 (2 cups of rice) 5,000 1.79 (1 pineapple) 10,000 3.59 (a standard bag of apples) 20,000 7.17 (two bags of apples) 50,000 17.93 (about a peck of tomatoes) *Optimal feeding rates were calculated based on the average daily consumption of 63 mg per individual larva per day (Parra et. al., 2015). or you can just let them reach adulthood and recolonize your bin. The resulting BSF digestate (compost) can be applied as a soil amendment. It is high in organic matter and can aid in water retention of the soil. There are also nutrients available, including N-P-K, however this product does not replace fertilizers. We encourage you to test the quality of the digestate produced to know exactly what you are adding back to the garden. In some instances, BSF digestate may have high levels of salts which can be detrimental to some plants.
BSF cannot survive winter in Indiana’s climate unless you move the bin into a sheltered or protected area. You can harvest your bin contents roughly every 20 days by simply digging out the contents. To do this you will want to be sure to feed the bin carefully according to the consumption of the flies reduce feeding as they get close to maturation so no residual un-digested feed is left over. Leaving a small amount of feed and larvae in the base of the bin will help kickstart the next round. If there are larvae or pupae present in what you harvest, it is OK to add this to the garden. The BSF will not feed on your living plants or become a pest. They will complete development and the adults should find their way back to the bin if it is near your growing site. If your bin is large enough, you can continue to add to it throughout the warmer months and do one harvest of the digestate (compost) in the fall or following spring.
References
Hall DC, Gerhardt RR. 2002. Flies (Diptera), pp 127- 161. In Mullen G, Durden L. (eds). Medical and Veterinary Entomology. Academic Press. San Diego, California.
Parra, S., Carrejo, N., and C. Gomez. 2015. Effects of larval density and feeding rates on the bioconversion of vegetable waste using black soldier fly larvae Hermetia illucens (L.), (Diptera: Stratiomyidae). Waste and Biomass Valorization 6(6). DOI: 10.1007/s12649-015-9418-8.
Black Soldier Fly 18-Gallon Rearing Bin Instructions
Supply List
- One 18-gallon tote
- Two 1-inch x 1-inch diameter 90-degree elbow PVC fitting
- One 1-inch x 5 ft PVC pipe
- One 1-inch x 1-inch diameter 90-degree PVC Tee fitting
- One Threaded 1-inch x 1-inch diameter 90-degree PVC Tee fitting
- One Threaded 1-inch x 1-inch diameter PVC male adapter fitting
- One 1-inch ball valve, including fitting to secure to bin
- Waterproof caulk
Tools
- 1-inch circular drill bit
- Drill
- PVC cutter
- Hand saw
- File
- Gloves
- Safety Goggles
- Marker
- Measuring Tape
Figure 6. View of completed bin. (Photo credit: Catherine Terrell)
Begin with the 18-gallon tote and a marker. Mark the position on the lid where you will drill a hole for the PVC Tee fitting to attach (Fig. 7). Then mark two holes on the short side of the bin near the top where the exit ramps will extend out of the bin (Fig. 8) and one hole on the opposite side, bottom of the bin for the ball valve drain (Fig. 9). Measure the 5-foot PVC tube lengths for the exit ramps by holding the tube at the desired angle along the side of the bin and marking the length to the top holes for the exit. The angle of these ramps should be around 35 degrees. You will need 2 of these ramps and they will allow the 5th instar larvae/pupae to leave the substrate (Fig. 10).
Figure 7. Top view of 18-gallon BSF larval rearing bin showing 1-inch circular opening for Tee PVC joint insertion. (Photo credit: Catherine Terrell)
Figure 8. Side view of 18-gallon larval rearing bin showing 1-inch circular openings for PVC pipe to exit rearing bin. (Photo credit: Catherine Terrell)
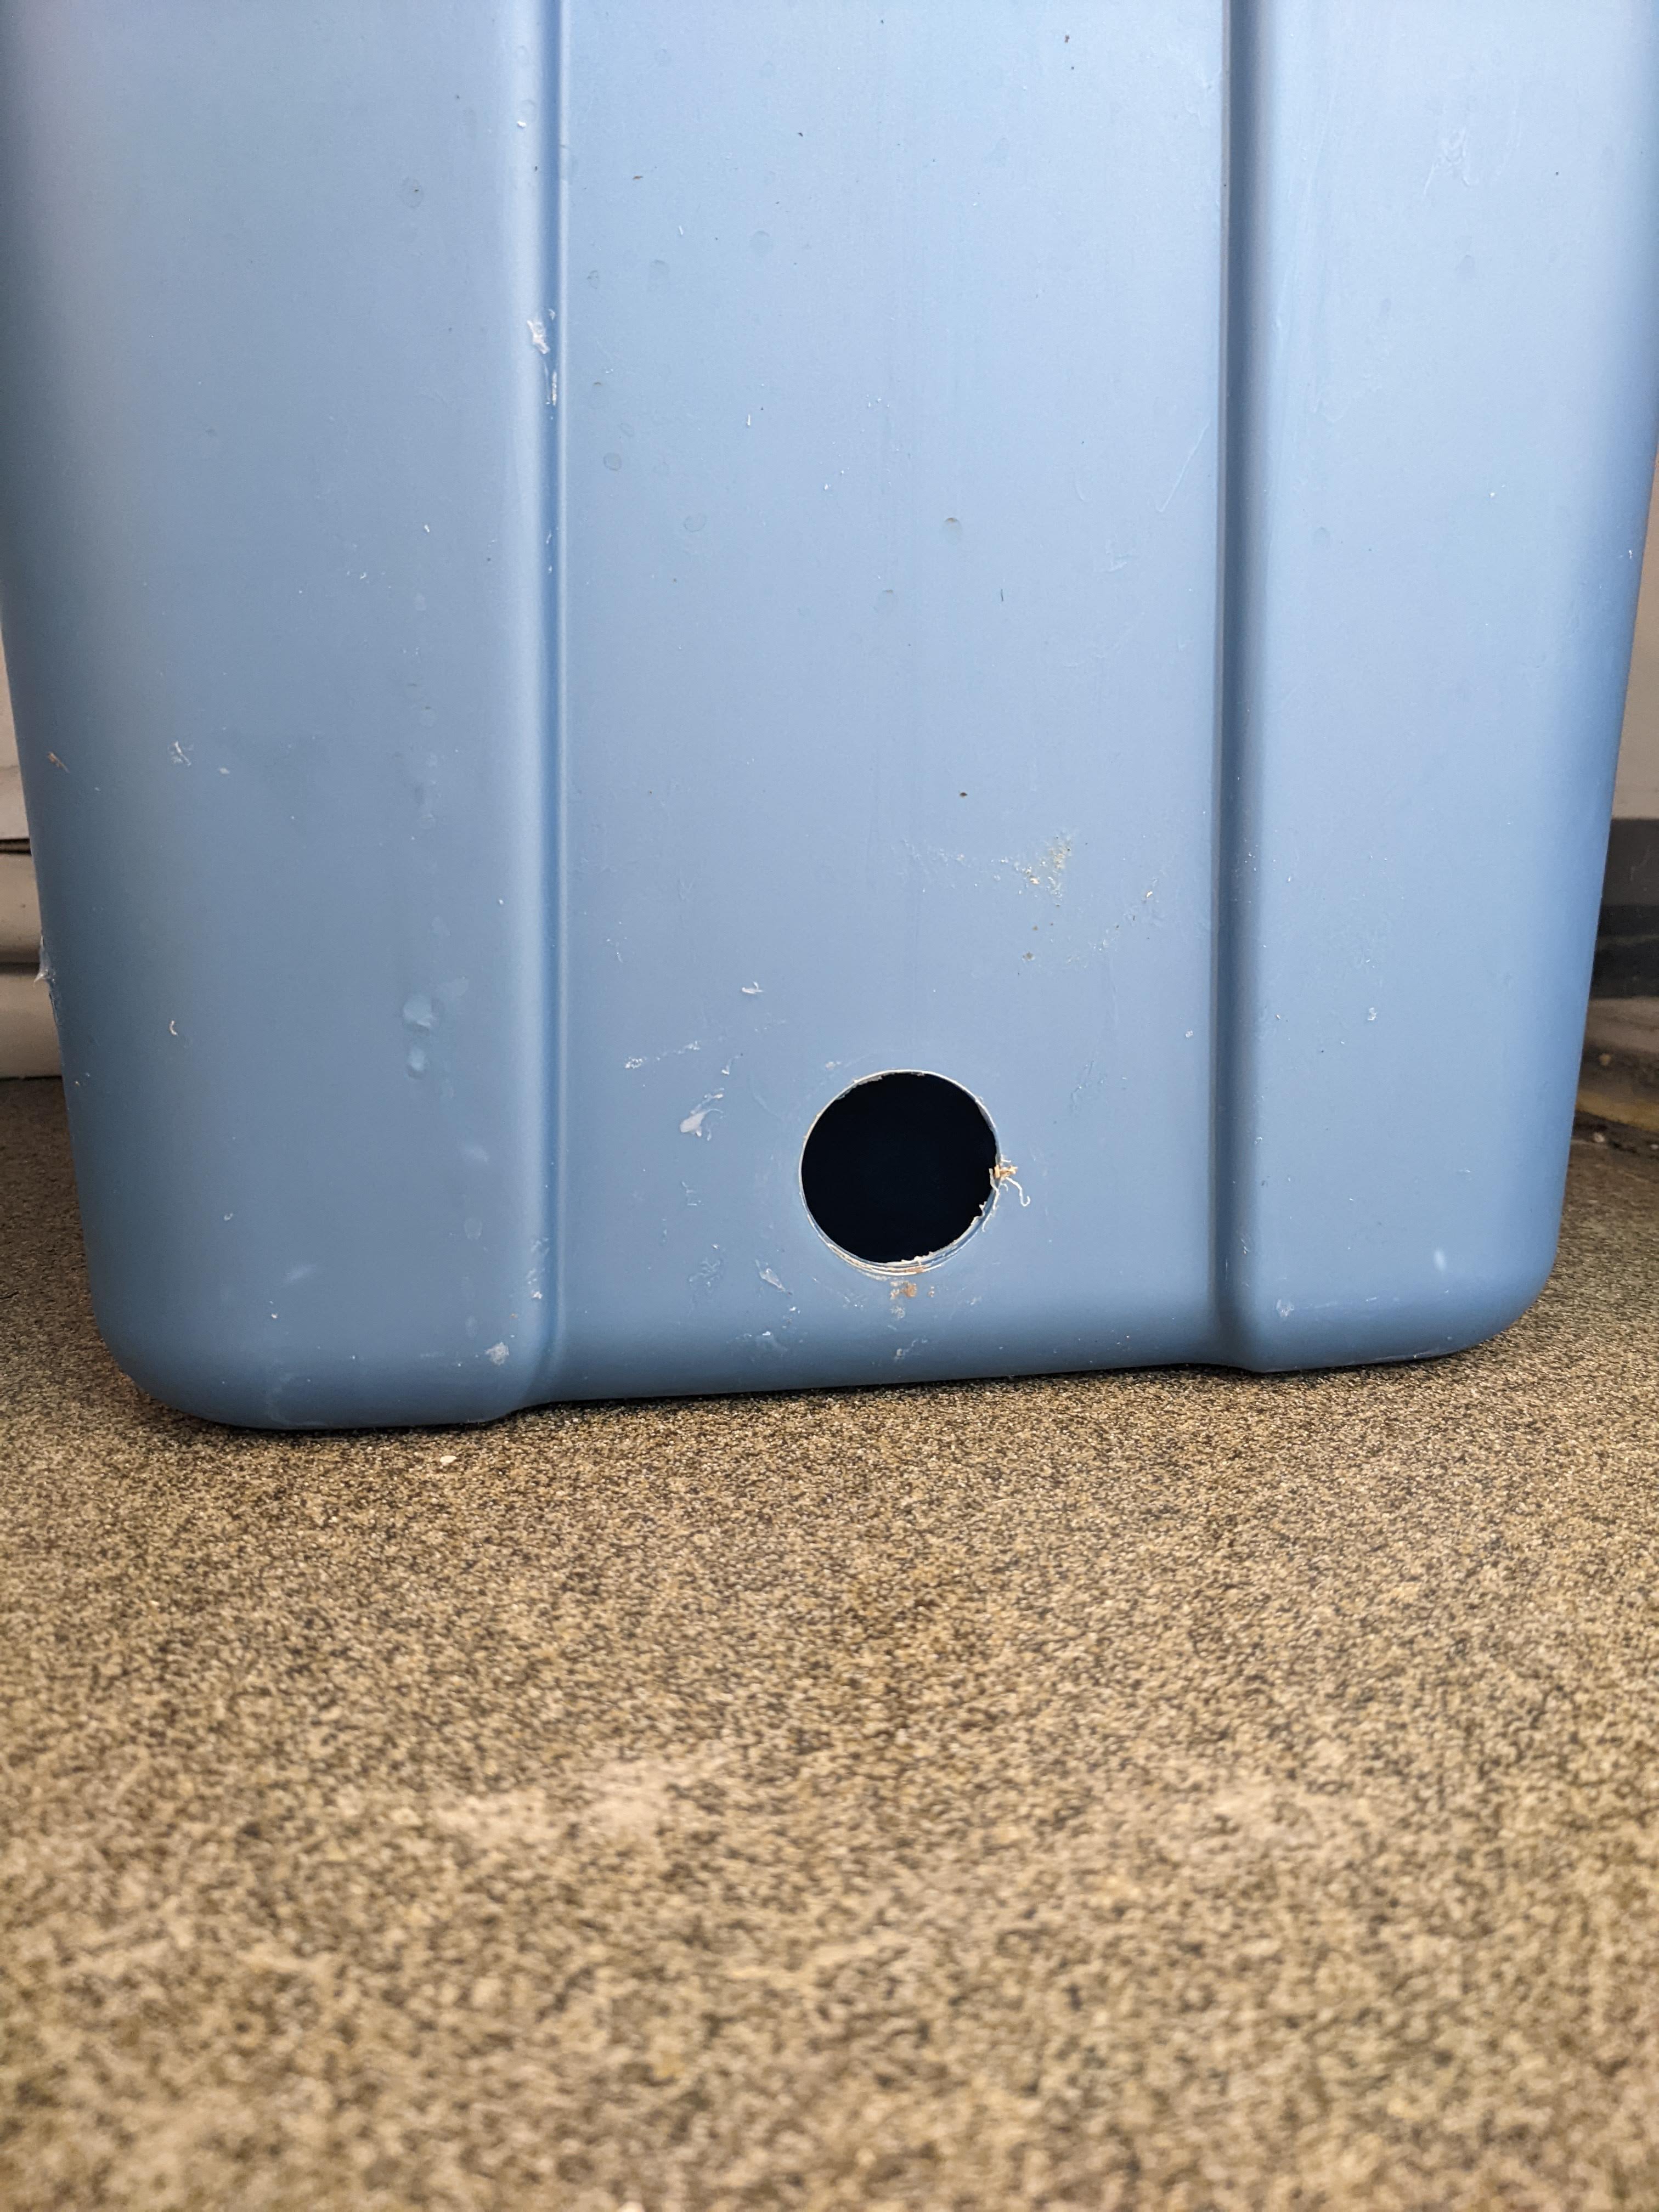
Figure 9. Drill hole for drain (optional). (Photo credit: Catherine Terrell)
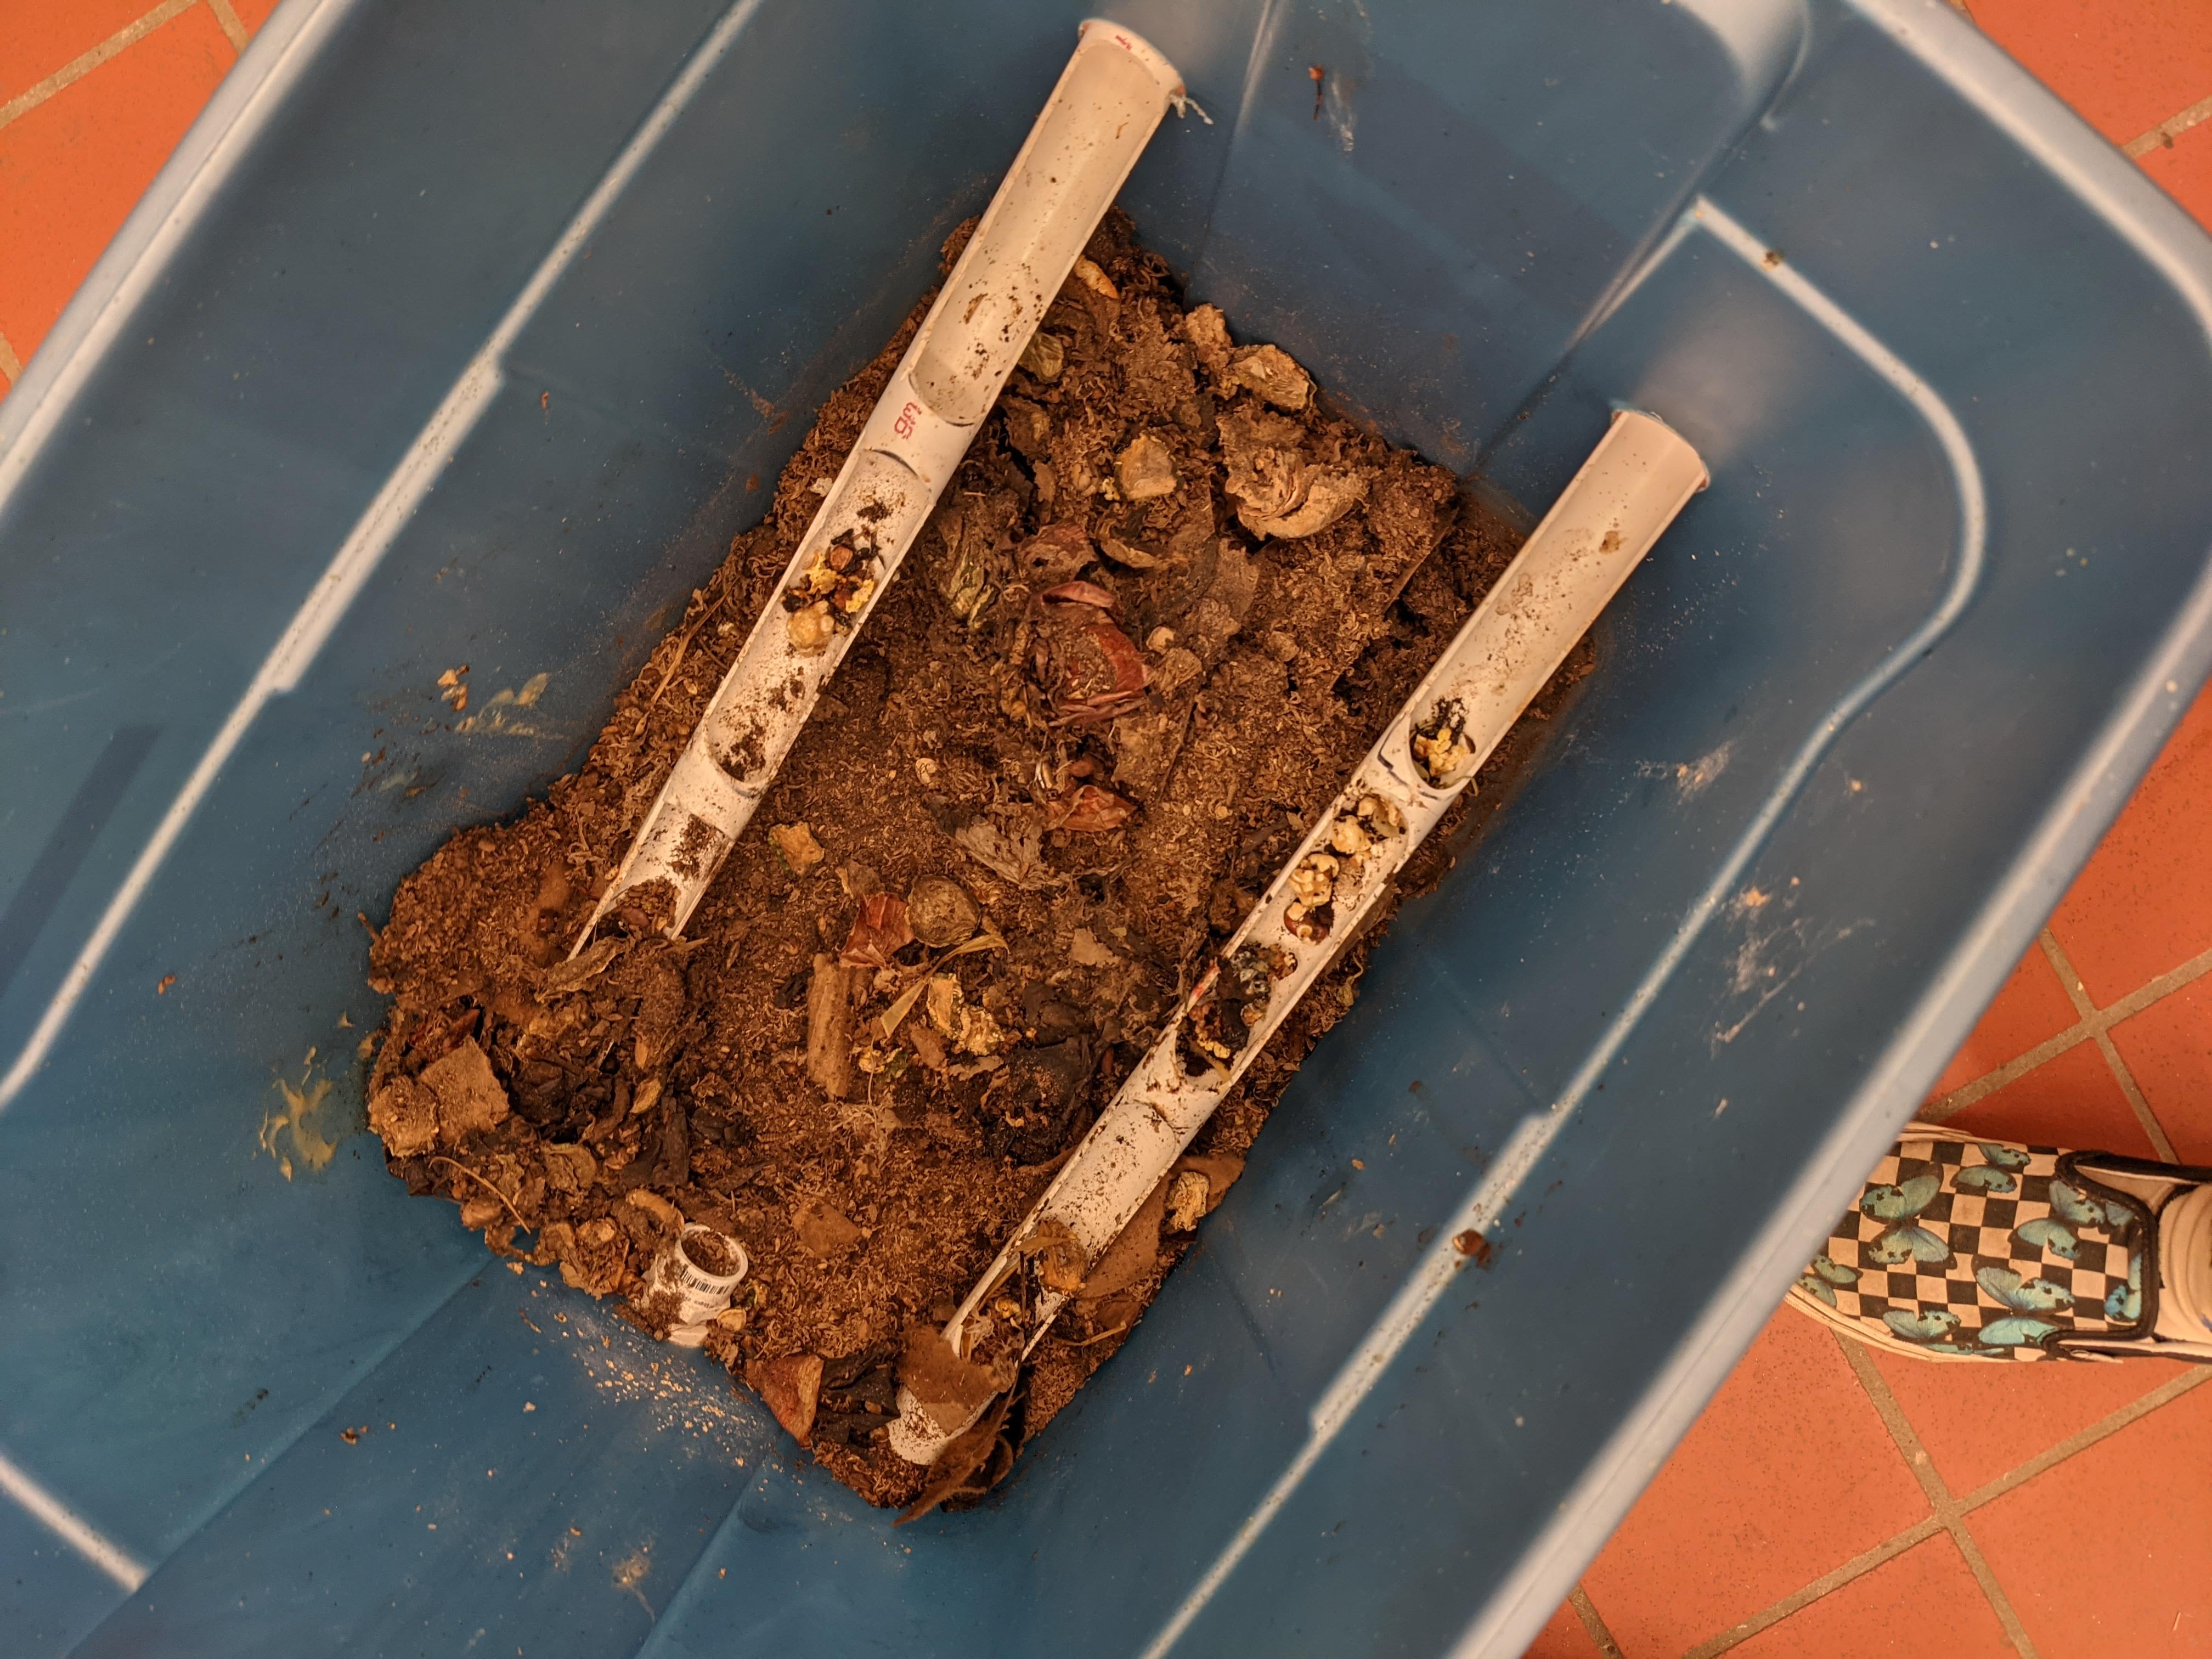
Figure 10. View into completed BSF rearing bin. Features ramp angles and how they should sit within the bin. (Photo credit: Catherine Terrell)
Wearing your safety goggles and gloves, cut the PVC tube with the PVC cutter. Along the length of the ramps mark holes or entry points for larvae to enter the ramps. Using the handsaw carefully cut away these entry holes and then file to smooth out the edges (Fig. 11). Attach the elbow PVC fittings to the end of the ramps. Locate one of the Tee fittings. Using extra PVC, cut two small pieces 1-inch in length and use to assemble the ramps, elbows and Tee fittings (Fig. 12). This completes the ramp assembly. Verify the width of the markings on the side of the bin by holding up the ramp assembly and then, using the 1-inch circular drill bit, cut the holes in the tote. The ramps should easily slide into the bin and be resting on the bottom at the desired angle (Fig. 13). You will want to seal the holes around the ramp entry with caulk to contain the larvae. Using the same 1-inch circular drill bit, cut the hole in the lid and attach the threaded PVC Tee fitting to the top of the bin by screwing on the 1-inch x 1-inch threaded fitting from the underside of the lid. Using a twist tie or string and a binder clip attach a small stack of corrugated cardboard to the PVC Tee fitting suspended inside the lid of the bin (Figs. 14-15). This will serve as the substrate for the adult flies to deposit their eggs back into the bin. When the eggs hatch the larvae will fall into the substrate and feed. The last step is to drill the hole that was marked for the ball valve. Place the ball valve on the outside of the bin and secure by tightening it to the included fitting on the inside (Fig. 16). Seal with caulk. This step is optional but will make it easier to drain water from the bin if it accumulates or you want to make compost tea from the substrate inside.
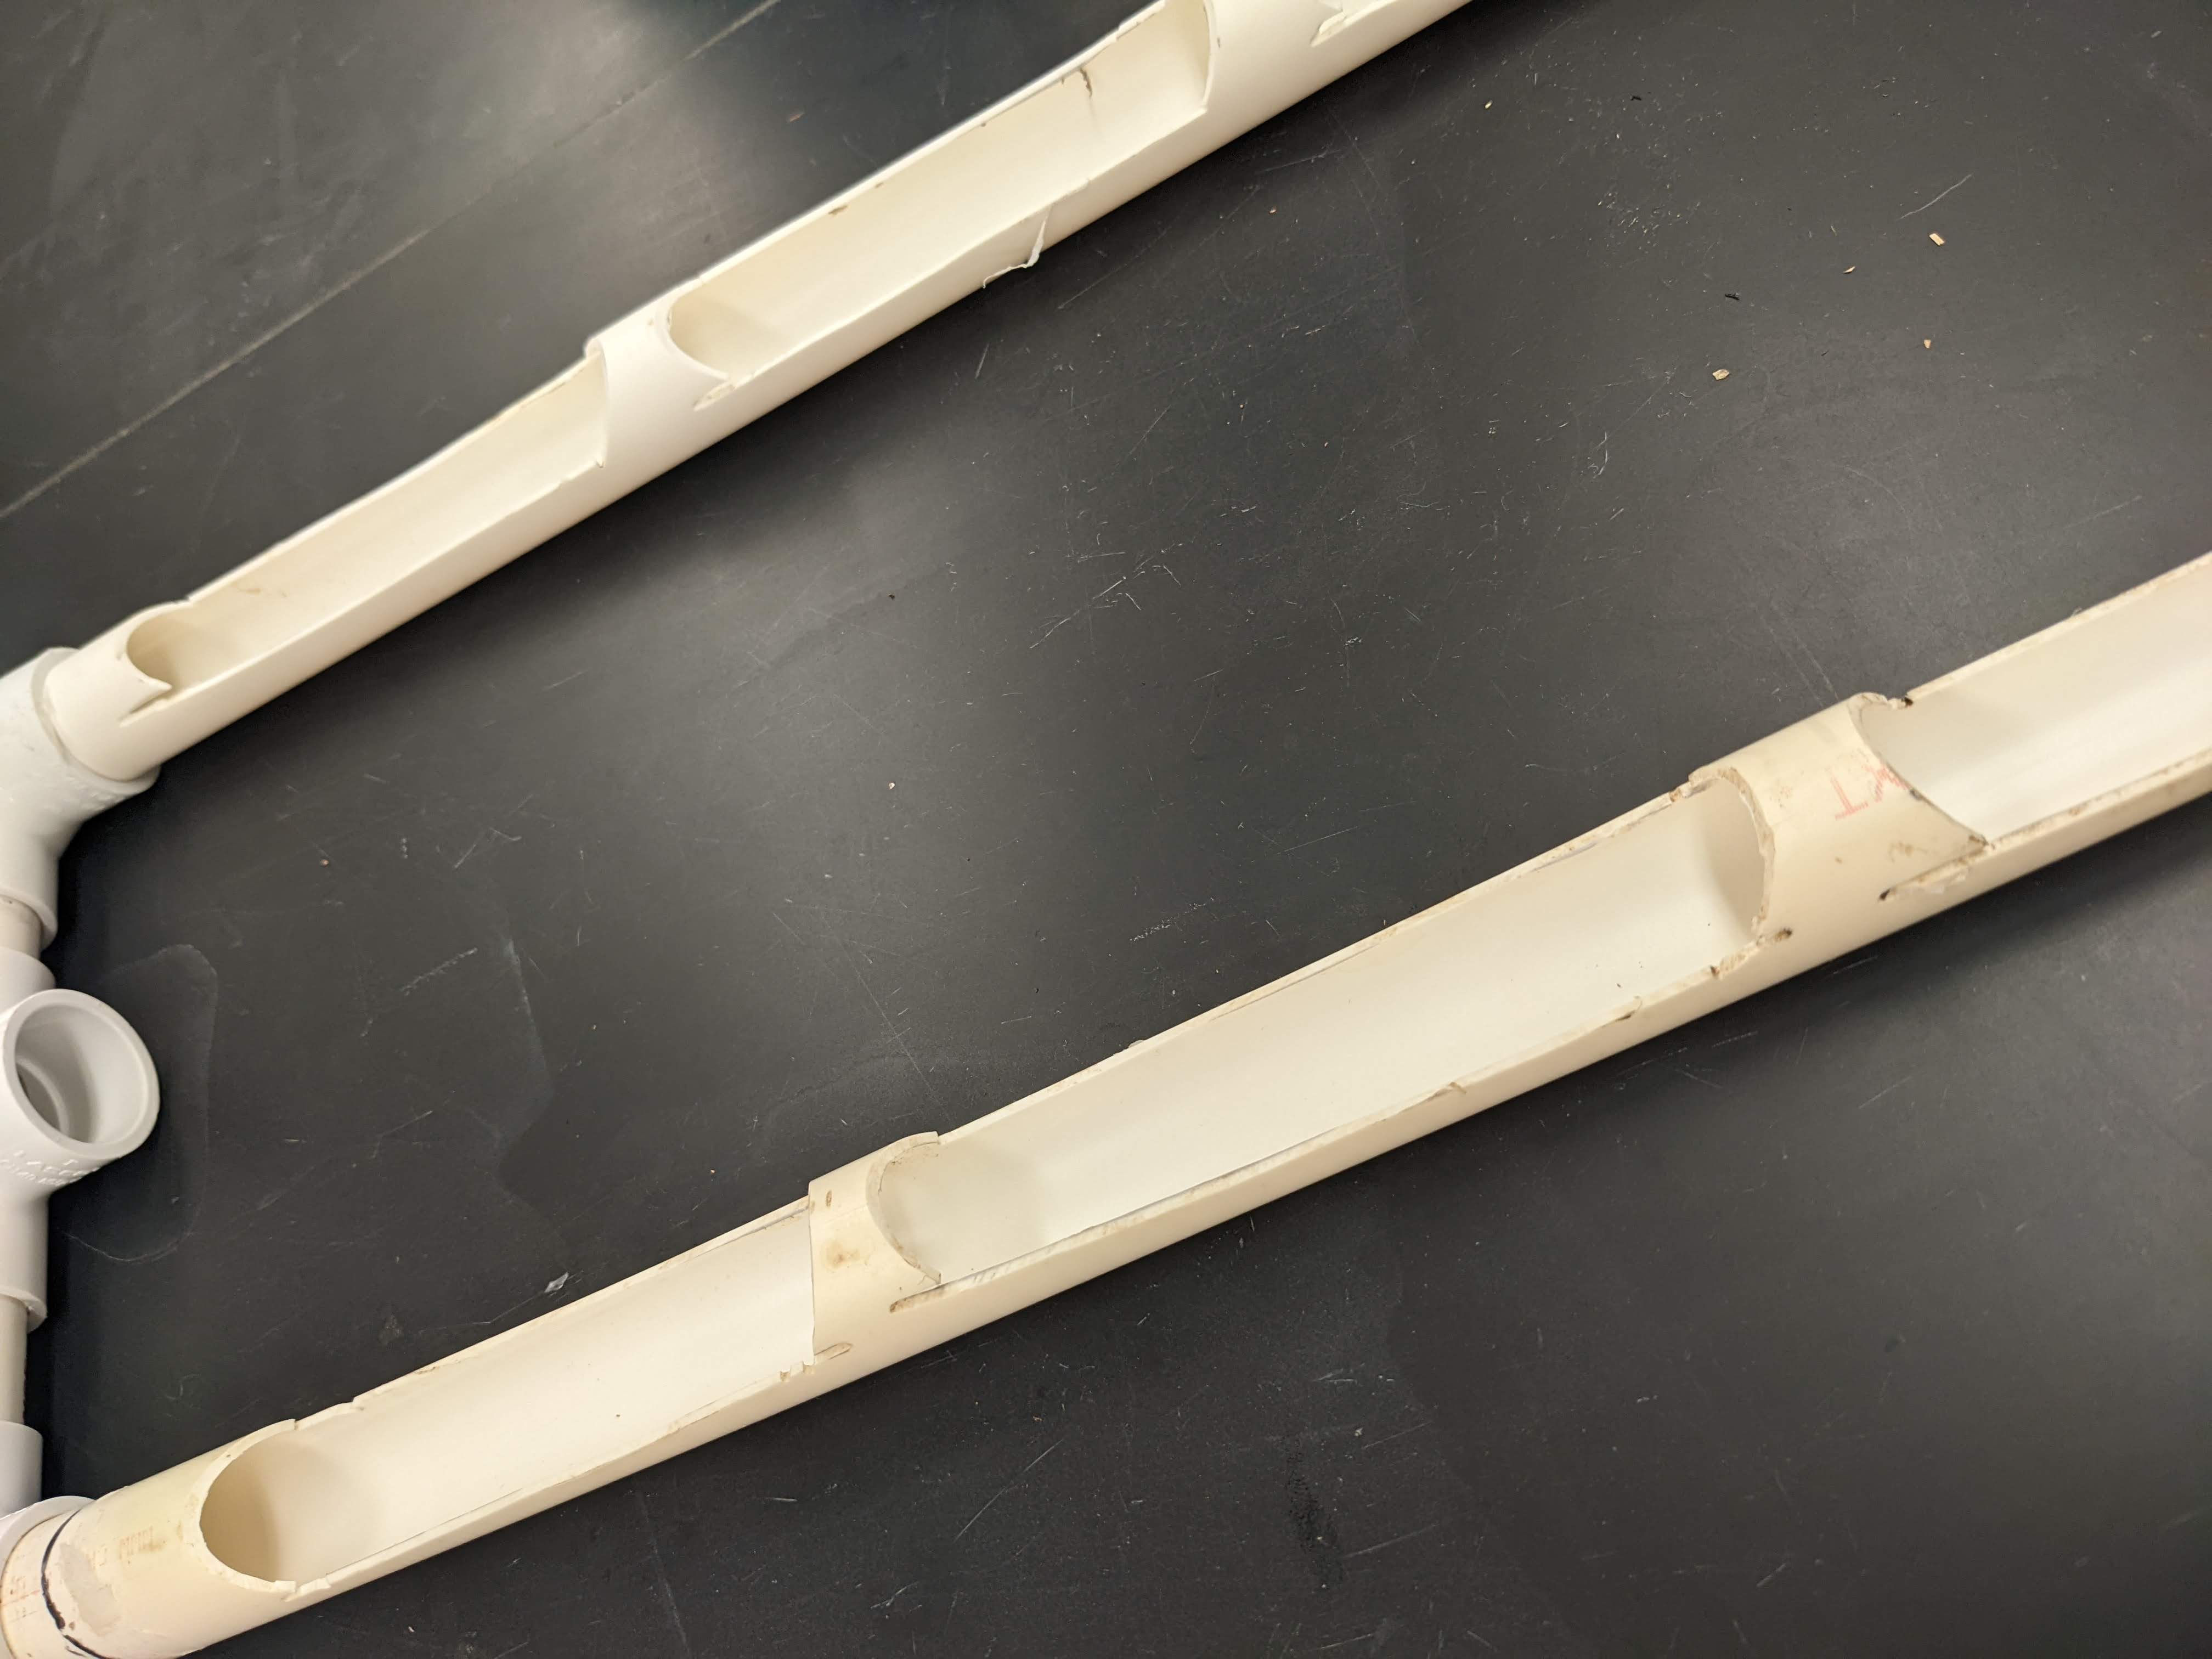
Figure 11. Smoothed edges of BSFL ramp targeted to fit into the bin around 35˚ to facilitate pupation outside of the bin. (Photo credit: Catherine Terrell)
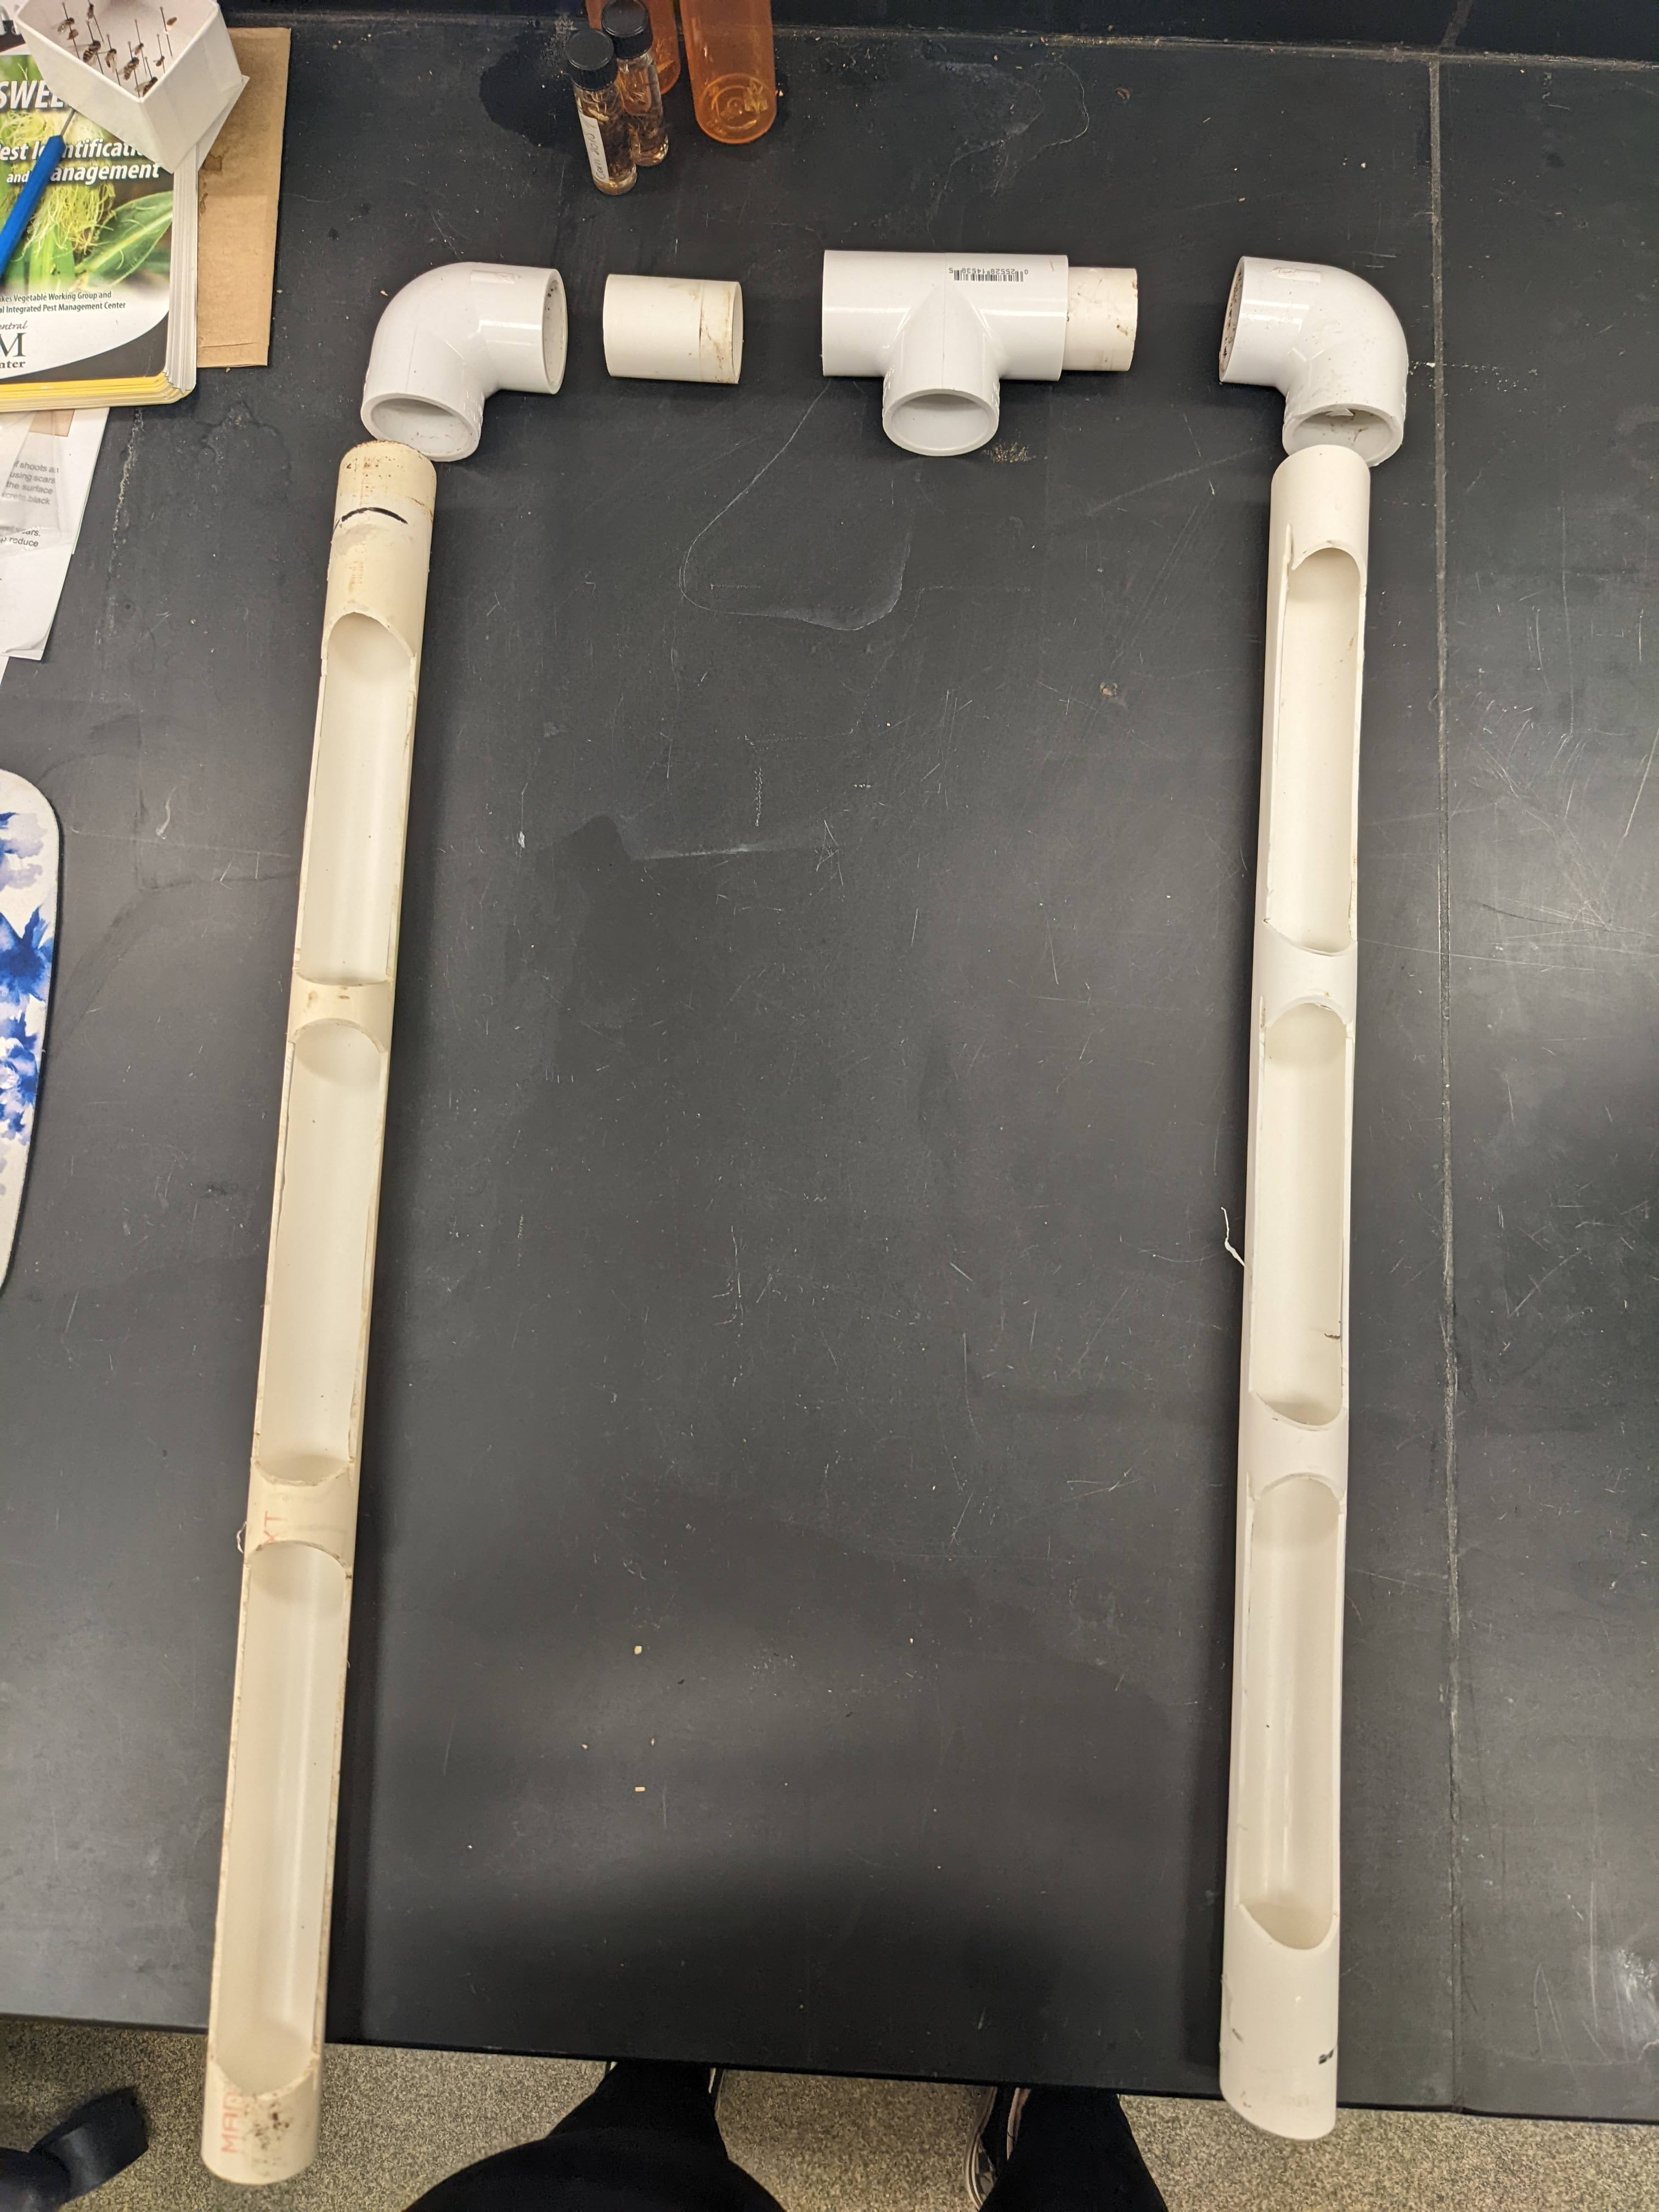
Figure 12. Top view of BSFL ramp pieces and where they connect to each other. (Photo credit: Catherine Terrell)
Figure 13. View into bin with no substrate. Note where the ramps sit at the bottom of the bin. (Photo credit: Catherine Terrell)
Figure 14. Top view of Tee PVC joint with twist tie securing egg-laying substrate. (Photo credit: Catherine Terrell)
Figure 15. Bottom view of BSF rearing bin lid with corrugated cardboard egg-laying substrate secured by a binder clip and a twist tie. (Photo credit: Catherine Terrell)
Figure 16. Drain valve that has been secured to rearing bin with caulk. (Photo credit: Catherine Terrell)
Black Soldier Fly 55-Gallon Rearing Bin Instructions
Supply List
- Waterproof caulk
- 55-gallon drum, lighter colors are better for warmer weather
- 60 feet of 2x4 lumber
- 115 feet of 1x4 lumber
- 100 3-inch screws
- 40 1.5-inch screws
- 6 feet of chain (will have excess)
- One pair of hinges
- One Threaded 1-inch Tee PVC joint
- One Threaded 1-inch x 1-inch diameter male adapter fitting
- One 1-inch ball valve, fitting included
Tools
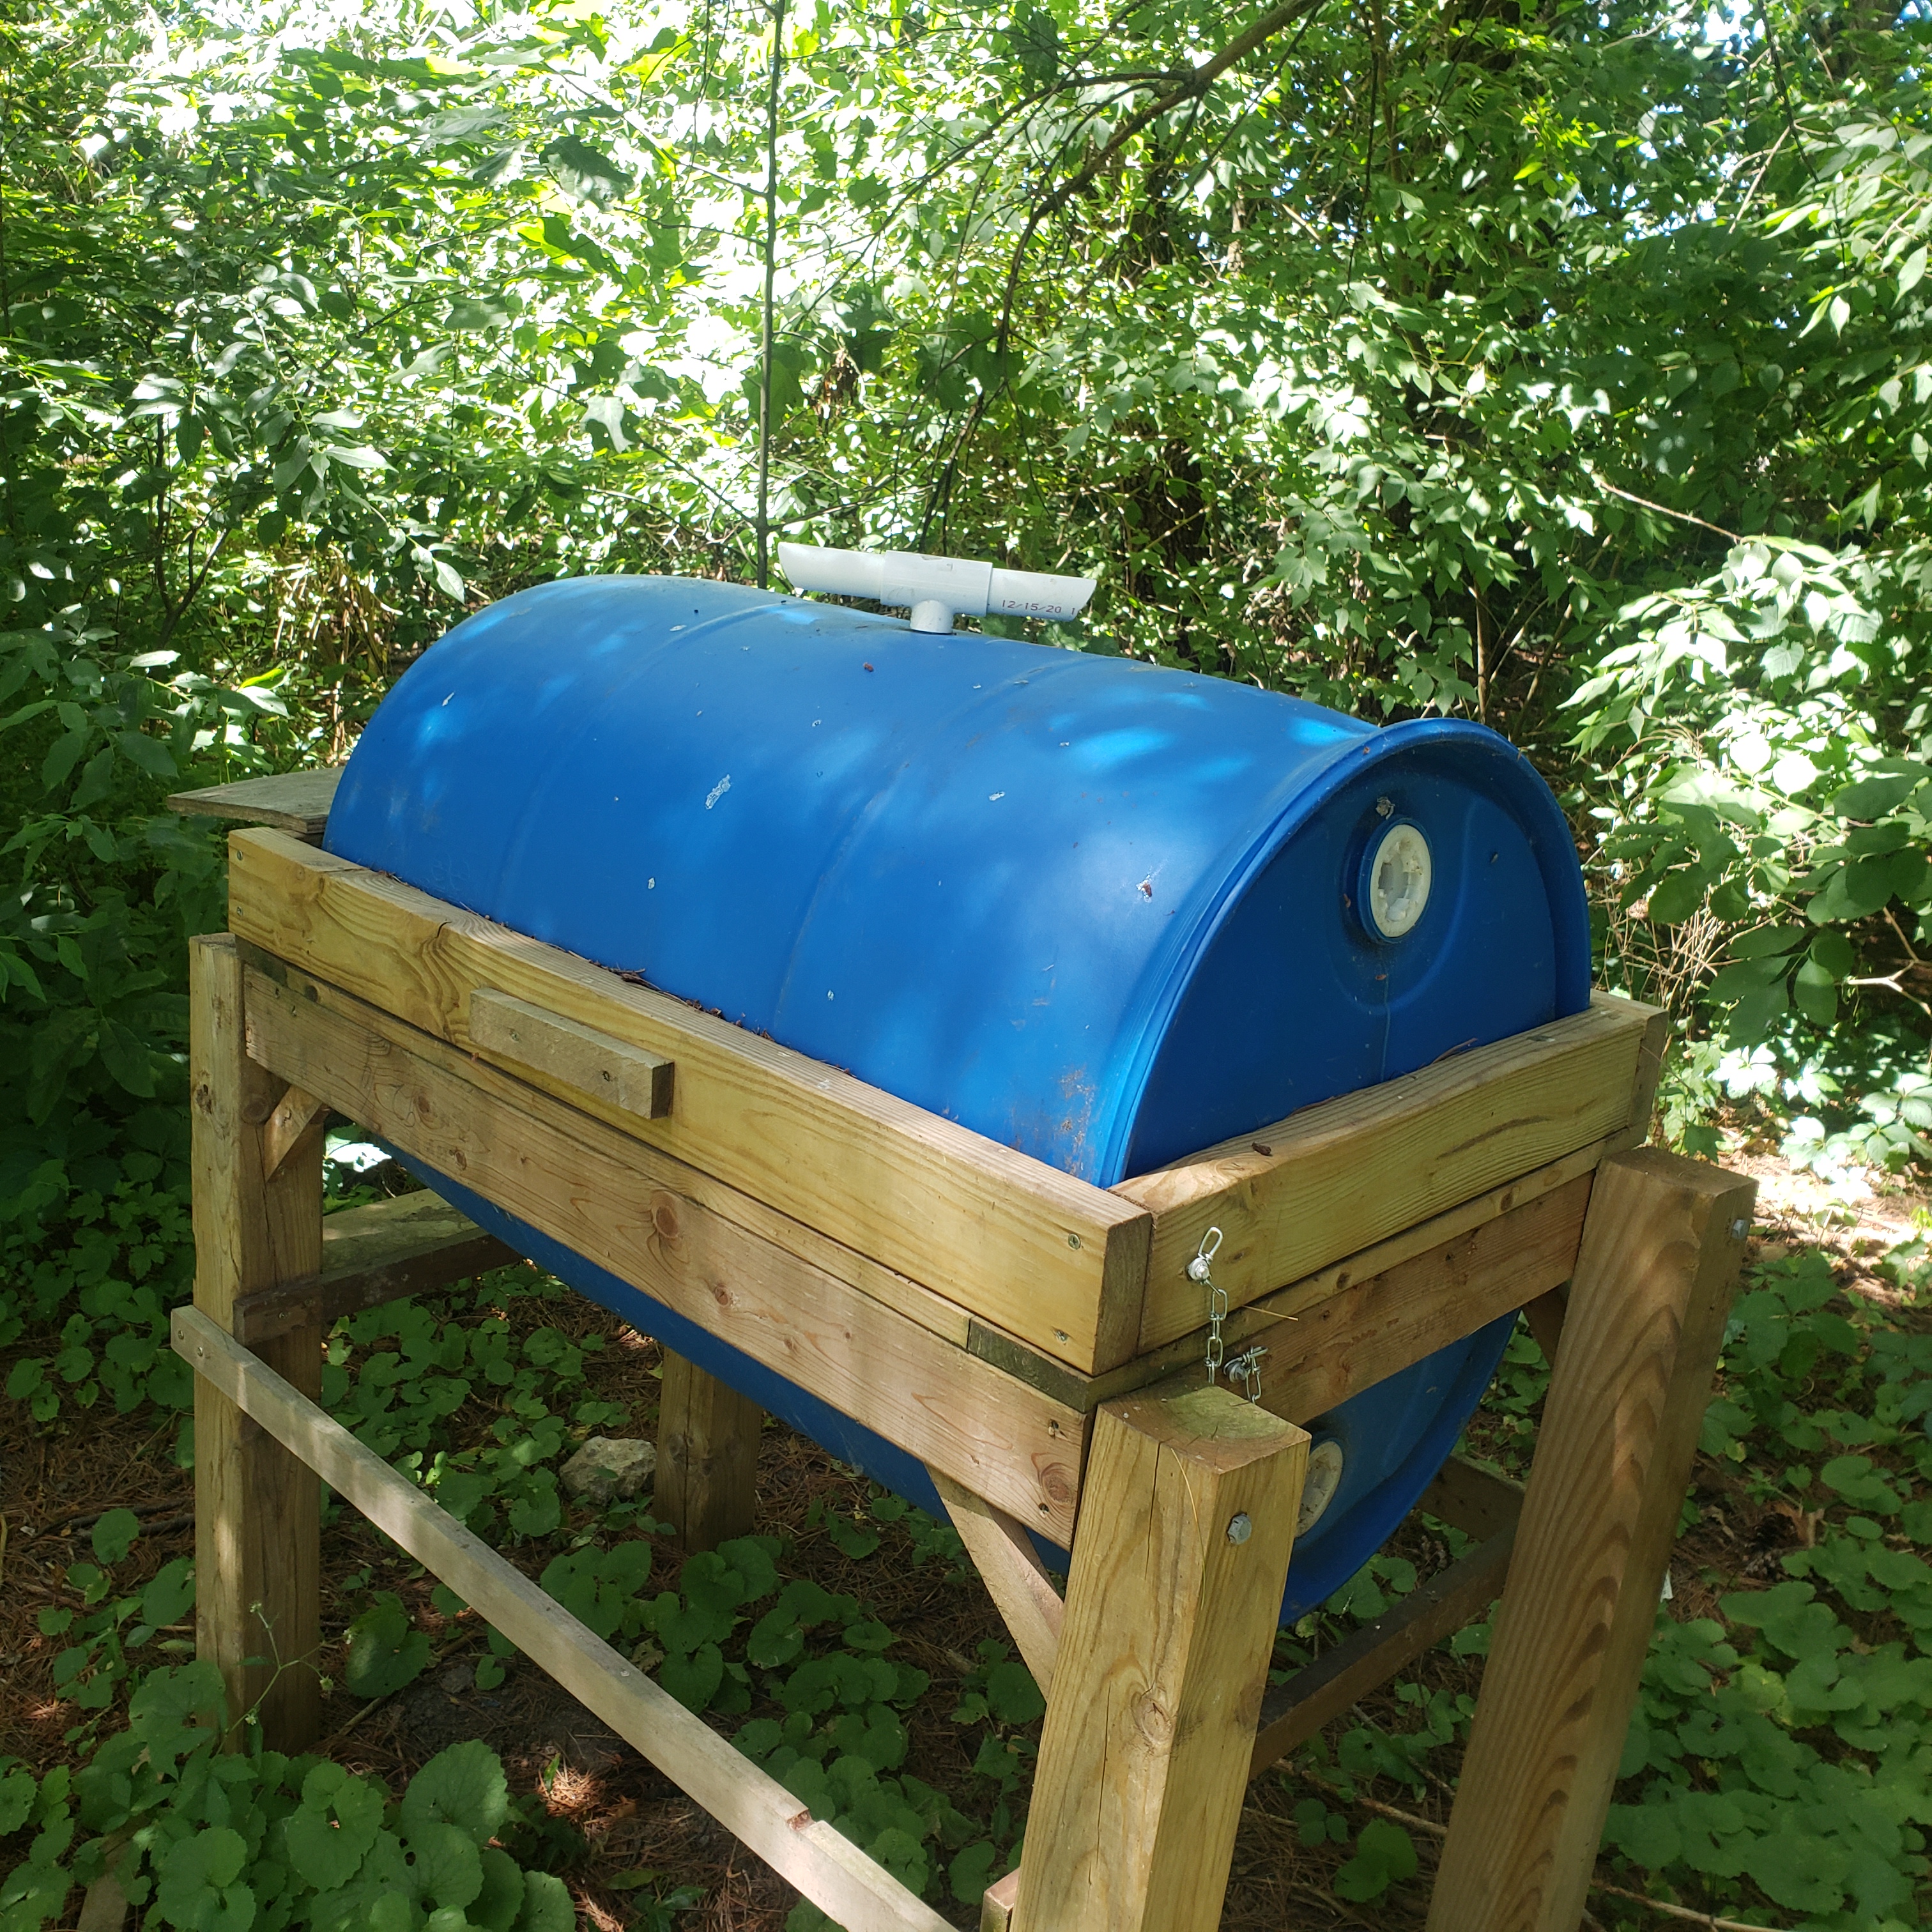
Figure 17. Front view of 55-gallon BSF larval rearing bin, closed. Featuring wooden handle, loose support chain, and Tee PVC joint for adult re-entrance. (Photo credit: Laura Ingwell)
Begin by marking and cutting the lumber according to the table below.
| Height X Width | Length (In Inches) | Quantity |
|---|
| 2x4 | 38 | 6 |
| 2x4 | 30.5 | 4 |
| 2x4 | 26 | 2 |
| 2x4 | 23 | 4 |
| 2x4 | 18.5 | 4 |
| 2x4 | 12 | 4 |
| 1x2 | 31 | 2 |
| 1x2 | 26.25 | 1 |
| 1x2 | 10.25 | 2 |
Next, lay the 55-gal drum on its side, secure it from rolling with help from an assistant or by placing pieces of the 2x4 on either side. Put on safety goggles and following the seam of the barrel and using the circular saw, cut the barrel in half lengthwise to create the top and bottom portions of the bin. Make two frames with four of the 38-inch and four of the 23-inch planks. The 55-gallon barrel halves should fit securely into this frame (Fig. 18). Secure the barrel halves to the frames with the 1.5-inch screws, 4 screws per side on the long edges and at least 3 on the short edges (28 total) inserted from the inside of the barrel out into the wood frame. In the barrel half that will serve as the lid, drill a 1/2-inch circular hole into the top and attach the Tee PVC joint on the outside, securing it with the threaded fitting on the inside of the bin. You can add optional short pieces of PVC on each end of the Tee joint, but this is not necessary. Using a twist tie or string and a binder clip secure a stack of cardboard as described above (Figs. 14-15). This will allow adults back into the bin to lay eggs.
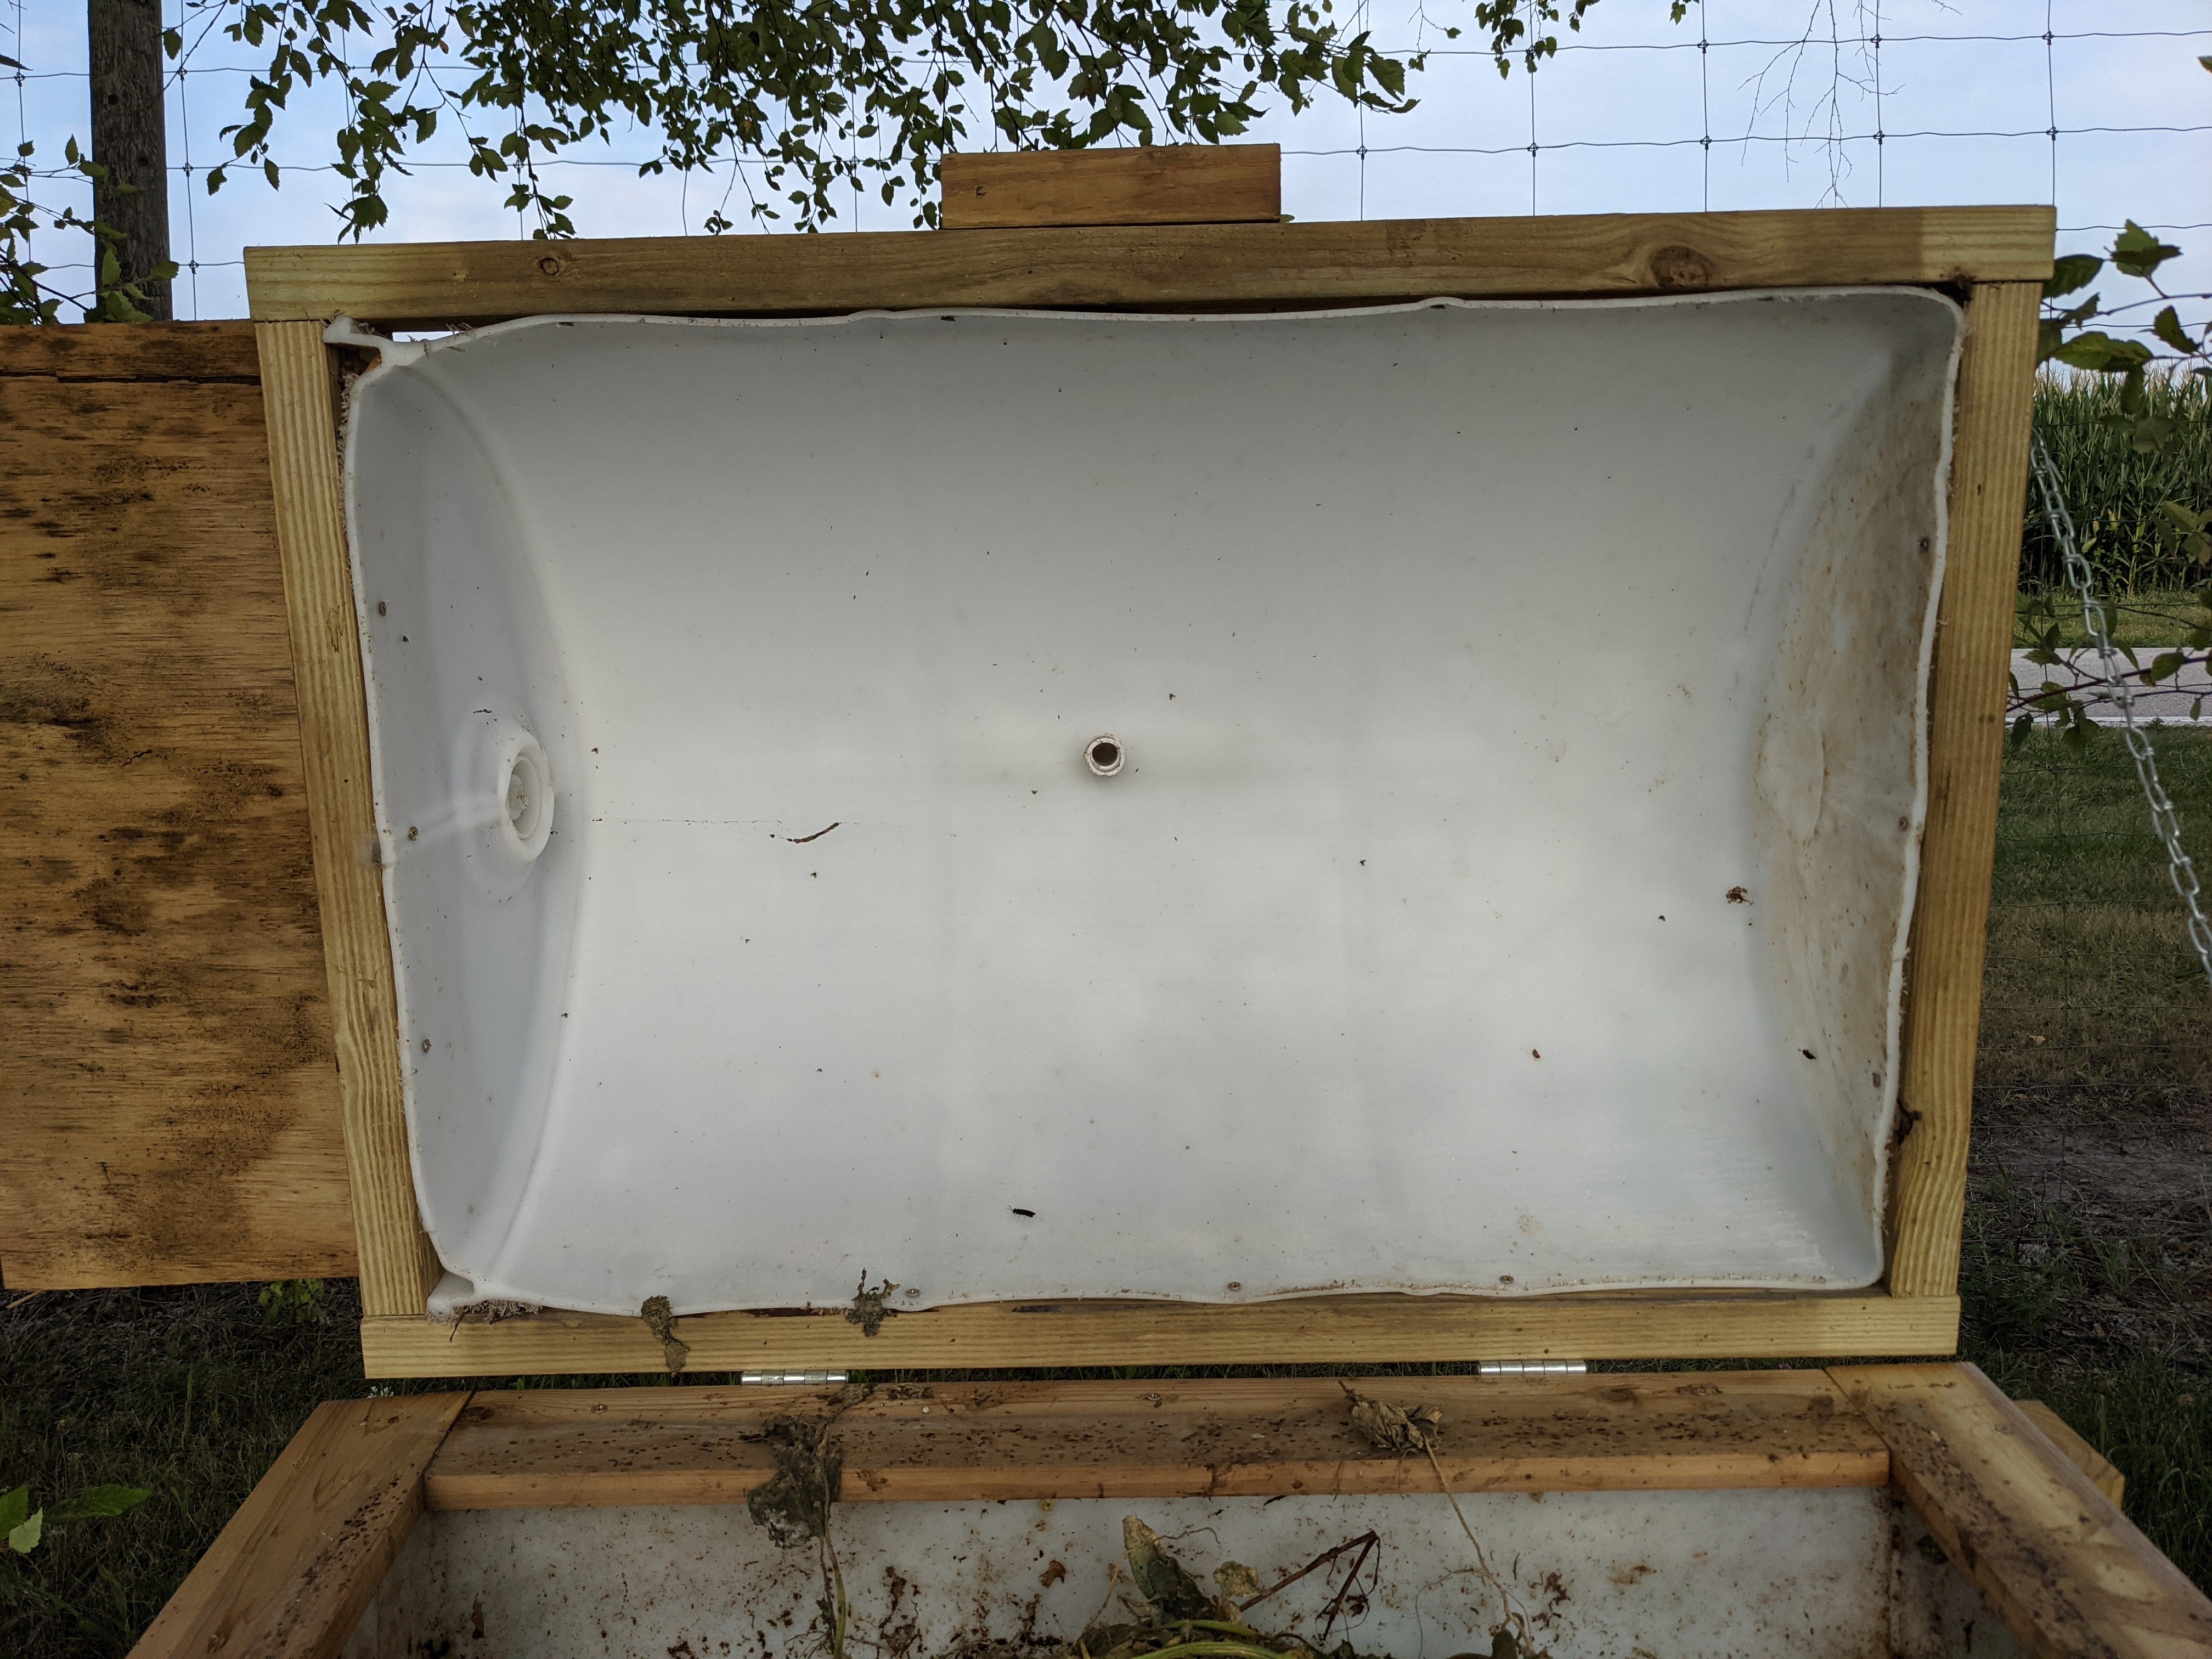
Figure 18: Front view of 55-gallon BSF larval rearing bin, open. Featuring lid with handle and adult entrance hinged to ottom half of rearing bin supported by a chain. (Photo credit: Catherine Terrell)
To construct the legs, take one 30.5-inch plank and make it flush (line it up) with one 18.5-inch plank (Fig. 19). Screw them together with the 3-inch screws to create a 4x4 base. Repeat three more times to make remaining legs. Grab one 12-inch plank and use one 26-inch plank to leave a 4-inch gap between the 18.5-inch plank and the 12-inch plank (Fig. 20). Screw the 12-inch to the 30.5-inch piece. Repeat on each leg. Connect two leg posts by securing the 26-inch plank between them in the 4-inch gap (Fig. 21). At this point you should have two H-leg pieces, two frames with barrel halves, and two 38-inch planks left.

Figure 19. Diagram of an incomplete leg. One 18.5-inch plank and one 30.5 inch plank make up this diagram. (Photo credit: Catherine Terrell)

Figure 20. Completed leg post. Should build four of this piece. (Photo credit: Catherine Terrell)
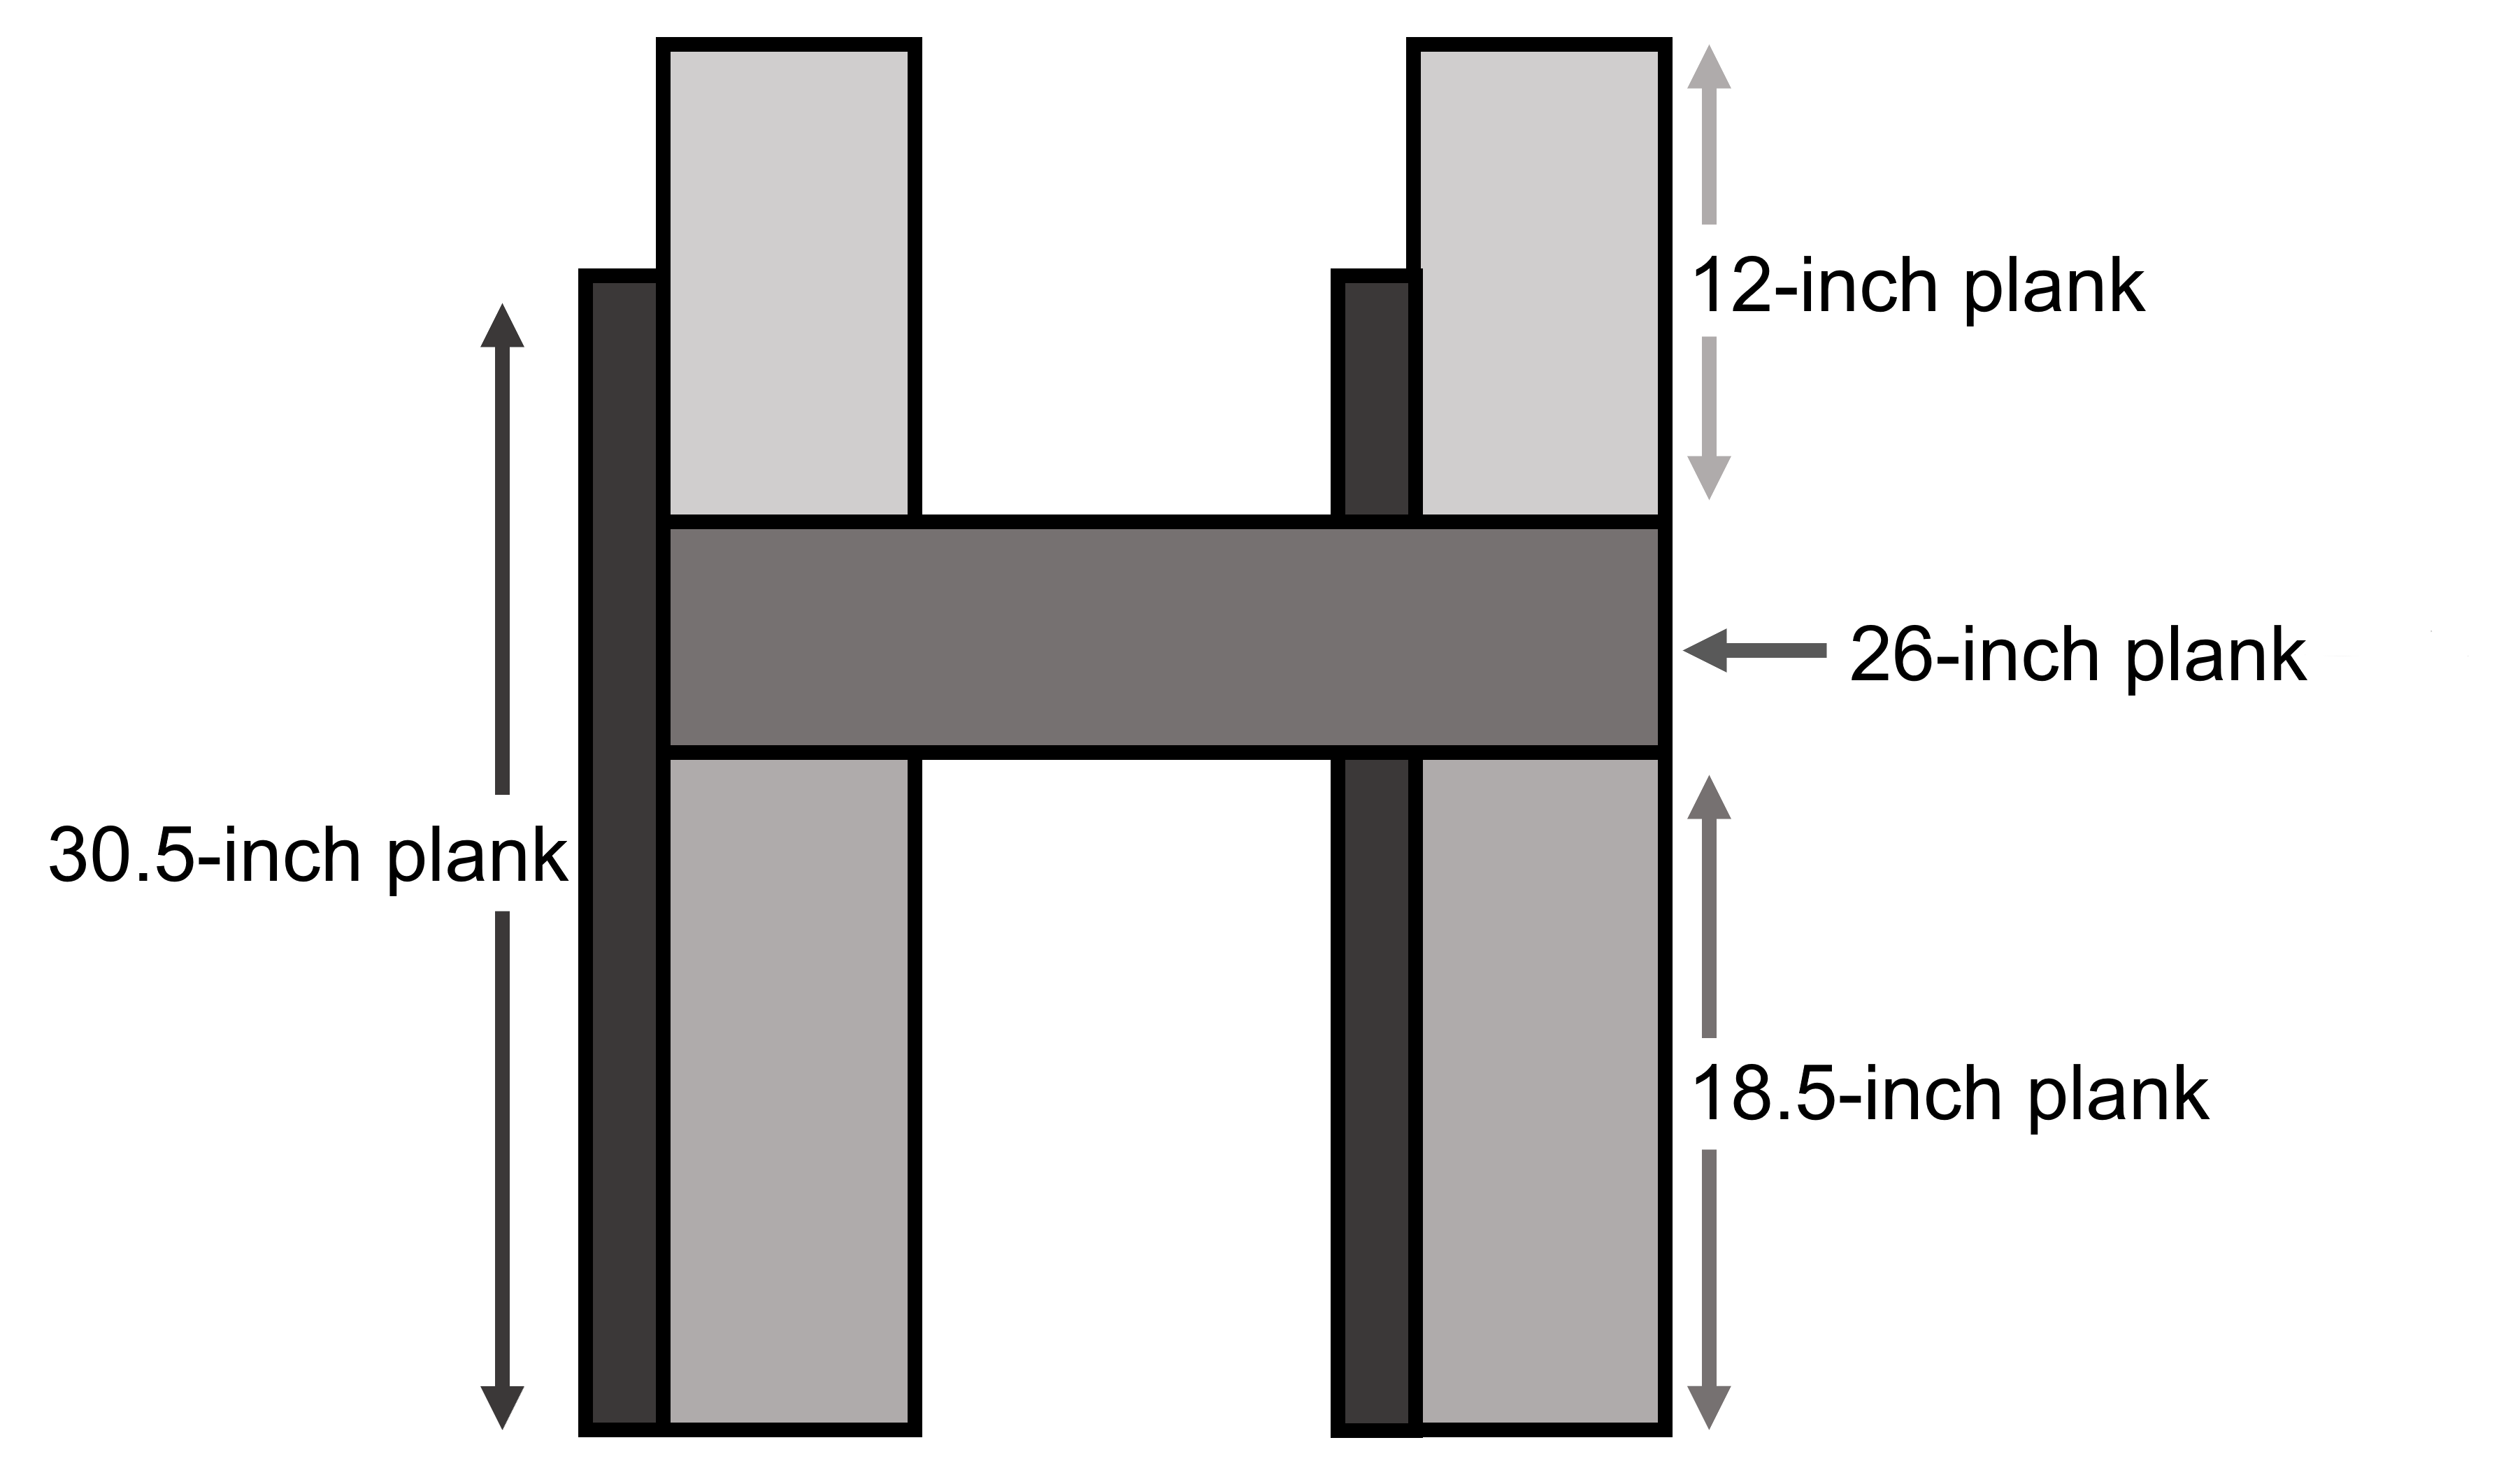
Figure 21. Diagram of H-shaped leg. Created combining two legs and connecting them using a 26-inch plank. (Photo credit: Catherine Terrell)
Connect the two H-leg pieces with the last two 38-inch planks by screwing them to the inside of the 30.5-inch plank (Figs. 22). Select the bottom barrel-in-frame piece that does not have the Tee joint attached and drill drain holes the size of your choosing throughout the bottom using a standard drill bit or install a ball valve in the bottom using a circular drill bit that matches the size of valve you select (optional). Place your bottom barrel-in-frame piece within the frame created by the leg pieces. Secure it with screws. Gather the 1X4 pieces of lumber that have been cut and line the edge of the bottom bin, shown in (Fig. 23). The two 10.25 pieces will be installed along one edge, leaving a gap in the middle where the exit ramp for the larvae will be placed. This lumber will create a gap in the lid closure allowing for the larvae to escape. Place the other barrel-in-frame piece (lid with the Tee PVC ) on top and attach the two with a set of hinges. Open the lid to slightly more than a 90 degree angle to determine how much chain you will need and attach with screws (Fig. 24). You will likely want a handle, so with either scrap lumber or with your own handle, attach to the front of the bin.
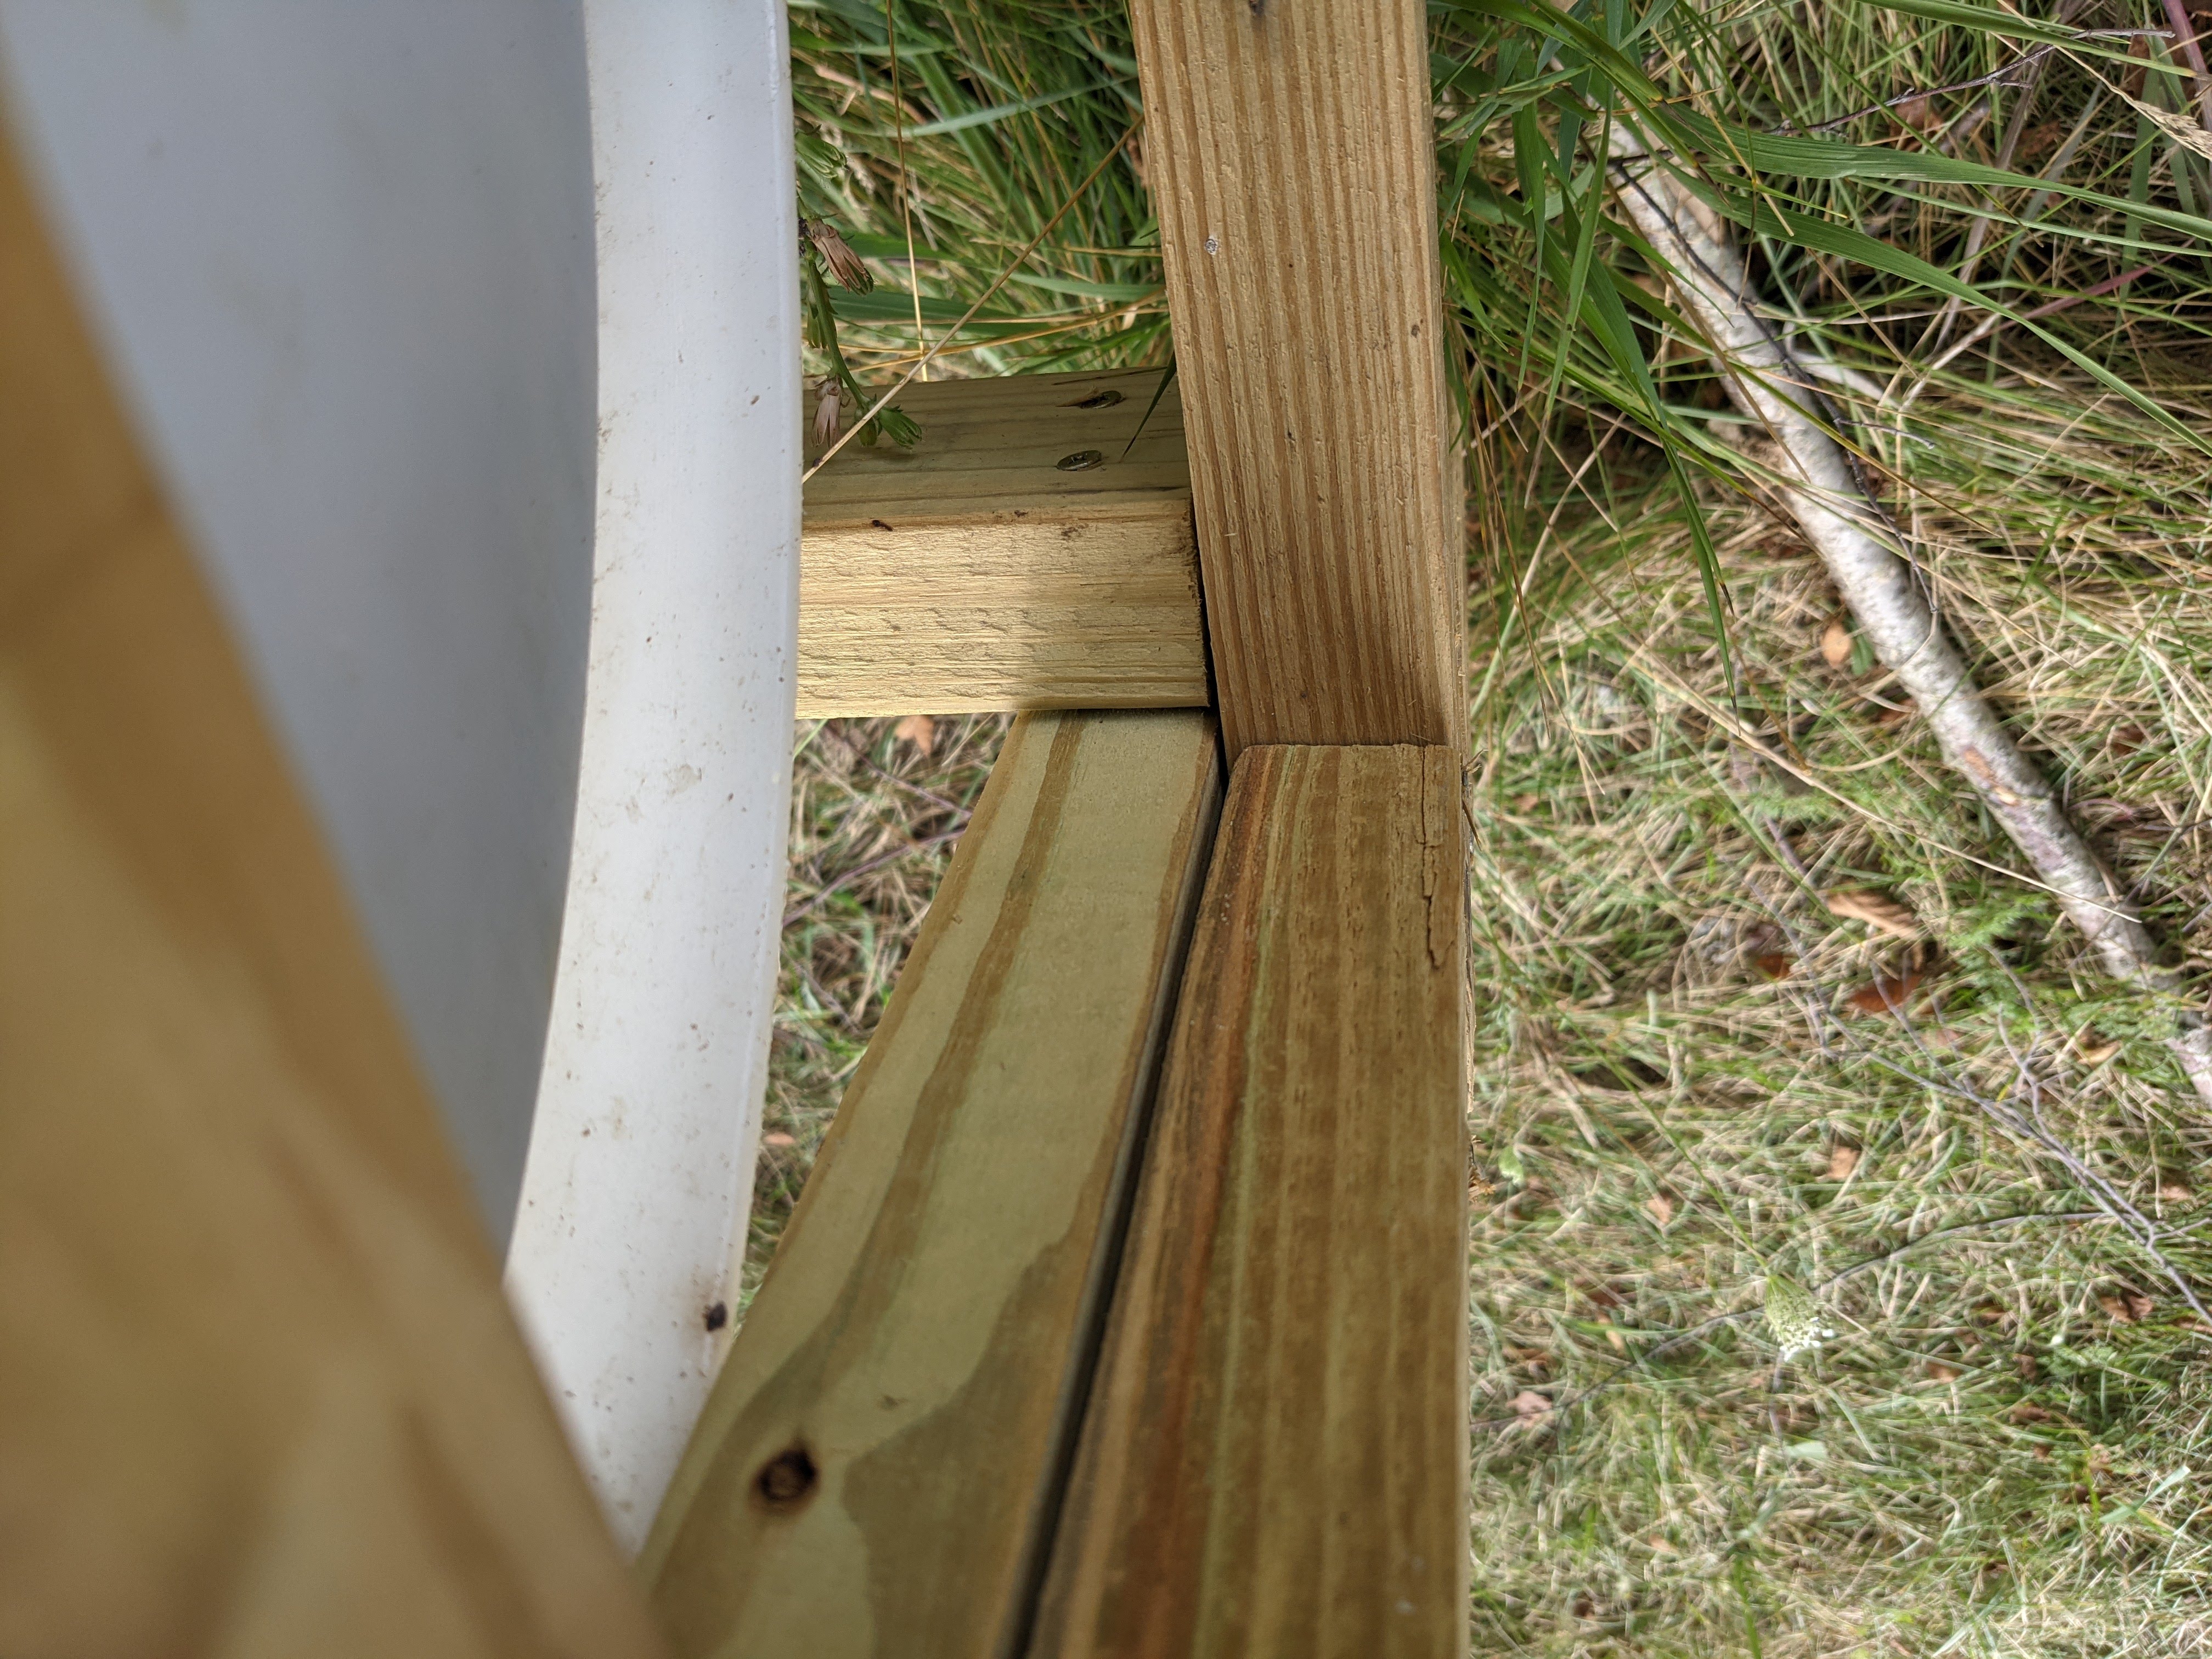
Figure 22. Top view of bottom two (2) 28-inch support planks. Attached to H-shaped legs, sits lower than the 55-gallon barrel half. (Photo credit: Catherine Terrell)
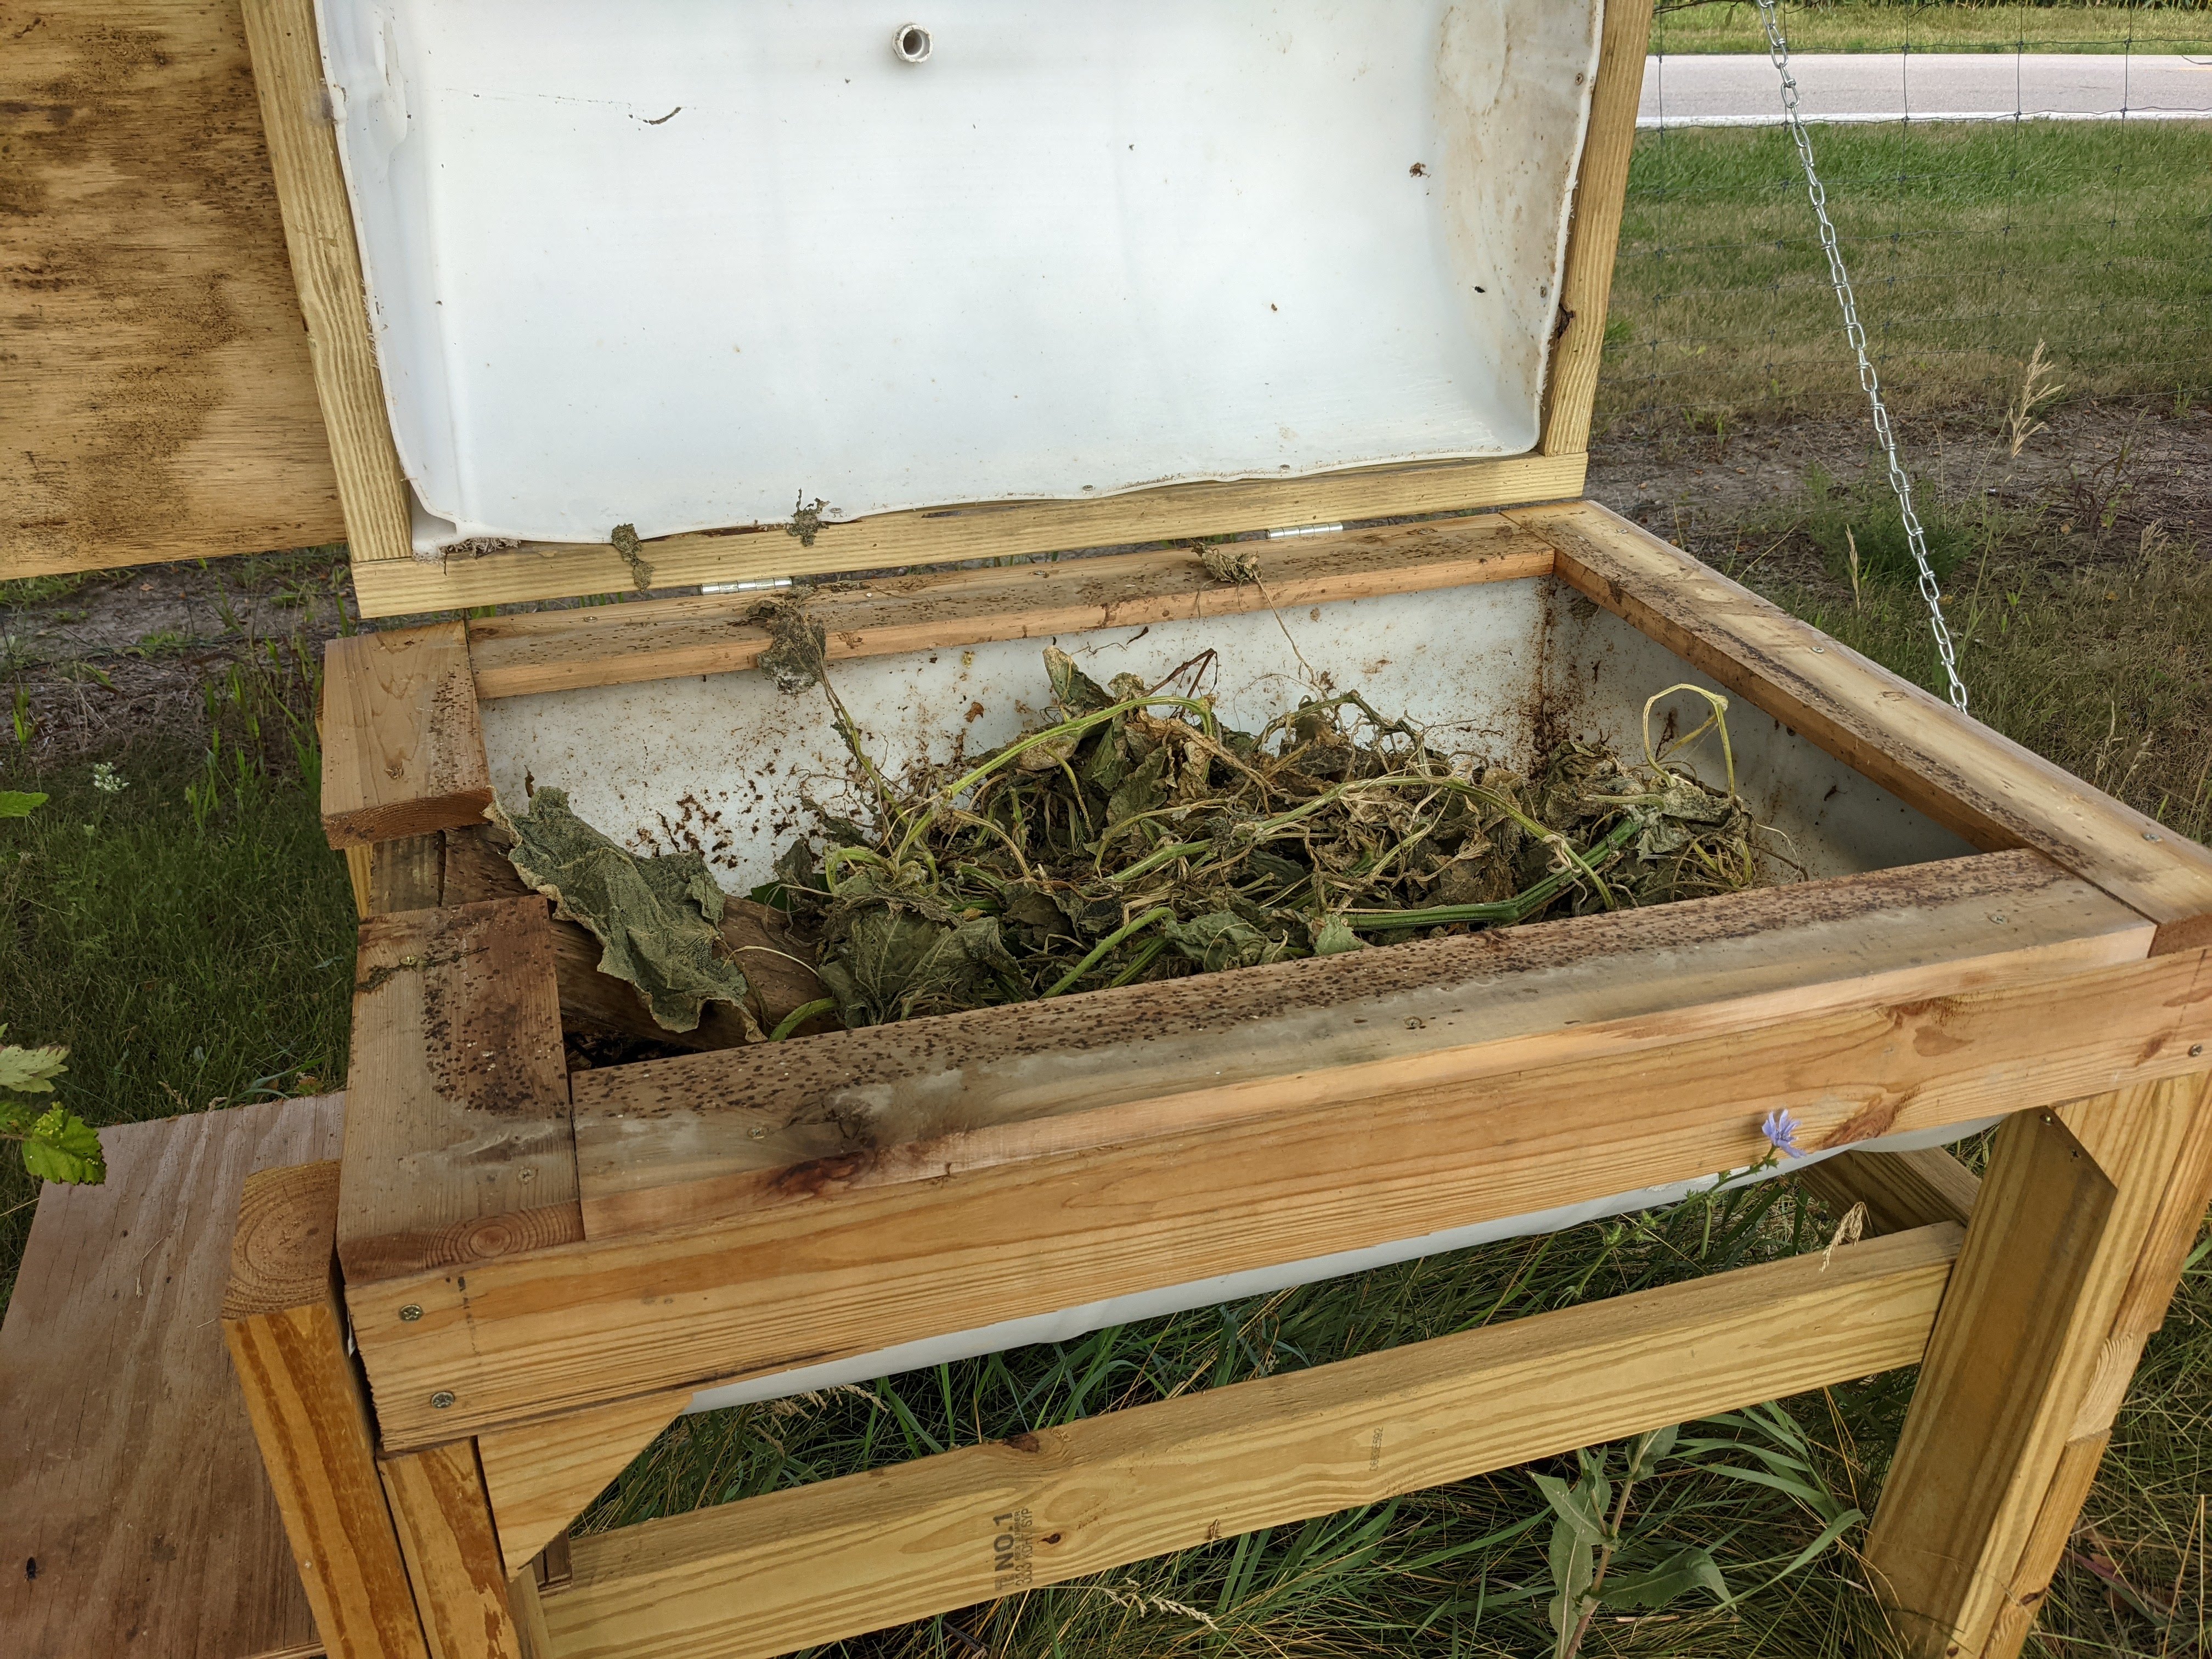
Figure 23. Inside of bin, mounted to legs and lined with 1x4 cut lumber. (Photo credit: Catherine Terrell)
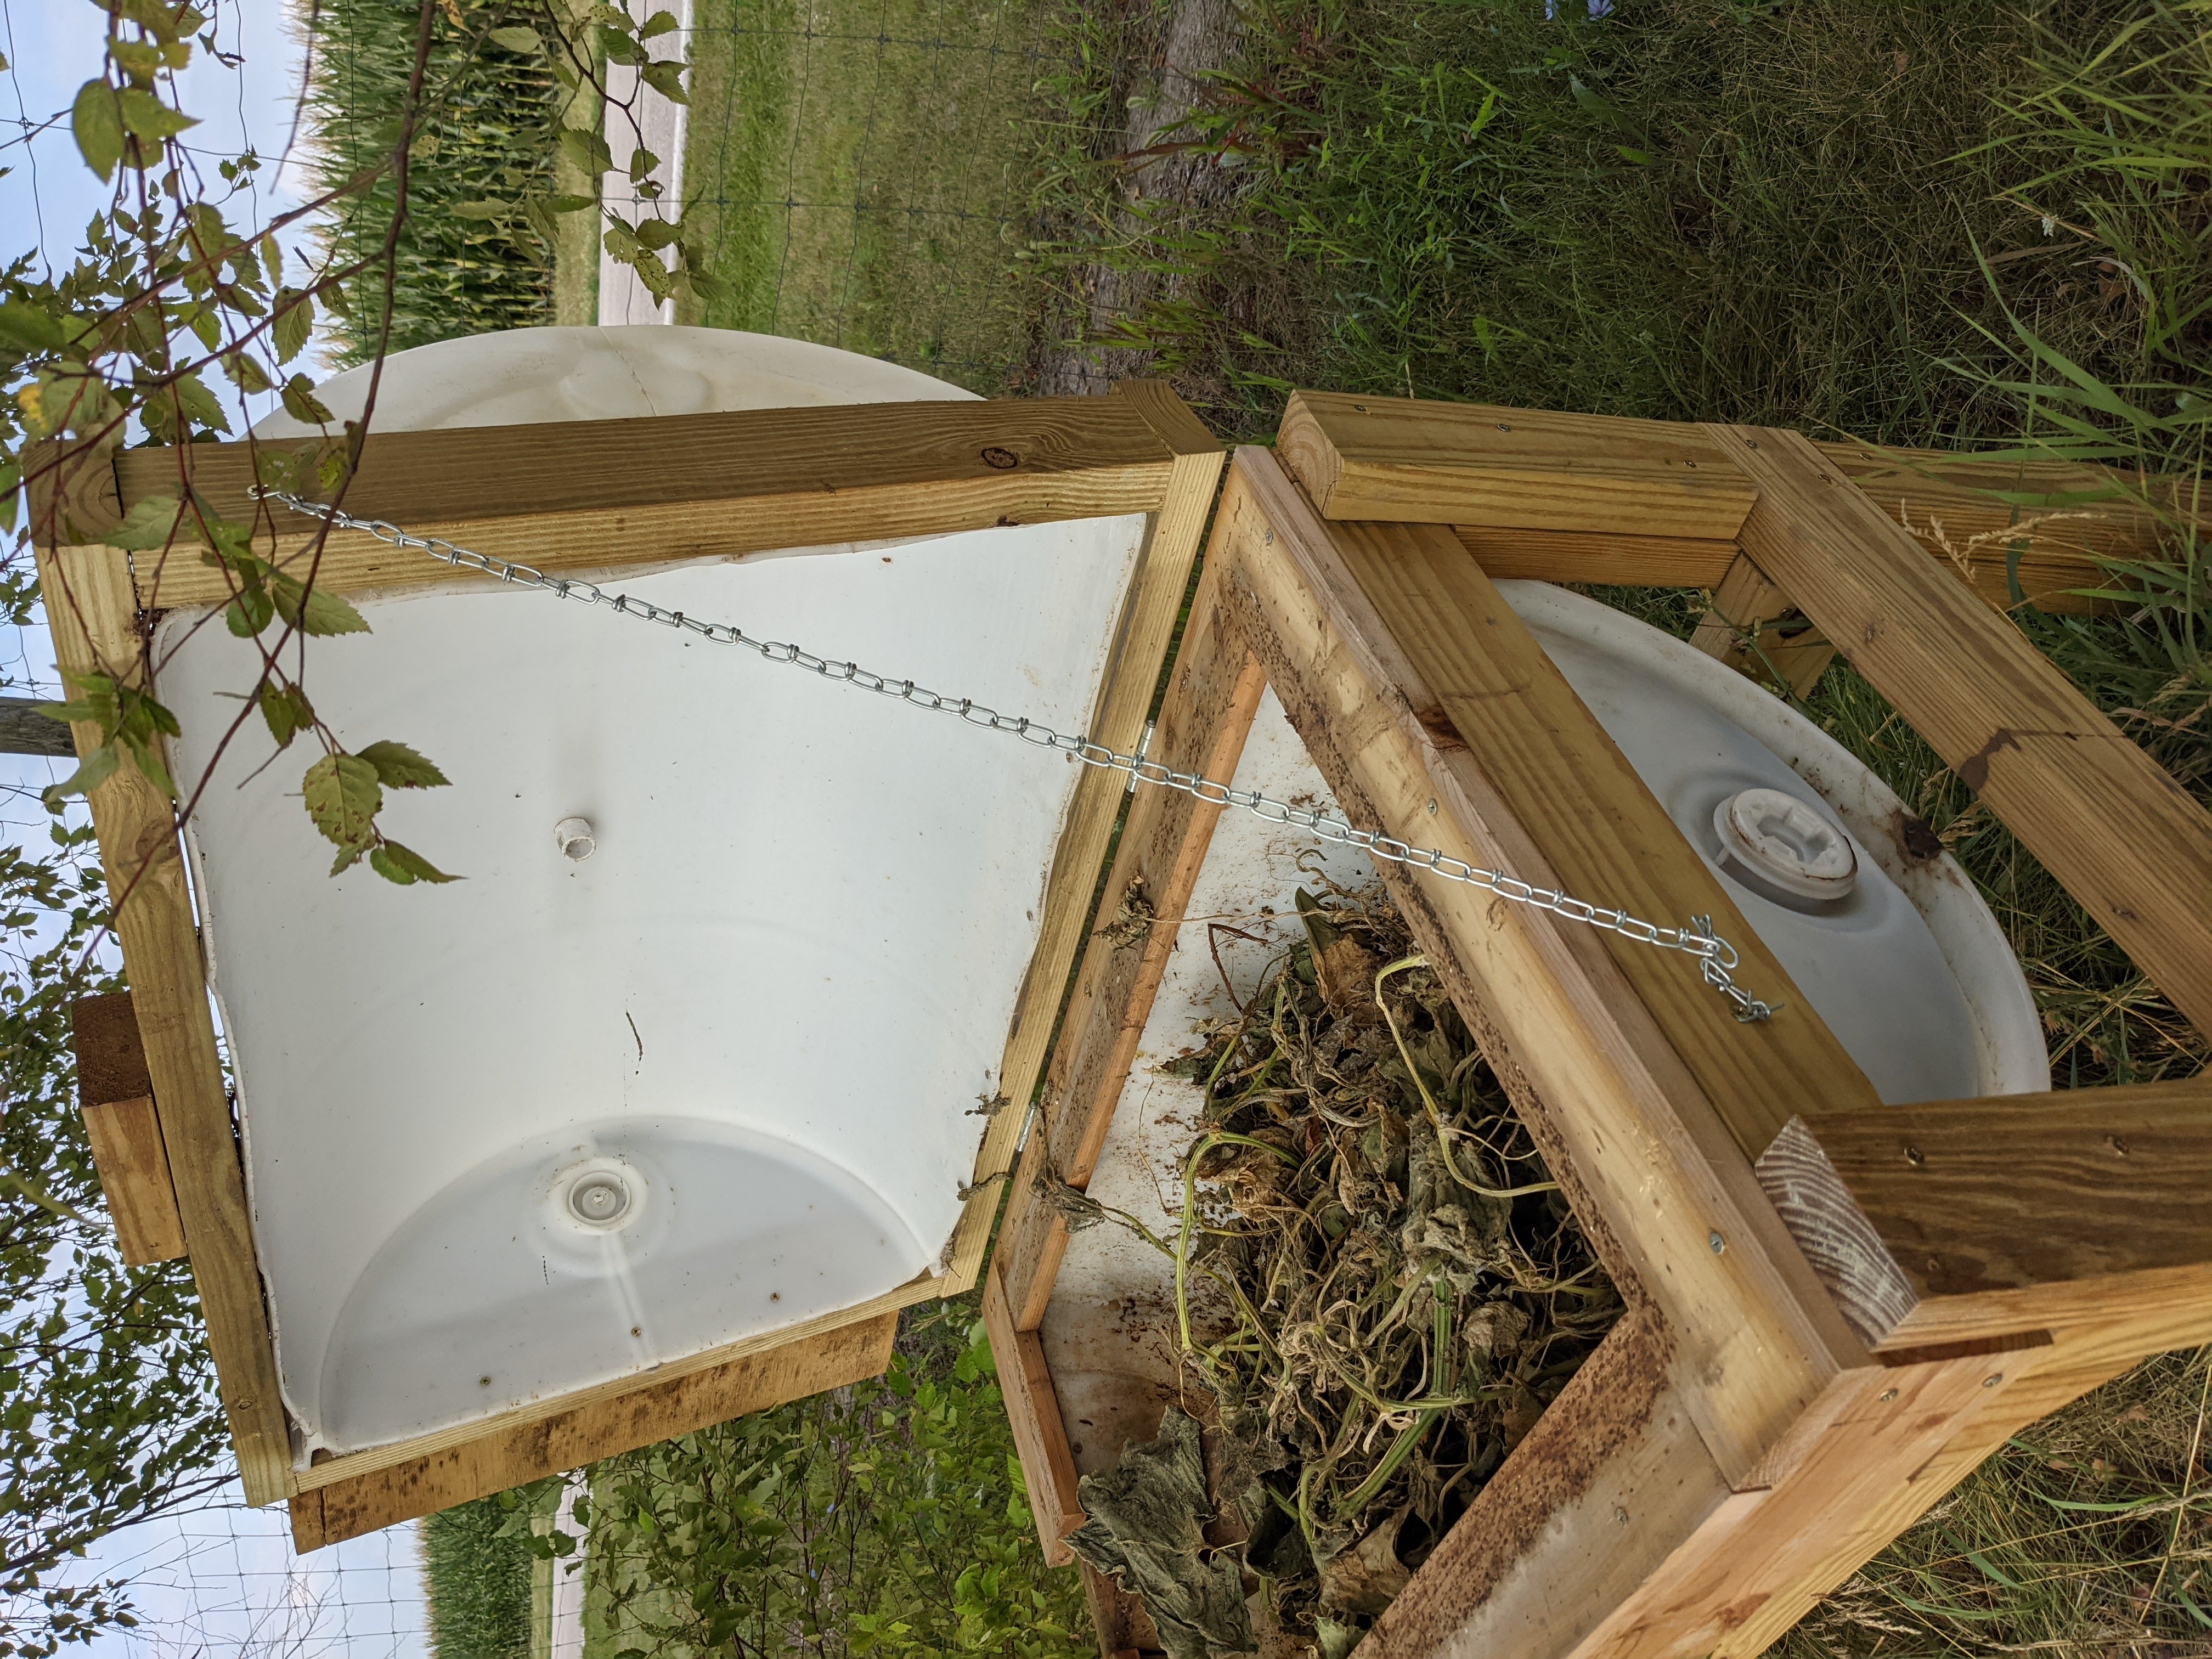
Figure 24. Side profile view of 55 gallon BSF larval rearing bin featuring fully extended support chain for the lid. Also features main drain hole. (Photo credit: Catherine Terrell)
Larvae will need a ramp on the inside to be able to exit the bin when they are ready to pupate. You should be able to make a ramp out of some of the excess lumber. If you do not place the bin in a sheltered area or provide ample drain holes, it tends to fill with water. For an extra seal, you can caulk the top barrel-in-frame piece or add a roof to divert water out of the barrel. To collect BSF larvae you can install shelves onto the side of your bin.
READ AND FOLLOW ALL LABEL INSTRUCTIONS. THIS INCLUDES DIRECTIONS FOR USE, PRECAUTIONARY STATEMENTS (HAZARDS TO HUMANS, DOMESTIC ANIMALS, AND ENDANGERED SPECIES), ENVIRONMENTAL HAZARDS, RATES OF APPLICATION, NUMBER OF APPLICATIONS, REENTRY INTERVALS, HARVEST RESTRICTIONS, STORAGE AND DISPOSAL, AND ANY SPECIFIC WARNINGS AND/OR PRECAUTIONS FOR SAFE HANDLING OF THE PESTICIDE.
November 2022
It is the policy of the Purdue University Cooperative Extension Service that all persons have equal opportunity and access to its educational programs, services, activities, and facilities without regard to race, religion, color, sex, age, national origin or ancestry, marital status, parental status, sexual orientation, disability or status as a veteran. Purdue University is an Affirmative Action institution. This material may be available in alternative formats.
This work is supported in part by Extension Implementation Grant 2021-70006-35390/ IND90001518G-1027053 from the USDA National Institute of Food and Agriculture and NCR SARE Award GNC20-311.
765-494-8491
www.extension.purdue.edu
Order or download materials from www.the-education-store.com


Purdue Extension Entomology, 901 West State Street, West Lafayette, IN 47907 USA, (765) 494-4554
Department of Entomology | College of Agriculture | Extension
© Purdue University | An equal access/equal opportunity university | Integrity Statement | Copyright Complaints | Maintained by ENTM IT
Trouble with this page? Disability-related accessibility issue? Please contact us at entmwebmaster@purdue.edu so we can help.