Pest & Crop Newsletter, Entomology Extension, Purdue University
- Soybean Aphid, A New Beginning for 2010
- Thanks to the Black Cutworm Pheromone Trap Cooperators
- Black Cutworm Adult Pheromone Trap Report
- Black Light Trap Catch Report
- Determining Corn Leaf Stages
- Heat Unit Concepts Related to Corn Development
- Corn And The Ugly Duckling
- Soybean Survival from Spring's Cold Snap
Soybean Aphid, A New Beginning for 2010 - (Christian Krupke and John Obermeyer)
- Soybean aphids are currently reproducing on Rhamnus (buckthorn) throughout IN and adjacent states.
- Spring migrant numbers should be low.
- June-July conditions will determine whether outbreaks occur, field scouting is KEY!
You may recall a series of reports last fall, when we described populations of aphids on buckthorn at various sites in Indiana, Ohio and Michigan. Following the huge aphid exodus from soybeans in late September, we may have expected to find large numbers of the insects on their overwintering host. The opposite was in fact true – very low numbers of aphids survived to lay eggs, most were killed by a fungal disease outbreak.
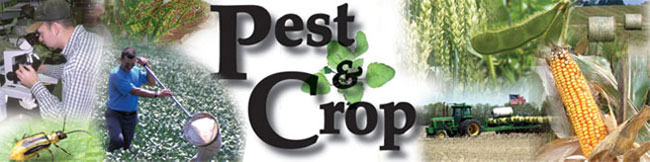
Eggs and a winged soyean aphid, next to buckthorn bud
Dave Voegtlin, an aphid taxonomist formerly of the Illinois Natural History Survey, recently visited those same sites and reports that aphids did indeed survive the rather harsh winter. However, as predicted by the low egg numbers in fall, the colonies currently developing on buckthorn are small in number. Although soybeans are not yet planted in most areas, there are winged aphids on buckthorn – meaning that movement to soybeans (their summer host) could happen at any time. Dr. Voegtlin suggests that if you are curious about when soybean aphids may colonize beans, volunteer beans are the best place to look at this very early stage.
As we’ve said before though, the true aphid story will be written in late June, into July and August. Favorable conditions (moderate temps, low predator numbers, outbreaks in states to the north and west of us) can lead to rapid population growth in Indiana soybeans.
Mass movement of winged aphids to Indiana from the upper Midwest has been, and continues to be, or primary concern. This pattern of aphid invasion, from locations of high infestation, is what occurred in 2003 and 2005. There are no shortcuts for soybean aphid and scouting is still critical for this insect, especially during the soybean’s early reproductive stages. Stay tuned throughout the summer, as we will update in future issues as we see and hear about soybean aphid outbreaks.
![]()
Thanks to the Black Cutworm Pheromone Trap Cooperators! - (John Obermeyer)
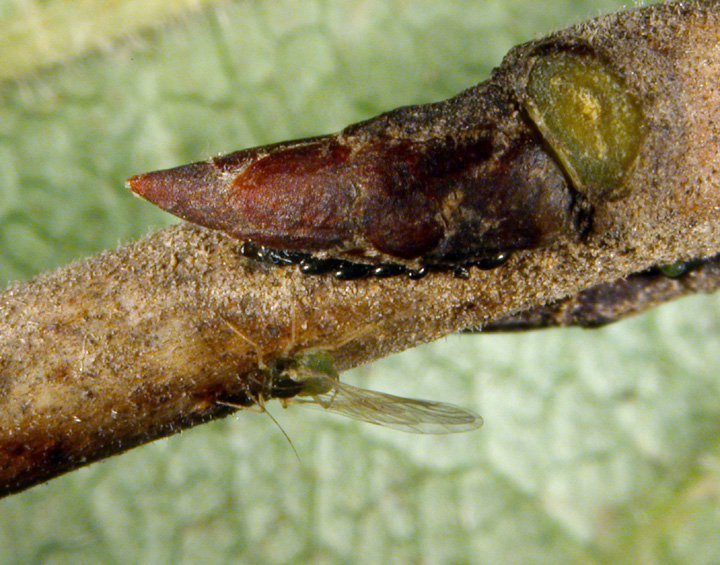
This is the last week of the “Black Cutworm Adult Pheromone Trap Report” for this year. As previously mentioned, this year’s moth captures haven’t been too impressive, see graph of trap comparisons to past years. This doesn’t take away from the dedication these volunteers have shown in daily checking traps, plucking out captured moths, and reporting counts for the benefit of all of Indiana. Please look over the list of cooperators, should you know them, please thank them. It really is valuable information.
Now we wait for heat units to accumulate for the black cutworm larval development…happy scouting!
![]()
Bug Scout Says: "Seedling corn should be scouted for black cutworm leaf feeding, especially in southern counties"
![]()
Click here to view the Black Cutworm Adult Pheromone Trap Report
![]()
Click here to view the Black Light Trap Catch Report
![]()
Methods to Control Volunteer Roundup Ready or Glyphosate-Tolerant Corn in a Corn Replant Situation – (Bill Johnson and Glenn Nice)
Although we don’t have near the issues with replanting this year like we have had the past two years (yet……), we have had a few calls on corn replant decision in fields that were planted initially to Roundup Ready corn. There are four legal options to kill an existing stand of Roundup Ready or GT corn in a replant situation – tillage, Select Max, Gramoxone + Sencor, or Ignite.
Our experience has been that tillage is a reliable method for killing the existing stand, and would not have the waiting interval associated with Select Max, but is not desirable for those in a long-term no-till situation. Select Max is labeled for volunteer corn control in a corn replant situation, and is very effective on volunteer corn that is tolerant to glyphosate (Roundup Ready) or glufosinate (Liberty Link) as well. But you cannot plant until 6 days after the field is treated with Select Max. The directions on the label indicate that up to 6 fl oz/A can be applied and NIS at 0.25% and AMS at 2.5 to 4 lb/A should be used as the spray additives. Apply to corn that is 12 inches or less. Avoid overlapping the boom for overlaps may result in rates that can cause excessive crop injury. Another option for controlling corn that is both Roundup Ready and Liberty Link is to use Gramoxone (2-3 pt/A) + Sencor (4-6 oz/A). Application of Gramoxone alone, without the addition of Sencor, is likely to be less effective. Corn that has advanced past the V3 growth stage will generally be more difficult to control.
Another option for controlling volunteer corn that is just tolerant to glyphosate (Roundup Ready), and not tolerant to Ignite (Liberty Link) would to plant Liberty Link corn and use Ignite herbicide. Use the full labeled rate of Ignite (22 oz/A) on volunteer corn 6 to 12 inches tall. Apply with 1.5 to 3 lbs/A of AMS. Ignite can provide somewhat variable control of volunteer corn, but it has the potential to suppress it to the point of reducing it’s competiveness. In addition, sequential treatments can be used if needed.
![]()
Nitrogen Accumulation by Annual Grass Weeds in Corn – (Bill Johnson and Glenn Nice)
A lot of corn has been planted around the state, and the recent wet or windy weather has prevented spraying in many areas. It is no secret that many growers are reducing their use of soil-applied acetamide-atrazine premixes and increasing their reliance on postemergence glyphosate in Roundup Ready corn or glufosinate (Ignite) in Liberty Link corn. So, we are going from a system which was largely devoid of early-season weed pressure to a system where early-season weed infestations will be common and require broadspectrum postemergence herbicides for effective control and protection against yield loss. It is important to understand that weeds are just like crop plants and will utilize soil nutrients in a similar manner to grow and complete their life cycle. What is not well understood is how much nitrogen is utilized by weeds and the effect of nitrogen use by weeds will have on crop yields. Over the past several years, I have had a couple of my graduate students conduct research projects that involved nitrogen accumulation by weeds in corn and their impact on corn yield. The first project I will discuss was an evaluation of annual grass weed interference and nitrogen accumulation in no-till, Roundup Ready corn. The objective of this project was to determine the interactive effects of grass weed interference and side-dressed N applications on corn and weed growth and N content and corn yield. The experiment was conducted in 1999 and again in 2000 on a silt loam soil with 2.5% organic matter. The experimental area was a no-till site. Soil-applied broadleaf herbicides were applied to control broadleaf weeds and allowed grass weeds to emerge with the corn. The grass weeds present in this study consisted of giant foxtail, barnyardgrass, and large crabgrass at a combined density of approximately 30 plants per square foot. Ammonium nitrate fertilizer was surface applied at 100 lb N/A just prior to planting. We utilized a relatively low or “threshold” rate of nitrogen in an attempt to tease out the effects of N accumulation by grass weeds on corn growth and yield.
The grass weeds emerged at about the same time or slightly later than the corn and were controlled with glyphosate when they were either 3, 6, 9, or 12 inches tall. After the grass weeds were controlled at the specific timings, the plots were kept weed-free for the remainder of the growing season. To determine if side-dress nitrogen could be utilized to overcome the effects of early-season grass weed competition, the weed removal timing treatments were duplicated and an additional 40 lbs of N/A was applied to those plots when corn was 2 feet tall. Corn and grass weed tissue samples and soil samples (2 feet deep) were collected from weedy and weed-free plots at each grass control timing and at corn harvest. Plant samples were analyzed for total Kjeldahl N and soil samples analyzed for nitrate and ammonium content.
Grass weeds accumulate quite significant amounts of nitrogen on a per area basis. At the 3 inch removal timing, grass weeds contained similar amounts of N on a per area basis as corn. By the time grass weeds are 12 inches tall, they had 50 to 63 lbs of N/A in 1999 and 16 to 32 lbs of N/A in 2000. This amounts to about 3 times as much N as contained in corn biomass in 1999 when the grass weeds emerged with the corn, and about ½ as much N in corn biomass in 2000, when corn emerged about 10 days before the weeds emerged. So these results stress the importance of giving the crop a head start on the weeds!
The main effect of weed removal height on corn yield was similar in both years. Corn yield and N content of corn biomass were similar to the weed-free controls with grass interference up to 6 inches in height before control measures were implemented. Yields were lower in treatments with grass weed interference until 9 inches or greater in height and there was less N in the corn biomass than the weed-free controls. Side-dress N had a positive effect on recovery of corn yield due to weed interference in 2000 when adequate late season precipitation was available, but had no effect on corn yield in 1999 when late-season precipitation was limited.
In summary, when grass weeds at a density of 30 plants per square foot emerge at the same time as corn, they should be controlled before reaching 6 inches in height to avoid excess N accumulation and crop yield loss. Surface-applied ammonium nitrate as a side-dress treatment was effective in overcoming the competitive effects of early-season weed interference in corn in a year with adequate late-season precipitation, but was not effective in a dry year. The best opportunity for utilizing side-dress N to recover yield due to weed interference will be to inject the N into the soil after postemergence weed control measures are conducted to minimize the amount tied up by microbes as they decompose the weed biomass on the soil surface.
Recommendations
To minimize the influence of grass weeds on N accumulation and corn yield, use residual herbicides in Roundup Ready, Glyphosate Tolerant, or Liberty Link corn. Many of these can be applied preplant or preemergence can also be applied to emerged corn. So you can still apply residual herbicides by themselves or as a tankmix with glyphosate or Liberty. Always check the label or with your retailer or sales rep to see which ones can be applied to emerged corn and can be tankmixed with foliar herbicides.
Reference
Hellwig, K. B., W. G. Johnson, and P. C. Scharf. 2002. Grass weed interference and nitrogen accumulation in no-tillage corn (Zea mays L.). Weed Sci. 50:757-762.
Bug Scout
Bug Scout says: "I think the weeds liked the extra nitrogen I added!"
![]()
Wheat Disease Update – (Kiersten Wise)
- Sign up for Fusarium head blight (scab) alerts courtesy of the USWBSI.
The majority of wheat in central and northern Indiana is past jointing, and most is in the boot stage or Feekes 10. Some fields have heads emerging, and varieties in research plots in West Lafayette will likely reach Feekes 10.5.1, or early flowering, later in the week. Septoria/Stagonospora leaf blotch is present on lower leaves in some fields, along with powdery mildew, but foliar disease levels have been low so far in scouted fields.
The rainy and cloudy weather conditions over the last week may promote disease development, and it is important to continue to monitor diseases in wheat, especially Fusarium head blight, or scab. So far, relative humidity has remained low which has reduced the risk for disease development according to the Fusarium head blight risk assessment tool: <http://www.wheatscab.psu.edu/>.
The United States Wheat and Barley Scab Initiative (USWBSI) is providing an alert system that wheat producers and other agribusiness personnel can subscribe to for updates on the risk of Fusarium head blight development in a given area. For more information and details on how to subscribe to this service, please reference the following news release: <http://scabusa.org/pdfs/uswbsi_fhb-alerts_05-10-10.pdf>.
![]()
Wheat & Barley Producers Can Sign Up for Scab Alerts (Kiersten Wise, News Release, May 10, 2010)
Wheat and barley producers, as well as other interested parties, will find it easier to stay ahead of potential Fusarium Head Blight (scab) problems this year, thanks to a scab alert system recently instituted by the U.S. Wheat & Barley Scab Initiative (USWBSI).
Producers, crop consultants, grain processors and others can sign up for the alerts by going to the following web site address: <http://scabusa.org/fhb_alert.php>. The alerts will be sent out to ones cell phone or email, depending upon the users preference.Frequency and timing of alerts will depend upon a given areas risk for severe scab which can vary widely, depending on environmental conditions.
The purpose of the alert system, according to USWBSI leaders, is to give growers and affiliated industry personnel better advanced notice of potential outbreaks and the risk of scab in their area, thus allowing for timely treatment of fields with fungicides. We are aware that many farmers do not have easy or convenient access to the Internet, but most of them carry a cell phone, says Dave Van Sanford, USWBSI co-chair. We wanted a system that would send an alert to their cell phone, prompting them to take an appropriate action such as going to the USWBSI website, checking with their county agent, chemical dealer or consultant, or simply looking at their crop to check its stage of development. Our hope is that the alerts will lead to some action that will reduce the impact of head scab on the crop.
The alert system is tied in with the Fusarium Head Blight Risk Assessment Tool hosted by Pennsylvania State University, Kansas State University, Ohio State University and the U.S. Wheat & Barley Scab Initiative. This web site <http://wheatscab.psu.edu/riskTool-2010.html>
For More Information about the FHB Alert System, please contact: Sue Canty USWBSI Networking & Facilitation Office Phone: 517-355-0271, Ext. 1183 E-Mail: scabusa@scabusa.org
For More Information about the FHB Risk Assessment Tool, please contact: Dr. Erick De Wolf Dept. of Plant Pathology, Kansas State University Phone: 785-532-3968 E-mail: dewolf1@ksu.edu
![]()
Determining Corn Leaf Stages – (Bob Nielsen)
Many of us remember standing against the doorframe in our early years and our parents marking our height with a pencil to measure how much we had grown. Some of you may have spent more time standing in the corner in your youth, but I won’t comment on that.
Because it is difficult to transport corn plants from the field to that doorframe to measure their growth, agronomists developed other means to measure the phenology or development of corn. Counting the number of leaves would seem to be a simple way to document corn development, but folks still tend to become confused over this simple strategy. There are two basic methods for leaf staging corn in use today.
Leaf Collar Method. This method determines leaf stage in corn by counting the number of leaves on a plant with visible leaf collars, beginning with the lowermost, short, rounded-tip true leaf and ending with the uppermost leaf with a visible leaf collar (Ritchie, et.al., 1993). The leaf collar is the light-colored collar-like “band” located at the base of an exposed leaf blade, near the spot where the leaf blade comes in contact with the stem of the plant.
Leaves within the whorl, not yet fully expanded and with no visible leaf collar are not included in this leaf staging method. The exception to this statement may be that leaves with barely visible leaf collars can be counted when you are staging plants early in the day, recognizing that the leaf collar may become completely visible by the end of the day.
Leaf stages are usually described as “V” stages, e.g., V2 = two leaves with visible leaf collars. The leaf collar method is generally the most widely used method by university and industry agronomists in the U.S.
TIP: Recognize that not all plants in a given field will be at the same leaf stage at the same time due to normal variability among plants for emergence or subsequent exposure to stress. By definition, the specific leaf stage for an entire field is defined by that value that represents the majority of the plants in the field (Ritchie, et.al., 1993). For example, if half or more of the plants you rate are at the V5 stage of development, then the entire field is assigned a V5 rating.
“Droopy” Leaf Method. Crop insurance adjusters, when assessing damage to a corn crop from weather events such as hailstorms, use this leaf staging method. Like the leaf collar method, this method of leaf staging begins with the short first leaf. Leaf counting then differs, though, by ending not with the uppermost leaf with a visible collar, but at that leaf that is at least 40 to 50 percent exposed from the whorl. In knee-high corn or older, the tip of this “indicator” leaf typically also “droops” or hangs down, hence the name “droopy” leaf method.
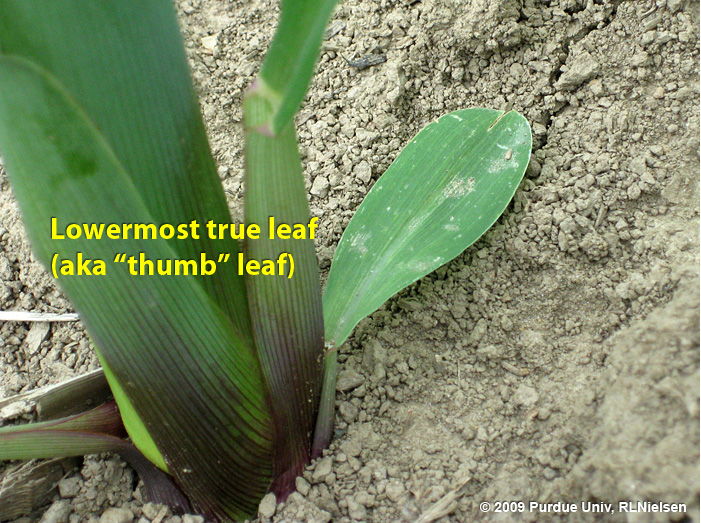
The lower most, thumb-shaped leaf of a corn plant

Parts of a corn leaf
The Two Methods Compared. Both methods assign a leaf stage to a field on the basis of the leaf stage common to the majority of the plants in the field. Up to the 5- or 6-leaf collar stage, the leaf collar method will typically result in a leaf stage value that is one less than the “droopy” leaf method. After corn reaches 18 to 24 inches in height, the leaf collar method will typically result in a leaf stage value that is two less than the “droopy” leaf method.
The usefulness in understanding the differences between these two leaf staging methods lies in the fact that the defoliation/yield loss chart used by hail insurance adjusters is based on the “droopy” leaf method. That chart is reproduced in the Purdue Extension publication ID-179, Corn & Soybean Field Guide. Identifying true “droopy” leaves on shredded, hail-damaged corn plants can be quite difficult, whereas leaf collars are often still identifiable. Thus, you can usually stage a damaged crop by the leaf collar method and then add one or two more leaves to the count in order to use the defoliation chart.
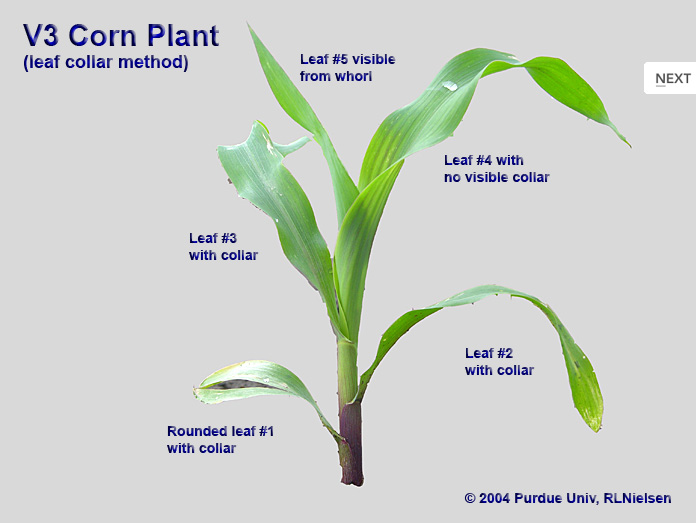
Young corn plant staged as V3 according to the collar method

Same plant, but staged as 4-leaf according to the "droopy" method
What About Herbicide Labels? Growers’ confusion with leaf staging often originates with less than clearly described growth stage restrictions listed on herbicide labels (Loux, et al. 2008). Label restrictions of older post-emergence herbicides typically ignored the short first leaf with the rounded tip and ended with the uppermost leaf that was at least 50% exposed from whorl. In essence, this was a bastardized “droopy leaf” method that resulted in roughly the same numerical leaf stage as the leaf collar method. Newer labels purport to define leaf stages according to the leaf collar method, but there is still some question about whether the short first leaf with the rounded tip is included. If in doubt with these newer herbicides, check with your ag. chemical technical representative to verify which leaf staging method is appropriate for the herbicide you intend to use.
Staging Older Plants. As corn plants develop, the lower few leaves typically die or are torn away from the stem by the expansion of the stalk or by developing roots. Consequently, growth stage identification can be difficult on older plants when you aren’t sure which leaves to begin counting first. But, not to worry, growth staging can still be accomplished!
First, dig or pull a plant without breaking the stalk. With a knife, carefully split the stalk down the middle, completely through the root ball. Look for the lowermost obvious internode (the whitish area between the “woody” horizontal stalk nodes) above the triangular “woody” base of the stalk. This first internode’s length is typically only 1/2 to 3/4 inch.
Determine which leaf corresponds with the node immediately above the first noticeable internode by carefully identifying which leaf sheath attaches to the node. This leaf is usually Leaf #5. Once Leaf #5 is identified, then stage the plant by continuing to count the remainder of the leaves with visible leaf collars above Leaf #5. For example, assume you’ve identified Leaf #5 and there are six more leaves above that one with visible leaf collars, then the plant is at leaf stage V11 (11 leaves with visible leaf collars).
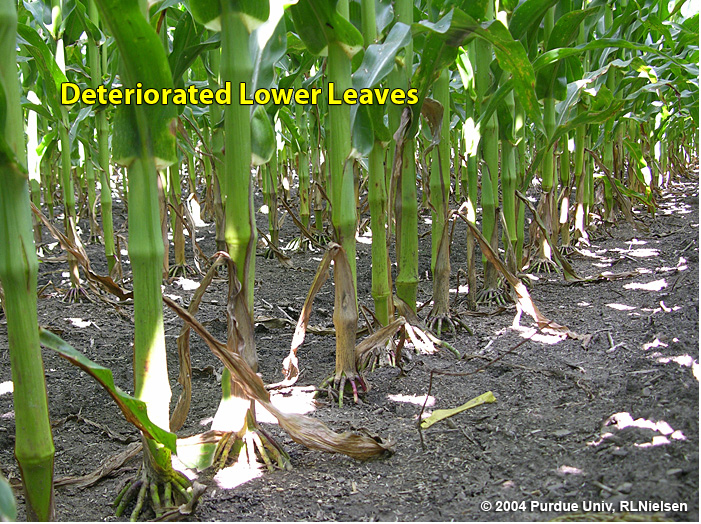
Typical deterioration of lower leaves in older corn plants
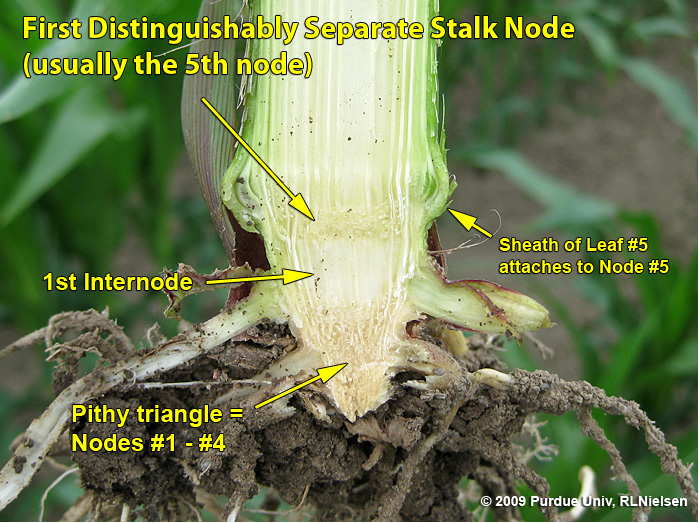
Split stalk illustrating the first distinguishable node above the pithy triangle
Related References
Loux, Mark, Anthony F. Dobbels, Jeff Stachler, Bill Johnson, Glenn Nice, & Tom Bauman. 2010. 2010 Weed Control Guide for Ohio and Indiana (WS-16). Table 7: Rainfast Intervals, Spray Additives, and Maximum Crop Size for Postemergence Corn Herbicides. Purdue Univ. & Ohio State Univ. Coop. Ext. Services. [On-Line]. Available at <http://www.btny.purdue.edu/Pubs/WS/WS-16/CornRainFast.pdf>. [URL accessed May 2010].
Nielsen, R.L. (Bob). 2008. Tips for Staging Corn with Severe Leaf Damage. Corny News Network, Purdue Univ. [On-Line]. Available at <http://www.kingcorn.org/news/timeless/VStagingTips.html>. [URL accessed May 2010].
Nielsen, R.L. (Bob). 2008. Use Thermal Time to Predict Leaf Stage Development in Corn. Corny News Network, Purdue Univ. [On-Line]. Available at <http://www.kingcorn.org/news/timeless/VStagePrediction.html>. [URL accessed May 2010].
Nielsen, R.L. (Bob). 2010. Heat Unit Concepts Related to Corn Development. Corny News Network, Purdue Univ. [On-Line]. Available at <http://www.kingcorn.org/news/timeless/HeatUnits.html>. [URL accessed May 2010].
Purdue University. 2010. Corn & Soybean Field Guide (ID-179). To order, call Purdue Extension toll-free at (888) 398-4636 and ask for the Media Distribution Center.
Ritchie, S.W., J.J. Hanway, and G.O. Benson. 1993. How a Corn Plant Develops (SP-48). Iowa State Univ. [On-Line]. Available at <http://www..extension.iastate.edu/hancock/info/corn.htm>. [URL accessed May 2010].
![]()
Heat Unit Concepts Related to Corn Development – (Bob Nielsen)
Growth and development of corn are strongly dependent on temperature. Corn develops faster when temperatures are warmer and more slowly when temperatures are cooler. For example, a string of warmer than normal days in late spring will encourage faster leaf development than normal. Another example is that a cooler than normal grain filling period will delay the calendar date of grain maturity.
The phrases “string of warmer than normal days” and “cooler than normal grain filling period” can be converted mathematically into measures of thermal time by calculating the daily accumulations of heat using temperature data. Commonly used terms for thermal time are Growing Degree Days (GDDs), Growing Degree Units (GDUs), or heat units (HUs).
Different methods exist for calculating heat units depending on a) the crop or biological organism of interest and b) the whim or personal preference of the researcher. The calculation method most commonly used throughout the U.S. for determining heat unit accumulation relative to corn phenology is the formula first suggested by the National Oceanic and Atmospheric Administration in 1969 and labeled as the “‘Modified Growing Degree Day” formula in 1971.
This method calculates daily accumulation of GDDs as the average daily temperature (°F) minus 50. The “modification” refers to the limits imposed on the daily maximum and minimum temperatures allowed in the calculation. Daily maximums greater than 86 degrees F are set equal to 86 in the calculation of the daily average temperature. Similarly, daily minimums less than 50 degrees F are set equal to 50 in the calculation.
Example 1:
If the daily maximum temperature was 80°F and the minimum was 55°F, the GDD accumulation for the day would be ((80 + 55) / 2) – 50 or 17.5 GDDs.
Example 2: (Illustrating the limit on daily maximums):
If the daily maximum temperature was 90°F and the minimum was 72°F, the GDD accumulation for the day would be ((86 + 72) / 2) – 50 or 29 GDDs.
Example 3: (Illustrating the limit on daily minimums):
If the daily maximum temperature was 68°F and the minimum was 41°F, the GDD accumulation for the day would be ((68 + 50) / 2) – 50 or 9 GDDs.
In late April to early May, normal daily GDD accumulations for central Indiana are about 10 GDDs. By late July, the normal daily accumulation rises to about 23 GDDs. For a typical corn growing season in central Indiana, say from late April to late September, the total seasonal accumulation of GDDs is about 2800 GDDs.
Historical normal GDD accumulations on a weekly basis for Indiana’s nine Crop Reporting Districts are listed in the accompanying table and are also available in Purdue’s Corn & Soybean Field Guide, Extension publication ID-179. These historical GDD values can be used to estimate weekly GDD accumulations if you do not have access to current temperature data.
Obviously, the ability to calculate daily heat unit accumulations is dependent on your having access to daily maximum and minimum temperatures. If you do not own your own max / min recording thermometer, you can guesstimate the daily highs and lows by manually recording the temperatures shortly after sunrise (approximate daily low) and late in the afternoon (approximate daily high).
Another option is to try your luck with the online Indiana State Climate Office data archive <http://climate.agry.purdue.edu/climate/data_archive_v3.asp>. At this Web site, you can search for temperature data from the automated Purdue weather stations located at a number of outlying Purdue Ag. Centers, cooperative weather stations maintained by the National Weather Service, and airport weather stations also maintained by the National Weather Service. Also, the weekly Pest&Crop newsletter lists accumulated GDDs for selected sites across the state based on various start dates.
Related References
Corn & Soybean Field Guide (ID-179). 2010. Purdue Univ. Extension. To order, call Purdue Extension toll-free at (888) 398-4636.
Nielsen, R.L. (Bob). 2008. Use Thermal Time to Predict Leaf Stage Development in Corn. Corny News Network, Purdue Univ. [On-Line]. Available at <http://www.kingcorn.org/news/timeless/VStagePrediction.html>. [URL accessed May 2010].
Nielsen, R.L. (Bob). 2010. Determining Corn Leaf Stages. Corny News Network, Purdue Univ. [On-Line]. Available at <http://www.kingcorn.org/news/timeless/VStageMethods.html>. [URL accessed May 2010].
Purdue Pest & Crop Newsletter. 2010. Purdue Univ. Pest Mgmt. Program. [On-Line]. Available at <http://extension.entm.purdue.edu/newsletters/index.html>. [URL accessed May 2010].
![]()
Corn And The Ugly Duckling – (Bob Nielsen)
- Ugly ducklings can change into beautiful swans.
- The story needs re-telling every so often.
Every year, for the first five weeks or so after corn planting is finished, the guys down at the Chat ‘n Chew Cafe complain royally about the looks of the crop. It does not matter whether it was an early planting season or a late planting season. Gripes about uneven stands, poor color, and slow growth waft over the tables as everyone airs their concerns about the looks of their neighbors’ fields.
Then suddenly one day, the tone of the conversation in between the coffee and sweet rolls perks up. Almost overnight, the crop has taken off like a rocket. The color of the leaves turns a dark, almost-blue green and they develop a distinct shine. From that point on, any connoisseur of corn feels better about life in general.
Why does this transition seem to happen over and over again every year?
During the first five weeks or so after planting, the corn plant is going about the business of creating all of the leaves it will ever have. A few of these leaves are visible, but most are wrapped tightly deep inside the whorl, biding their time until it is their turn to emerge.
Some root development is also occurring during these same first five weeks. In fact, the successful development of the first three or four sets of nodal roots during this time will go a long ways to ensuring successful stand establishment of the crop.
Even though new leaves and some roots are developing during this time, the rate of increase in total plant dry matter is relatively slow. The photosynthetic “factory” is small, as is the size of the raw material accumulator devices (aka, the roots).
Up until about the three leaf stage determined by number of visible leaf collars, corn seedlings are dependent primarily on the energy and nutrition reserves of the kernel to sustain their development. Beyond the three leaf stage, seedlings increasingly “wean” themselves from the kernel reserves and slowly become more dependent on the developing nodal root system.
READ THIS. During this important transition from dependence on kernel reserves to dependence on the nodal root system, corn seedlings are easily sidetracked when growing conditions are not adequate for maximum photosynthesis and rapid development of the nodal root system. Consequently, the appearance of corn seedlings during these early leaf stages can be downright ugly during extended periods of cloudy, cool weather. Throw in some excessively wet soils plus a little soil compaction plus a pinch of frost damage and you have a good start on a recipe for “crappy” stands of corn. The best remedy for most fields of yellow-green corn seedlings suffering from the effect of “crappy” growing conditions is the return of ample sunshine and warmth.
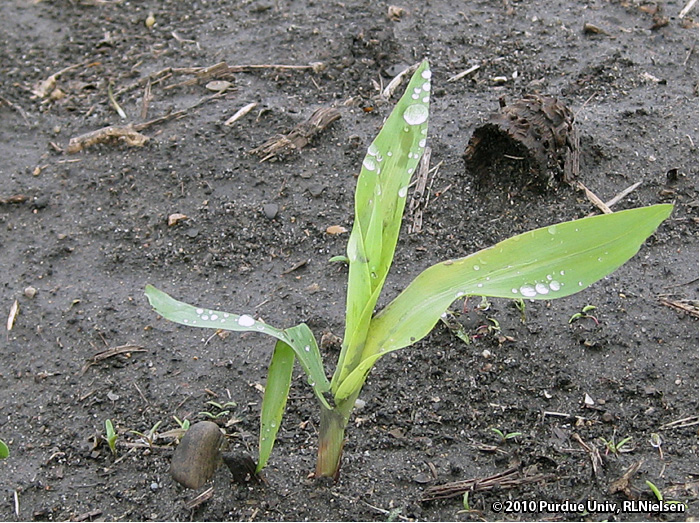
A 2-leaf stage corn seedling with a yellow-green appearance indicative of 'crappy' growing conditions
This period of transition during “crappy” growing conditions is exactly when that band of starter fertilizer you placed 2 inches over and 2 inches below the seed begins to pay for itself as the fledgling first nodal roots begin to tap into that fertilizer band sometime after the 2-leaf stage. Remember that prior to this leaf stage, young seedlings are relying primarily on the kernel reserves and do not use much additional soil nutrients. As the kernel reserves “play out” and the first few nodal roots tap into the starter band around the 2-leaf stage, the so-called “starter kick” begins to occur and seedling appearance will begin to improve by the 4- to 5-leaf stage of development.
The good news is that if the plants “hang in there” until they reach the five or six leaf stage, a miraculous turn of events usually occurs. The final leaf is created at the main growing point of the plant (near the top of the “pyramid” of stalk tissue) and the plant turns its attention toward developing the reproductive structures known as the tassel and ears.
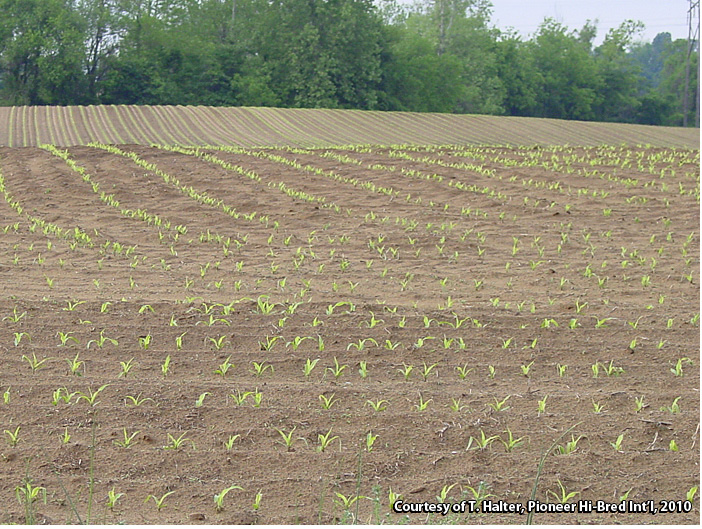
Yellow-green corn seedlings; late V2 to early V3 stage of development
At the same time, the size of the photosynthetic “factory” and its supporting staff of roots is reaching a critical mass that is finally capable of manufacturing greater and greater amounts of energy. With greater amounts of available energy, the “factory” begins to convert more and more of the incoming nutrients and carbon dioxide into sugars, starches, and other plant dry matter.
Subsequently, the stalk begins to elongate rapidly, the roots begin to develop rapidly, the tassel develops rapidly, the tiny ears within the ear shoots develop rapidly, and suddenly the plant is growing like wildfire. From about knee-high corn to the onset of pollination, the corn crop progresses through its most rapid growth phase (above- and below-ground), including the uptake of the lion’s share of soil nutrients for use during the grain fill period.

Yellow-green corn seedlings; late V2 to early V3 stage of development
By now you may be wondering what’s the moral of this story?
Primarily, it’s a reminder to take time once in a while to look at this King of Crops with a certain amount of awe and wonder.
Secondarily, be reminded that an ugly duckling of a corn crop that reaches the five to six leaf stage in reasonably good condition will usually turn the corner and become a beautiful swan of a corn crop during the next few weeks.
Thirdly, be reminded that true yield potential is just beginning to be determined at the start of this rapid growth phase. Ugly corn up to this point in time has not necessarily lost its yield potential. Ear size is determined rom about knee-high to shoulder-high corn. Weather during pollination and grain fill finish off the yield determination.
While we often moan and complain about the looks of young corn, it often surprises us with acceptable yields in the fall.
Related References
Nielsen, RL (Bob). 2007. Ear Size Determination in Corn. Corny News Network, Purdue Univ. [online]. Available at <http://www.kingcorn.org/news/timeless/EarSize.html> [URL accessed May 2010].
Nielsen, RL (Bob). 2008. A Recipe for Crappy Stands of Corn. Corny News Network, Purdue Univ. [online] <http://www.kingcorn.org/news/articles.08/CrappyRecipe-0422.html> [URL accessed May 2010].
Nielsen, RL (Bob). 2008. Growing Points of Interest. Corny News Network, Purdue Univ. [online]. Available at <http://www.kingcorn.org/news/timeless/GrowingPoints.html> [URL accessed May 2010].
Nielsen, RL (Bob). 2010. Determining Corn Leaf Stages. Corny News Network, Purdue Univ. [online]. Available at <http://www.kingcorn.org/news/timeless/VStageMethods.html> [URL accessed May 2010].
Nielsen, RL (Bob). 2010. Root Development in Young Corn. Corny News Network, Purdue Univ. [online]. Available at <http://www.kingcorn.org/news/timeless/Roots.html> [URL accessed May 2010].
![]()
Soybean Survival from Spring’s Cold Snap - (Shaun Casteel)
April brought many warm days with excellent field conditions that allowed nearly 70% of corn and near 20% of the soybeans to be planted by the end of the month. As we enter May, temperatures have dropped and the water spigot has opened. The recent cold spells over the past weekend (~May 9th) raise concerns with cold injury to soybeans, especially in the northern third of the state. Some areas also experienced freezing temperatures around the 28th of April in east-central Indiana, though emerged soybeans were minimal at that point.
Will freezing air temperatures kill soybeans?
NO, if the soybeans had not emerged. Soybeans that had not emerged should not be injured from a cold snap since the soil and/or residue were “insulating” the seeds and developing seedlings. However, exposure to long periods of cold temperatures increases the risk of damage to soybean seedlings from diseases and insects.
YES (potentially), if the soybeans had emerged. Soybean seedlings exposed to freezing temperatures are more prone to injury than corn due to the growth patterns. The growing point of the corn plant is protected until about the V5 growth stage; whereas, the soybean’s growing point is exposed to the elements as soon as it emerges.
The first soybean part exposed to the air temperatures and the elements is the hypocotyl (lower stem) followed by the cotyledons (seed leaves). The hypocotyl pulls the cotyledons out of the soil and looks like a shepherd’s crook (Figure 1). The hypocotyl will straighten as the soybean seedling develops, which will lift the cotyledons up and “rest” them above the hypocotyl (Figure 2).
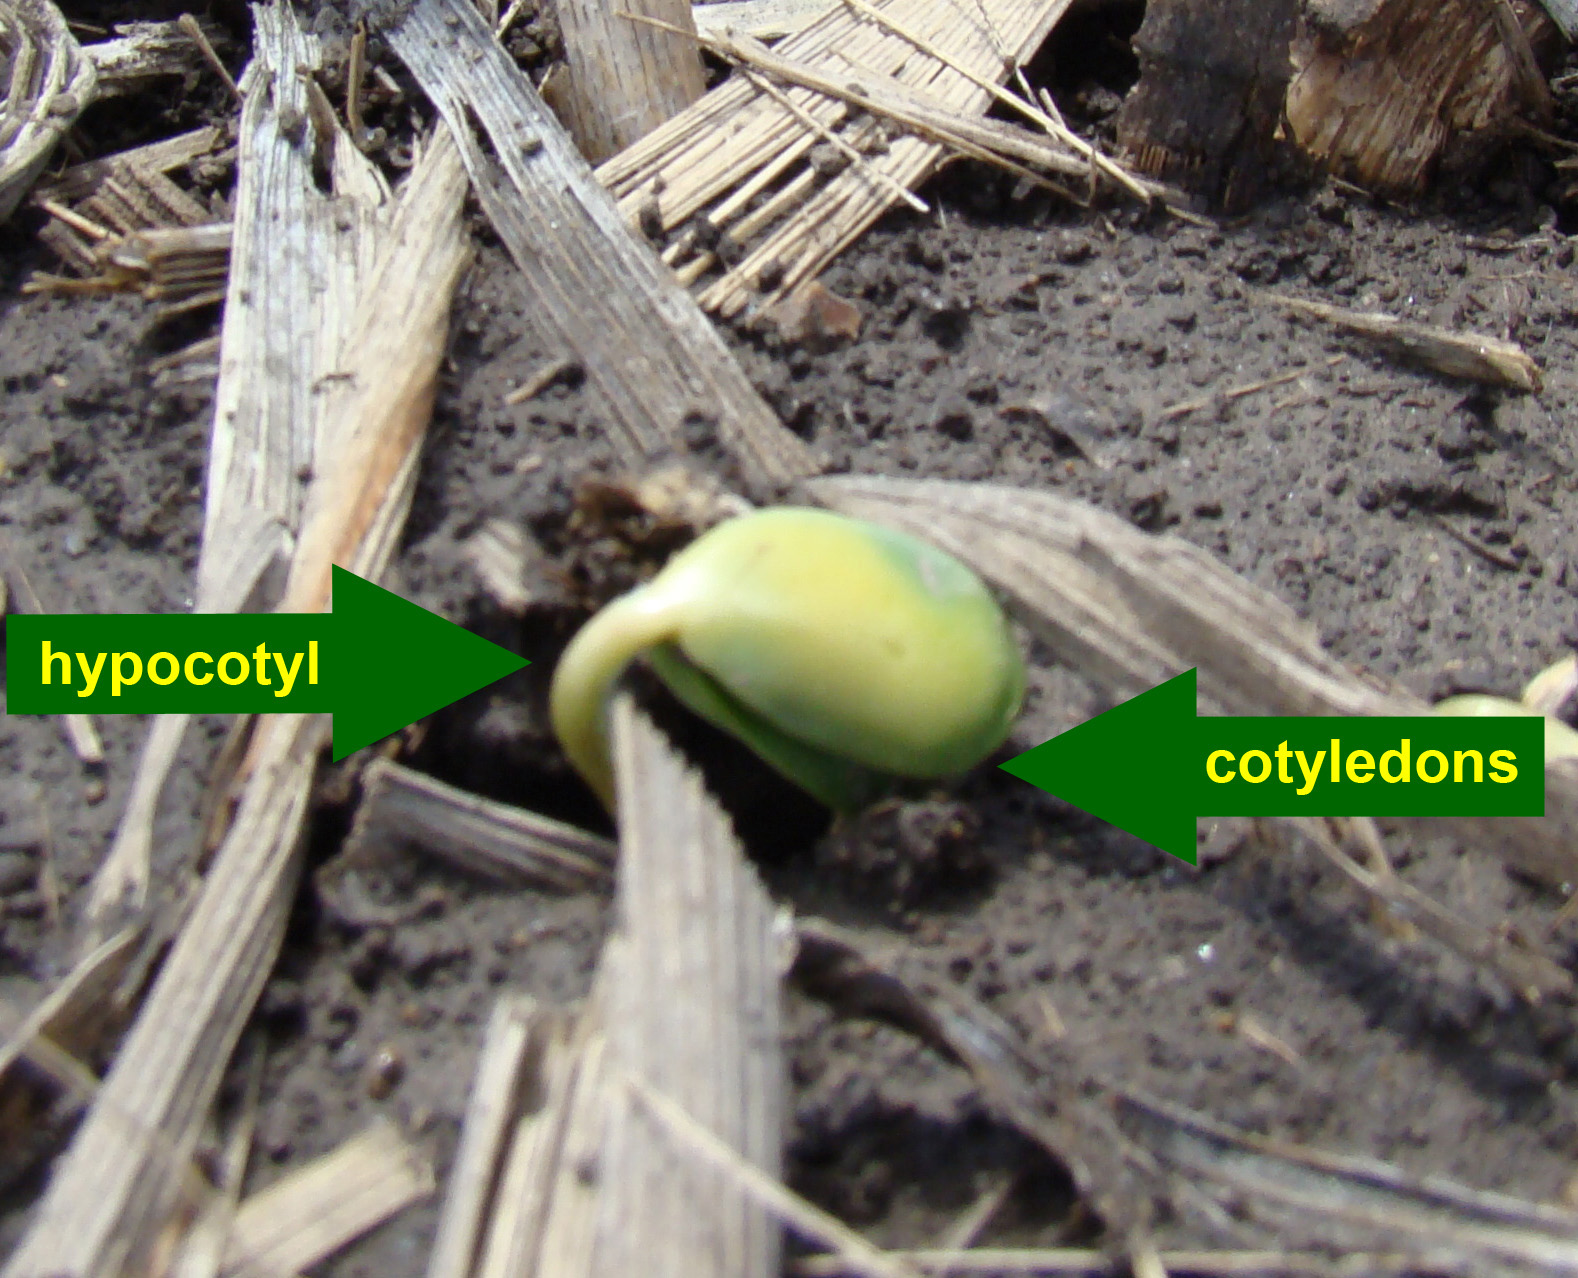
Figure 1. Emerging soybean seedling (shepherd's crook): hypocotyl and cotyledons
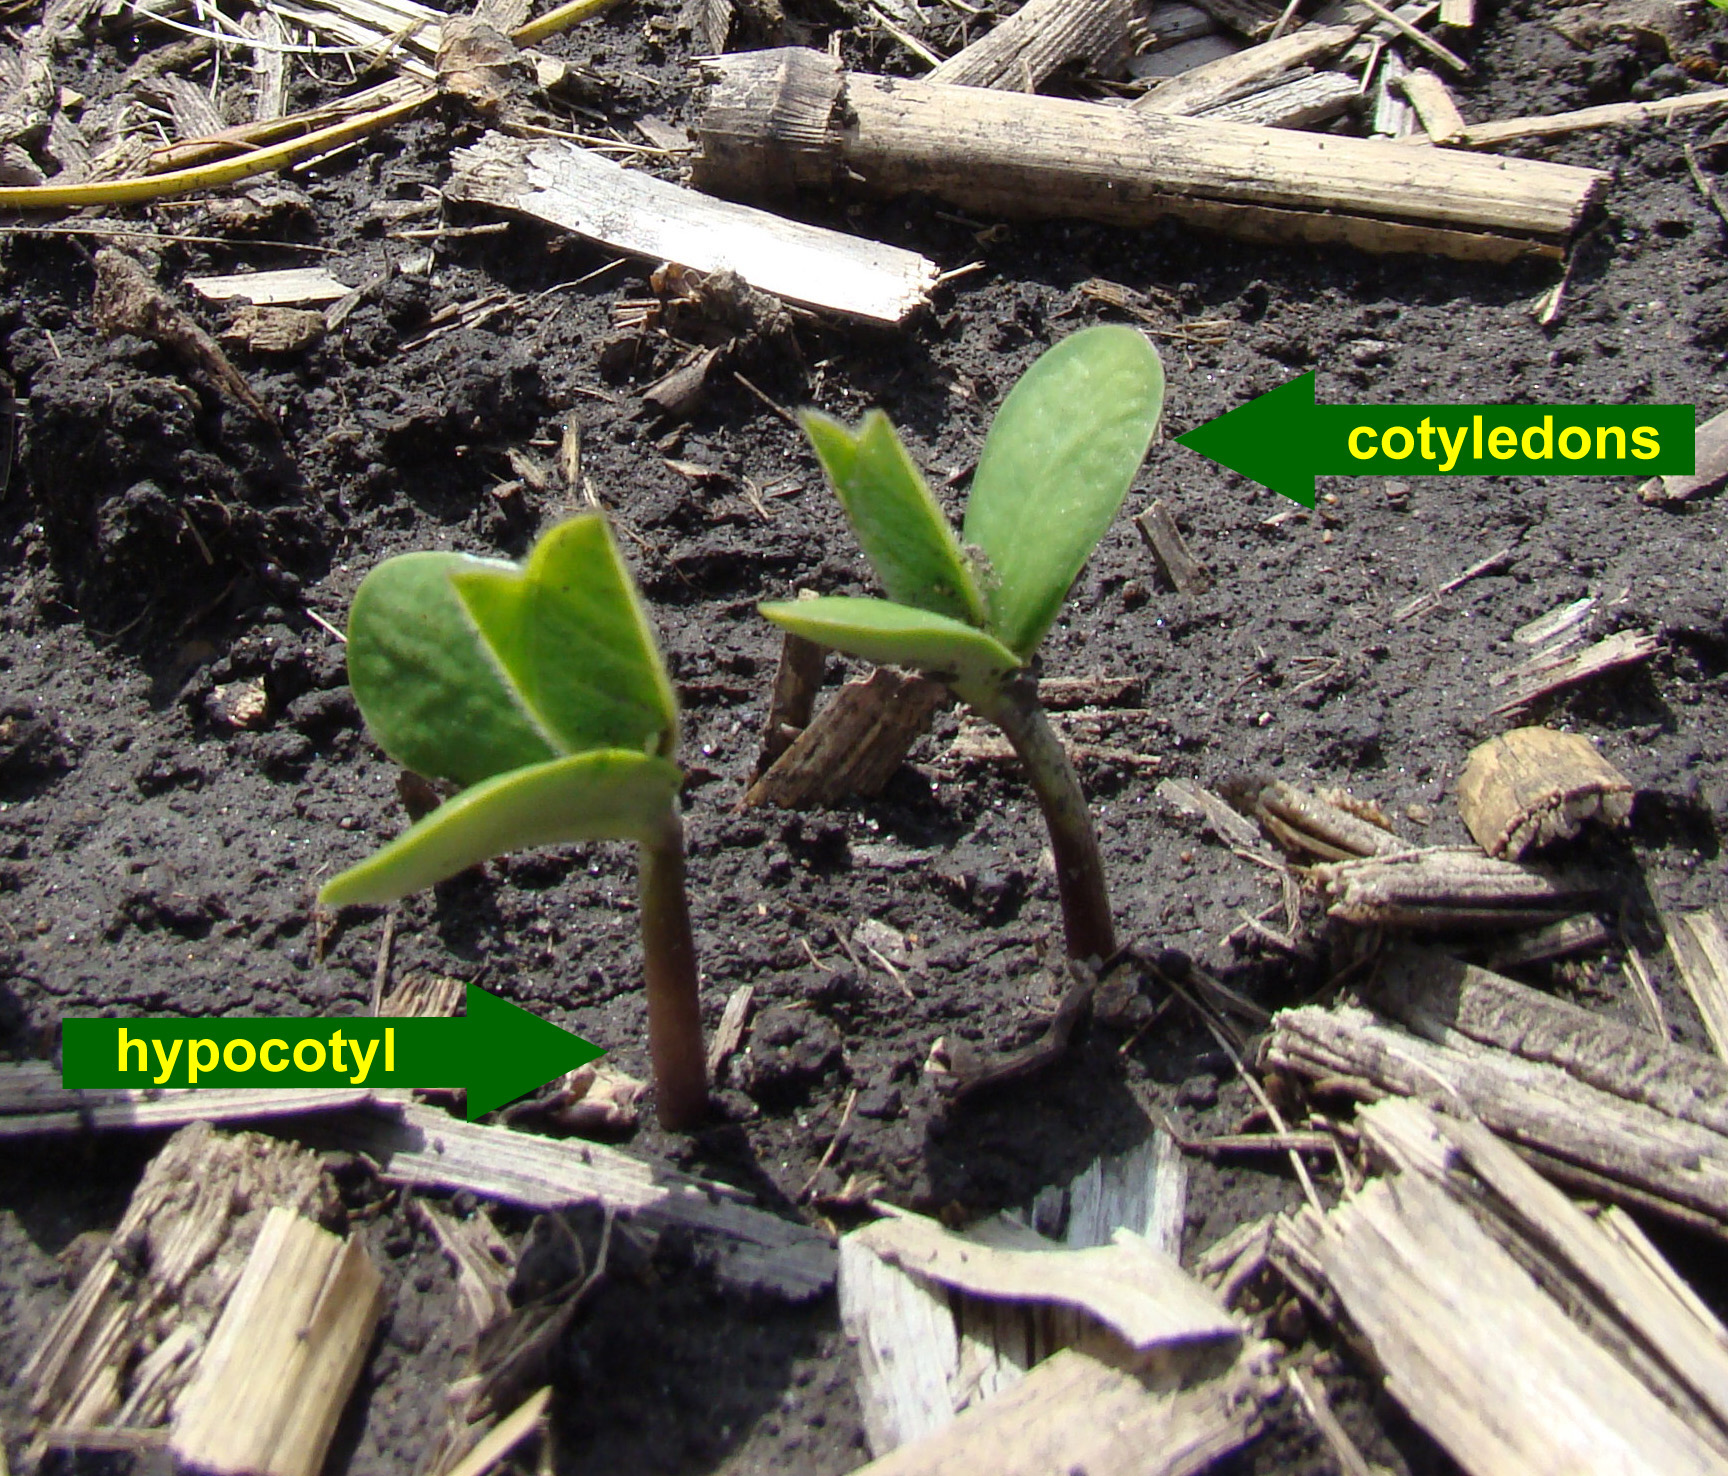
Figure 2. Emerged soybean seedling that has straightened
What soybean part is injured due to the cold temperatures – the hypocotyl, the cotyledons, or the unifoliate leaves?
The soybean plant will die or is already dead if the hypocotyl is discolored or water-soaked (Plant B in Picture 3). The cotyledons and unifoliate leaves may still be green, but they will soon die or the plant will be “clipped off” as the hypocotyl deteriorates. However, the plant will likely survive if the hypocotyl and the cotyledons remain green even with dead unifoliate leaves (Plant A in Picture 3). The axillary buds will develop at the cotyledonary node since the apical bud, the growing point, is dead. Thus, the plant may develop split stems from this node (Picture 4). Each stem will grow and develop “normal” producing leaves, flowers, pods and beans, but the plant may be more prone to lodging later in the season.
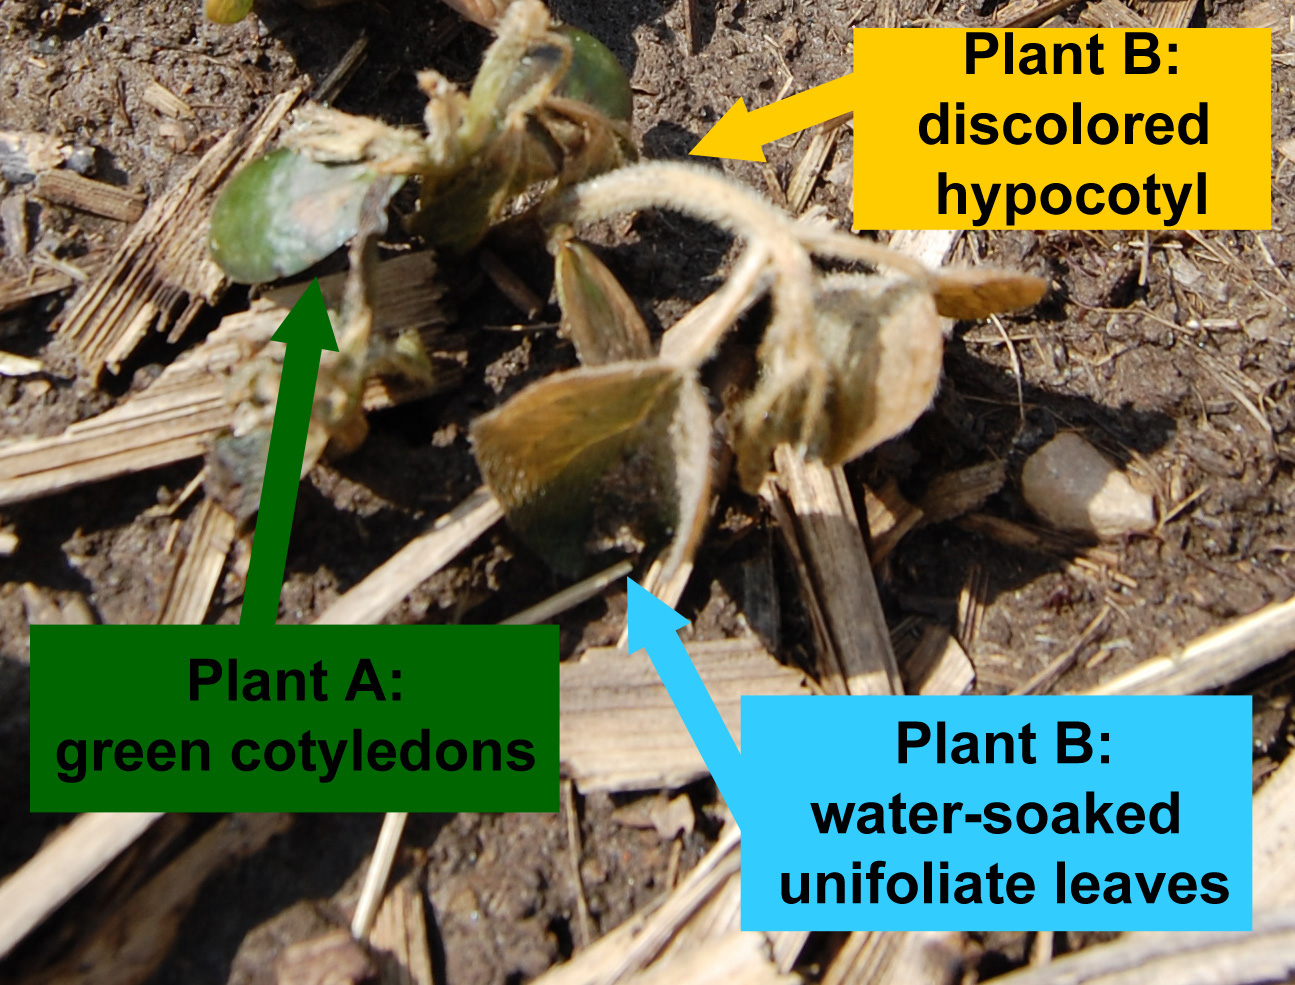
Figure 3. Plant A has a green hypocotyl and cotyledons and will likely survive. Plant B has a discolored hypocotyl and water-soaked cotyledons and unifoliates, and it is dead. (Photo Credit: Phil Walker, Planted April 7, 2010 near Columbia City, Indiana)

Figure 4. Split-stem growth aftger freeze damage to unifoliate leaves
Will I need to replant due to cold injury?
Soybeans have a tremendous ability to compensate for various plant to plant spacings (row widths and plant populations). In a recent article, we discussed the appropriate seeding rates to attain the target plant stand at harvest and ultimately, the appropriate plant stand to maximize yield and profitability. That target at harvest is approximately 100 to 120 thousand plants per acre. Plant stands as low as 40,000 plants per acre will have a yield reduction of 13% provided the weeds were controlled.
A field assessment of the plant stand is necessary to make the decision to replant. Cold injury can be spotty varying based on low lying areas, hills or knolls in the field, a wet hole, etc. Plant stands should be taken across the field with special attention to the areas that differ in stand. Secondly, plant stand counts should not include those dying/dead plants that we previously discussed. The goal is to assess the surviving plant stand, its yield potential, and the subsequent management decisions to maximize the productivity and profitability of the reduced stand vs. replanting.
![]()