
Pest & Crop Newsletter, Entomology Extension, Purdue University
- Forgot Insecticide for Planted Bt Refuge Acres? Options are Limited
- Alfalfa Weevil Control Products
- Black Cutworm Moth Captures Up Slightly
- Black Cutworm Adult Pheromone Trap Report
- Black Light Trap Catch Report
Forgot Insecticide for Planted Bt Refuge Acres? Options are Limited - (Christian Krupke and John Obermeyer)
- Lorsban 4E is the only liquid soil insecticide to use after planting to protect corn from rootworm.
- Apply shortly before or at the beginning of rootworm egg hatch for best efficacy.
- Direct the spray at the base of the plants.
It’s been reported that during the recent hectic planting pace, that producers inadvertently omitted some intended inputs, one being insecticide to protect refuge acres within Bt-RW cornfields. Obviously the low rates of the seed-applied insecticides (pre-applied to virtually all hybrid corn seed to protect against some seedling pests), does NOT control rootworms. So what are the options?
Should the refuge remain untreated at planting time and rootworm damage is anticipated (most of Indiana), a rescue treatment is still a possibility. Liquid insecticide (i.e., Lorsban 4E) can be applied at post-emergence or cultivation-time. Obviously having the refuge area well marked will help in treating only the unprotected corn. Shortly before rootworm egg-hatch, about the third week of May, drop nozzles should be directed toward the base of the corn plants with the labeled rate of Lorsban 4E. Following-up with cultivation will incorporate the insecticide and promote the establishment of brace roots. Weather is often a limiting factor in getting post-emergence insecticides applied in a timely manner. All other liquid insecticide that are labeled for use at planting to control rootworm are NOT legal to apply post-planting/emergence. There is also the risk that off-label applications may injure the crop.

"Is the refuge corn protected from rootworm?
![]()
Alfalfa Weevil Control Products - (Christian Krupke and John Obermeyer)
- Alfalfa weevil damage has intensified, scout now in southern Indiana.
- Recommended insecticides appear below.
- The dingy, variegated, and claybacked cutworm species all overwinter as partially grown larvae.
- The dingy and variegated cutworms are mainly leaf feeders, whereas the claybacked will also cut plants.
- Seed treatments aren’t highly effective against these other species, because of their large size when feeding.
Producers can manage this pest most effectively by utilizing heat unit accumulations data (base 48°F) to determine when sampling should begin and when an action should be taken. See last week’s Pest&Crop for management guidelines using the following heat unit map to track weevil development in your area. Below are recommended insecticides for alfalfa weevil control.
| Insecticide | Formulation and Amount Per Acre | Harvest Or Pasture Restriction |
|---|---|---|
| chlorpyrifos (Lorsban)1,2 |
1 pt 4E 2 pt 4E |
14 days 21 days |
| chlorpyrifos & gamma-cyhalothrin (Cobalt)1,2 | 19 – 26 fl. oz. EC 27 – 38 fl. oz. EC |
14 days 21 days |
| cyfluthrin (Baythroid XL)1,2 |
1.6 - 2.8 fl oz. EC | 7 days |
| gamma-cyhalothrin (Proaxis)1,2 (Declare)1,2 |
2.6 - 3.8 fl oz. EC 1.0 - 1.5 fl. oz. EC |
1 day-forage 7 days-hay |
| lambda-cyhalothrin (Warrior )1,2 |
2.6 - 3.8 fl oz. CS | 1 day-forage 7 days-hay |
| permethrin (Ambush)1,2 (Pounce)1,2 |
12.8 oz. 2EC 8 oz. 3.2EC |
14 days 14 days |
| zeta-cypermethrin (Mustang Max)1,2 |
2.2 – 4.0 fl oz. EW | 3 days |
1Restricted use pesticide. |
||
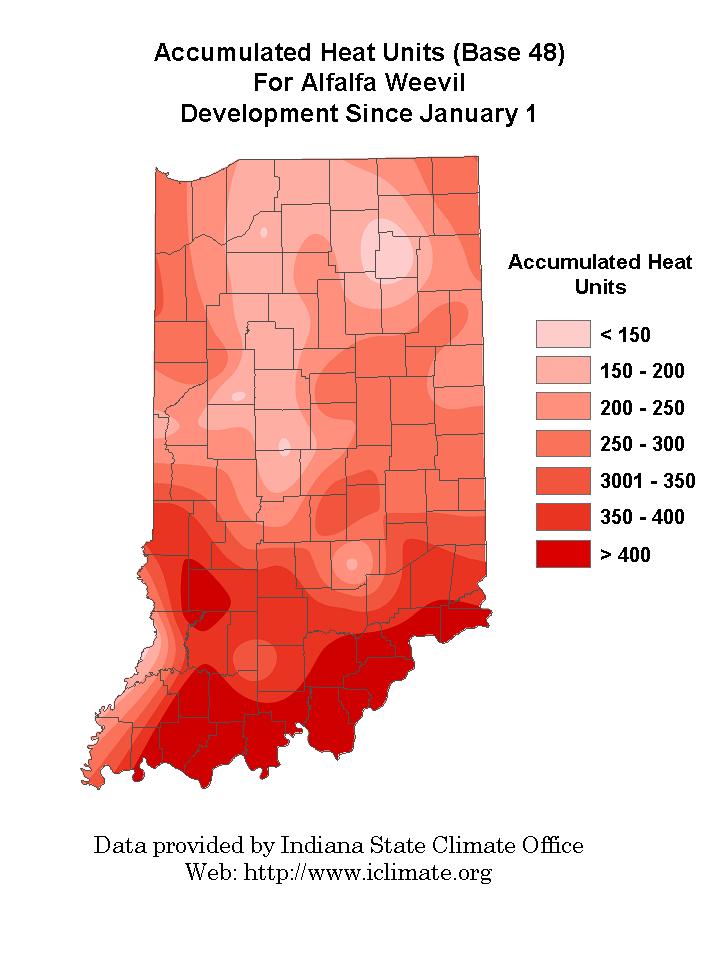
Accumulated Heat Units
![]()
Black Cutworm Moth Captures Up Slightly – (John Obermeyer)
Refer to the “Black Cutworm Adult Pheromone Trap Report” to see that captures have increased slightly over the previous weeks. Our first intensive capture (9 or more moths caught in a two-day period) was recorded in Sullivan County this past week, with other traps close to that threshold. We will begin to track heat unit development of black cutworm and publish that map in next week’s Pest&Crop. While guessing at this time, depending on upcoming temperatures, it appears that the corn already planted will likely escape black cutworm injury. Stay tuned!
![]()
Click here to view the Black Cutworm Adult Pheromone Trap Report
Click here to view the Black Light Trap Catch Trap Report
Wild Garlic – (Glenn Nice and Bill Johnson)
Last week I had the pleasure of being in the Southeast part of Indiana counting weeds. It is occasionally part of the job being in weed science and although it probably would not make it on the show “Dirty Jobs” it can be pretty hard on the knees. While face down I noticed that the weed we were counting the most was wild garlic (Allium vineale L.).
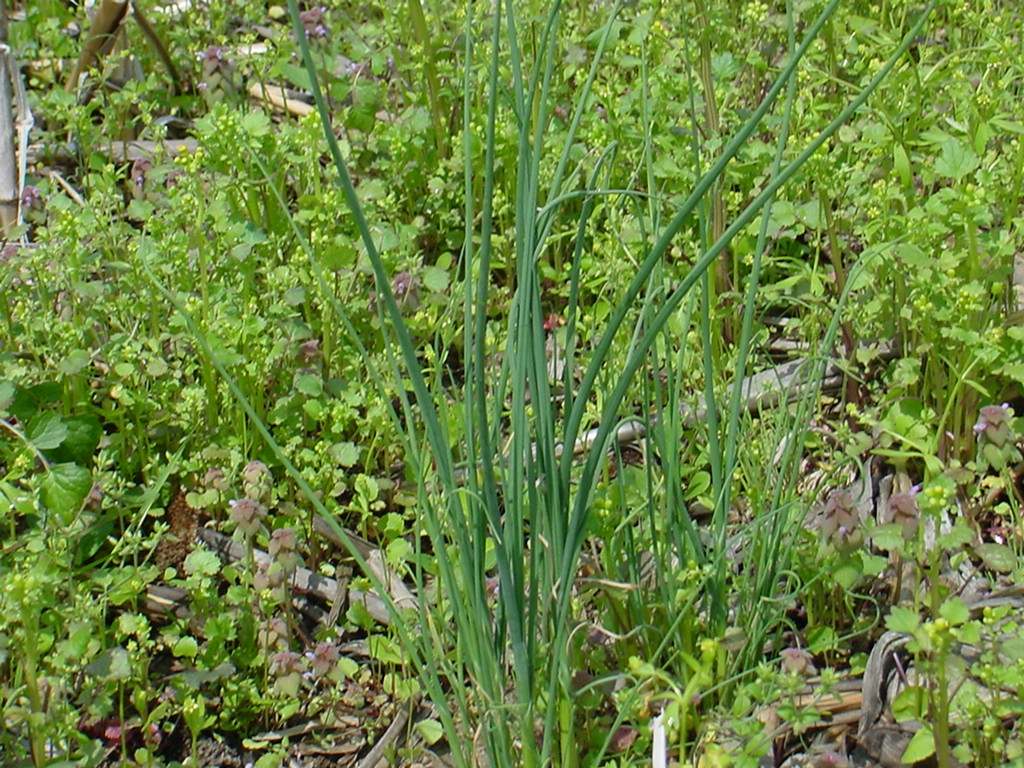
Wild garlic in a no-till field in the spring
(Photo Credit: Glenn Nice, Purdue University)
Originally introduced from Europe, wild garlic is a perennial that can be found though out the state of Indiana. It has linear leaves that are hollow and look like chives growing in the field or yard. It can be differentiated from wild onion by the fact that wild onion’s leaves are not hollow[1] and wild onion often appears to be smaller in stature. If you have a chance to dig wild garlic up you will see that its leaves come from an underground bulb. No surprise there, for wild garlic is related to onion (A. cepa L.) we buy in the grocery store. If you break wild garlic’s leaves and take a sniff, you will smell a distinct onion or garlic smell. It spreads by aerial bulbs or bulbs in the soil, seeds are reported to not be a common way of spread[1].
Wild garlic has occasionally been used as an edible and medicinal plant. Although toxicity is not commonly reported in wild garlic[2, 3, 5, 6], large doses in a short period of time may cause problems due to sulfoxides found in the plant[4], not to mention bad breath. In the article “Wild Garlic, Allium vineale L. – Little to Crow About,” the author cited a case reported by the Indiana Academy of Science of cattle poisoning in 1917[4]. I could not find a copy of the original report for any details.
Wild garlic is most troublesome in wheat where the aerial bulbs are similar in size as wheat grain. These bulbs can get processed with the grain and taint the flavor of flower. It also can be a weed in pastures, where it can also alter the flavor of milk. Wild garlic is often present when planting soybean and corn. We have also received calls regarding wild garlic control in lawns.
Control
Typically in Indiana, wild garlic will have to be controlled in the fall or early spring. The bullets develop in May or June so control of plants should be done before bulb production.
Wheat. Harmony Extra SG (0.75-0.9 oz) + surfactant can be applied when wild garlic is 12” or shorter but after 2” to 4” of new growth has occurred. Harmony Extra SG can be applied to wheat after the 2-leaf stage but before the wheat’s flag leaf is visible. Peak also has good activity on wild garlic (0.25 to 0.5 oz) and is labeled for up to 8” wild garlic control.
Soybean. Applications of Canopy EX (1.1 oz or more) + 2,4-D (0.5 lb ai)+ COC (1% v/v) in the fall provided above 90% control of wild garlic in the spring[7]. Synchrony XP + 2,4-D can be used in the spring 7 days before planting and Harmony Extra SG (0.45-0.9 oz) or Harmony GT at 0.08 oz/A can be used up to planting soybean before emergence. Apply Harmony Extra when wild garlic is less than 12” tall, but when at least 2” new growth has occurred. Classic or Synchrony XP can be used postemergence in soybean, however control is best achieved early season or in the fall. Glyphosate + 2,4-D can provide suppression to control of wild garlic in the spring burndown. Work done in southern Illinois reported 100% control with applications of glyphosate at 0.75 lb ae/a in fall and spring[8]. However, the use of glyphosate may be inconsistent and time dependent. In a study in South East Indiana, glyphosate + 2,4-D (0.75 lb ae/A + 0.5 lb ae/A) applied early (April 8) in the spring was reported to provide 88% control of wild garlic[9]. Applications 15 days later at the same rates provided only 45% control 22 days after application.
Corn. Harmony Extra SG at 0.45 to 0.9 oz/A or Harmony GT at 0.08 oz/A can be applied as a burndown treatment up to planting corn but before emergence. Apply Harmony Extra SG to wild garlic that is less than 12” but has at least 2 to 4 inches of growth in the early spring. Glyphosate (0.75 lb ae) + simazine (l lb ai) in the fall followed by glyphosate in the spring provided 100% control in a study conducted in Southern Illinois[8]. However, most of the activity most likely came from glyphosate in the treatment. See above for more information regarding glyphosate’s activity.
Pasture. Products containing the herbicide active ingredient metsulfuron-methyl have excellent activity on wild garlic. Such products include Cimarron Max (0.25 oz Part A + 1 pt Part B), Cimarron Plus (0.125 to 0.25 oz), or Valuron (0.1 to 0.2 oz). Glyphosate products that are labeled for dormant applications or in renovation can provide good control of wild garlic.
References
1. R.H. Uva, J.C. Neal and J.M. DiTomaso. 1997. Weeds of the Northeast. Cornell University Press, Ithica and London. p. 30.
2. Annonymous. Accessed April 14, 2010. Plants Poisonous to Livestock. Cornell University <http://www.ansci.cornell.edu/plants/index.html>
3. J. Cardina, C. Herms, T. Koch and T. Webster. Accessed April 14, 2010. Ohio Perennial and Biennial Weed Guide; Wild Garlic. <http://www.oardc.ohio- state.edu/weedguide/singlerecord.asp?id=190>
4. M.S. Defelice. 2003. Wild garlic, Allium vineale L. – little to crow about. Weed Technology Vol. 17:890-895.
5. H.A. Stephens. 1980. Poisonous Plants of The Central United States. The Regents Press of Kansas, Lawrence. p. 138.
6. R.J. Goetz, T.N. Jordan, J. W. McCain and N.Y. Su. Accessed April 14, 2010. Indiana plants poisonous to livestock and pets. <http://www.vet.purdue.edu/toxic/cover1.htm>
7. B. Johnson. 2009. Annual Research Report. 128:08F-SEP-NTS-04 <http://www.btny.purdue.edu/weedscience/resreport/BJ2005/128-09-04.pdf>
8. R.F. Krausz and Young B.G. 2005. Winter annual weed control in glyphosate-resistant corn. NCWSS Research Report Vol. 62:178.
9. B. Johnson. 2009. Kixor efficacy on chickweed and henbit. 132:09S-SEP-NTS-50. <http://www.btny.purdue.edu/weedscience/resreport/BJ2005/132-09-50-1.pdf>
Will Fusarium Head Blight (Scab) Be a Problem in Indiana Wheat? – (Kiersten Wise)
- Monitor the wheat scab risk map duing head emer-
gence and flowering: <http://www.wheatscab.psu.edu/>
Wheat growth stages across Indiana range from head emergence (Feekes 10.5) in far southern Indiana to early flag leaf emergence (Feekes 8) or earlier in northern Indiana. As wheat approaches flowering (Feekes 10.5.1, Figure 1), it is important to consider the risk for Fusarium head blight, or scab, development.
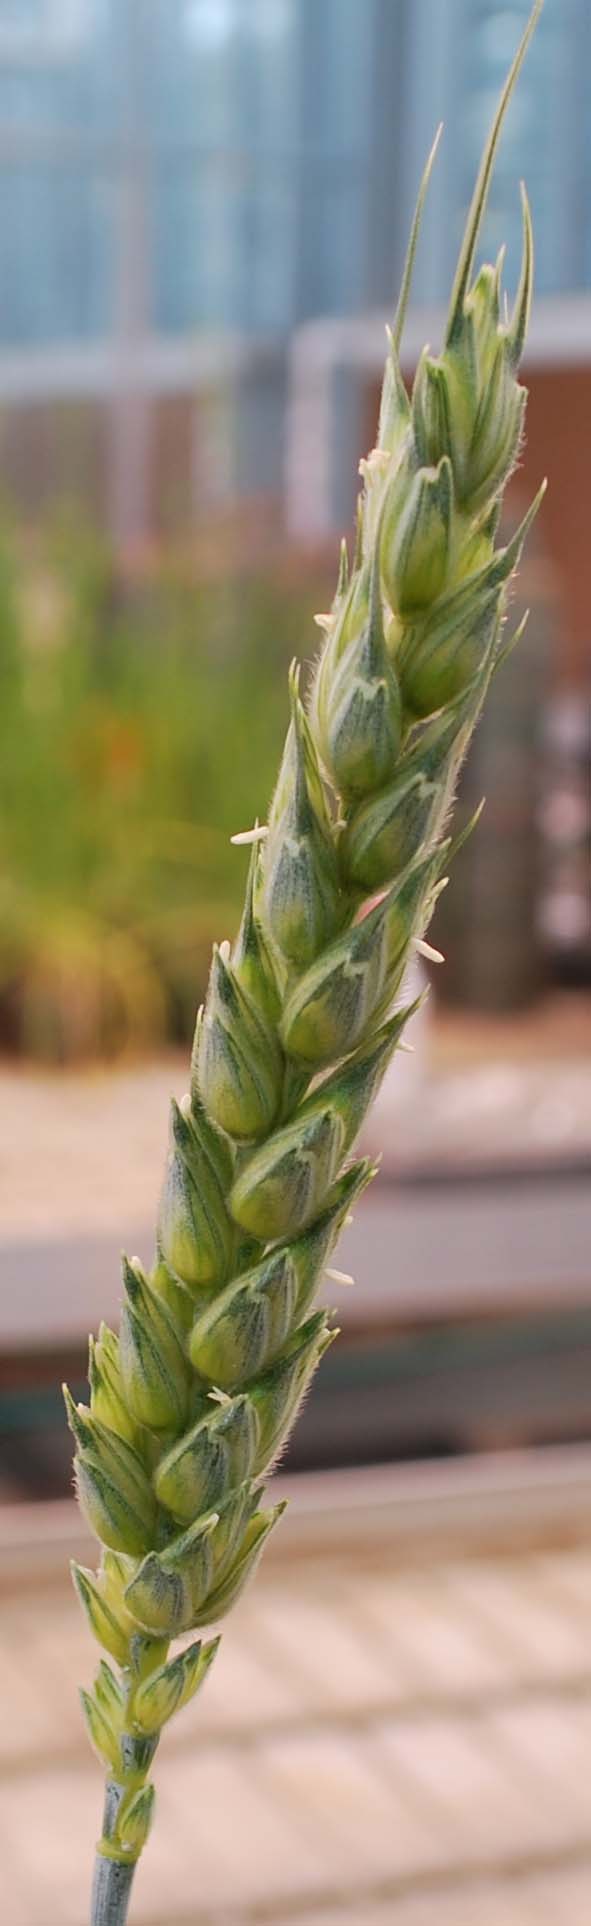
Figure 1. Feekes 10.5.1, or beginning flowering of the wheat plant
The fungus that causes head scab, Fusarium graminearium, infects wheat during flowering, beginning at Feekes 10.5.1. Symptoms include bleached spikelets on the head (Figure 2), and small or shriveled grain kernels, commonly called “tombstones”. The fungus also produces mycotoxins, such as deoxynivalenol, or DON, which can accumulate in the infected grain.
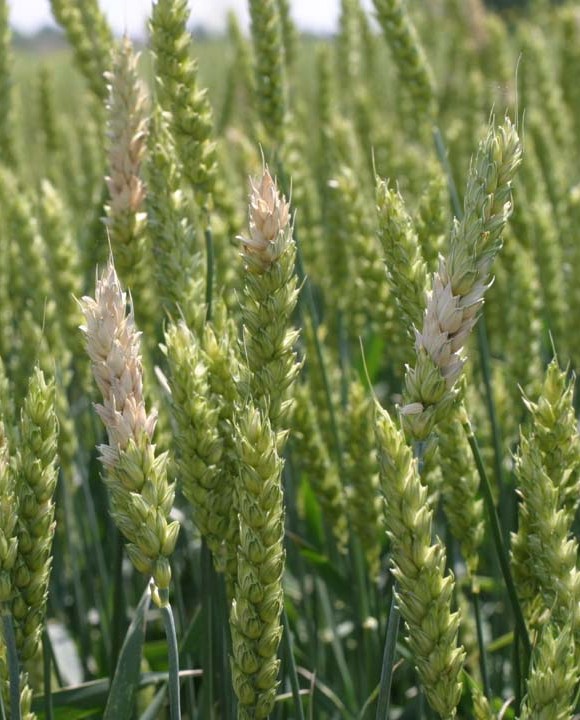
Figure 2. The bleached spikelets present on a portion of the wheat head is diagnostic of Fusarium head blight
Rainy, warm, and humid weather conditions favor disease development. The cool temperatures and dry conditions over the last few weeks have not been extremely favorable for spore development, but the recent rains may have triggered spore production. We will need to have more rainy weather and warmer temperatures to see an increase in spore production. Spore production and dispersal will also need to coincide with flowering for infection to occur. So how do we predict whether or not Fusarium head blight will impact Indiana wheat in 2010?
There is a risk assessment tool available for growers to use to assess the risk of Fusarium head blight infection in Indiana. This model can be accessed through the following link: <http://www.wheatscab.psu.edu/>.
At this site there are several links that explain how the model was developed, and links providing additional information about Fusarium head blight on wheat. To access the model, click on the link marked “Risk Map Tool.” The first screen will explain how to use the model. This model requires that you know the approximate flowering date of your wheat variety, and after reading the initial screen, click on calendar to input the date that your variety is expected to flower. Next, click on the state map of Indiana. Commentary on Indiana wheat development and disease risk will be displayed on this screen, as well as Indiana weather stations. Clicking on a weather station within the state will generate a prediction for the risk of Fusarium head blight development in that area (Figure 3).
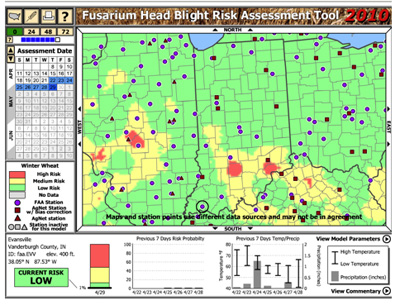
Figure 3. Indiana commentary and risk of Fusarium head blight development on the wheat scab risk model:
This model uses weather information including temperature, rainfall, and relative humidity to calculate risk levels for Fusarium head blight. Although it is a good tool for predicting risk, it has an estimated accuracy level of 80%. Keep in mind that the model does not provide a guaranteed prediction for whether or not scab will occur in individual fields, and additional factors such as the local weather forecast, crop conditions, and Extension commentary should be considered when assessing the level of risk.
Crop rotation and selection of partially resistant varieties can help reduce the impact of Fusarium head blight development, but timely fungicide applications may be needed to supress the disease in-season. There are several fungicides available for Fusarium head blight control, and these are listed in the foliar fungicide efficacy table developed by the North Central Regional Committee on Management of Small Grain Diseases or NCERA-184 committee: <http:// www.ppdl.purdue.edu/ppdl/wise/NCERA_184_Wheat_fungicide_chart_2010_v2.pdf>. Applications of fungicide prior to head emergence, such as those applied at jointing or flag leaf emergence may not reduce FHB infection. Be sure to follow label restrictions on how many days must pass between fungicide application and harvest.
Root Development in Young Corn – (Bob Nielsen)
Successful emergence (fast & uniform) does not guarantee successful stand establishment in corn. The next crucial phase is the establishment of a vigorous nodal root system. Success is largely dependent on the initial development of nodal roots from roughly V2 (2 leaves with visible collars) to V6.
Corn is a grass and has a fibrous type root system, as compared to soybeans or alfalfa that have tap root systems. Stunting or restriction of the nodal root system during their initial development (e.g., from dry soil, wet soil, cold soil, insect damage, herbicide damage, sidewall compaction, tillage compaction) can easily stunt the entire plant’s development. In fact, when you are attempting to diagnose the cause of stunted corn early in the season, the first place to begin searching for the culprit is below ground.
To better understand rooting development and problems associated with root restrictions, it is important to recognize that root development in corn occurs in two phases. The first phase is the development of the seminal or seed root system. The second phase is the development of the nodal or crown root system.
Corny Trivia: Sometimes you may hear the seminal root system referred to as the primary root system and the nodal root system as the secondary root system. This classification was described by Cannon (1949) and certainly makes chronological sense but always confuses me from the standpoint of importance to the plant.
The Seminal (Seed) Root System
Seminal (seed) roots originate from the scutellar node located within the seed embryo and are composed of the radicle and lateral seminal roots. Even though the seminal roots technically are nodal roots, in practice they are usually distinguished from the nodal roots that develop later from the crown area of the seedling.
The radicle root emerges first and elongates towards the tip end of a kernel. The lateral seminal roots emerge later from behind the coleoptile and elongate towards the dent end of a kernel.
The seminal root system helps sustain seedling development by virtue of water uptake from the soil, but a young corn seedling depends primarily on the energy reserves of the kernel’s starchy endosperm for nourishment until the nodal root system develops later. Once a seedling has emerged (growth stage VE), the rate of new growth of the seminal root systems slows down dramatically as the nodal root system begins to develop from nodes above the mesocotyl.

Radicle root and coleoptile of pre-VE seedling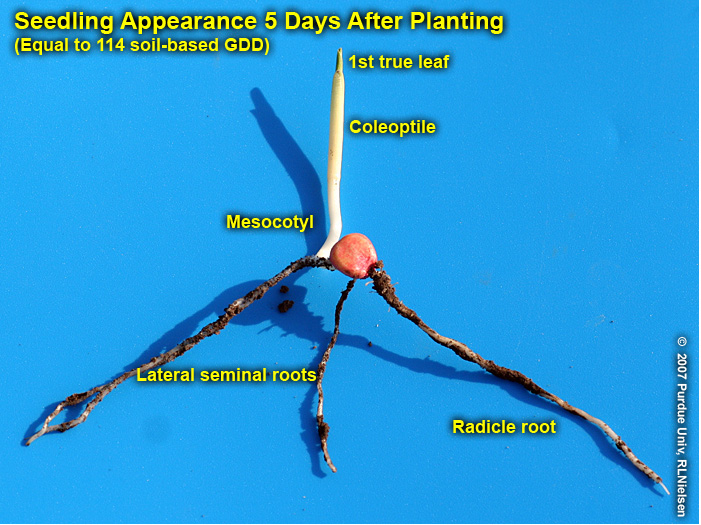
Seminal root system of VE seedling, but not evidence yet of nodal root system
Even though the seminal root system contributes little to the season-long maintenance of the corn plant, early damage to the radicle or lateral seminal roots can stunt initial seedling development and delay emergence. Such damage will not necessarily cause immediate death of the seedling as long as the kernel itself and mesocotyl remain healthy, but may result in the seedling leafing out underground. As more and more nodal roots become established over time, damage to the seminal root system will have less and less impact on seedling survival.
Examples of seminal root damage include imbibitional chilling injury, post-germination injury from lethal or sub-lethal cold temperatures, and “salt” injury from excessive rates of starter fertilizer placed too close to the kernel. Symptoms of such root damage include retarded root elongation, brown tissue discoloration, prolific root branching, and outright death of root tissue. If the radicle root is damaged severely during its emergence from the kernel, the entire radicle root may die. Once the radicle has elongated a half-inch or so, damage to the root tip will not necessarily kill the entire root, but rather axillary root meristems may initiate extensive root branching in response to damage to the apical meristem.
The Nodal Root System
Nodal roots develop sequentially from individual nodes above the mesocotyl, beginning with the lowermost node in the area of the young seedling known as the “crown”. Once a seedling has reached the V1 stage of development, one can usually identify the first set of nodal roots beginning to elongate from the lowermost node. By the V2 stage of development, the first set of nodal roots are clearly visible and the second set of nodal roots may be starting to elongate from the second node of the seedling. Each set or “whorl” of nodal roots begins to elongate from their respective nodes at about the same timing that each leaf collar emerges from the true whorl of the seedling.
Elongation of the stalk tissue begins between leaf stages V4 and V5. Elongation of the internode above the fifth node usually elevates the sixth node above ground. Subsequent elongation of higher-numbered stalk internodes will result in higher and higher placement of the remaining stalk nodes. Sets of nodal roots that form at above ground stalk nodes are commonly referred to as “brace” roots, but function identically to those nodal roots that form below ground. If surface soil conditions are favorable (moist and not excessively hot), brace roots will successfully penetrate the soil, proliferate, and effectively scavenge the upper soil layers for water and nutrients.
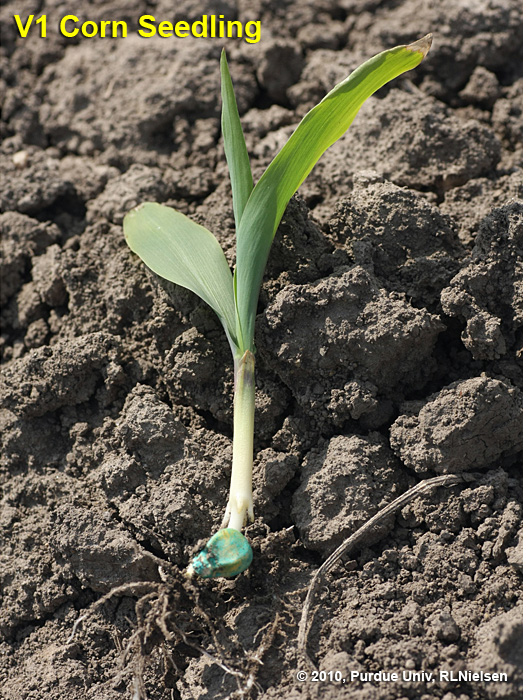
V1 corn seedling
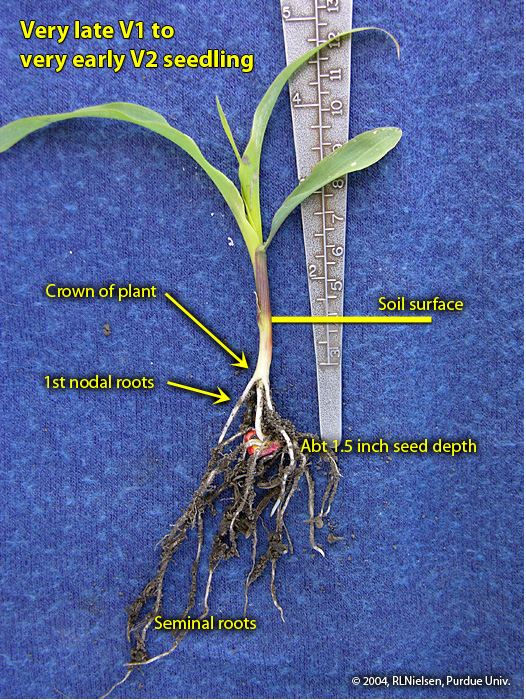
Seminal and nodal roots of V2 seedling

Root hairs on a V2 corn seedling
Corny Trivia: Root hairs are lateral extensions of root epidermal cells, grow to a length of several millimeters, and number about 200 per sq. millimeter (Gardner et al., 1985). Their typical life span is only about 2 days at moderate temperatures and less so at higher temperatures (Gardner et al., 1985). Root hairs are visible even on the radicle root of a young seedling. Collectively, the surface area represented by root hairs is very large and can account for a large share of nutrient and moisture uptake by the plant.
Corny Trivia: The primary meristem of a root is located near the root tip. Elongation of cells behind the meristem leads to elongation of the root.
A split stalk of an older plant will reveal a “woody” triangle of stalk tissue at the bottom of the corn stalk. This triangle is typically comprised of four stalk nodes, one on top of the other, whose associated internodes do not elongate. The first internode to elongate is the one above the fourth node, which elongates about 1/4 to 1/2 inch, above which is found the fifth node (usually still below or just at the soil surface). Consequently, five sets or whorls of nodal roots will usually be detectable below ground (one set for each of the below ground stalk nodes).
Corn seedlings transition from dependence on kernel reserves to dependence on nutritional support by the nodal roots around the V3 leaf stage. Damage or stress to the first few sets of developing nodal roots during the time period V1 to V5 can severely stunt or delay a corn plant’s development. Damage to the first few sets of nodal roots forces the young seedling to continue its dependence on kernel reserves longer than is optimum. If the kernel reserves are nearly exhausted, continued seedling development is easily stunted and seedling death is not uncommon. Typical stresses that can stunt initial nodal development include fertilizer salt injury, seedling diseases, herbicide injury, insect feeding damage, excessively wet or dry soils, soil compaction (tillage or planter).
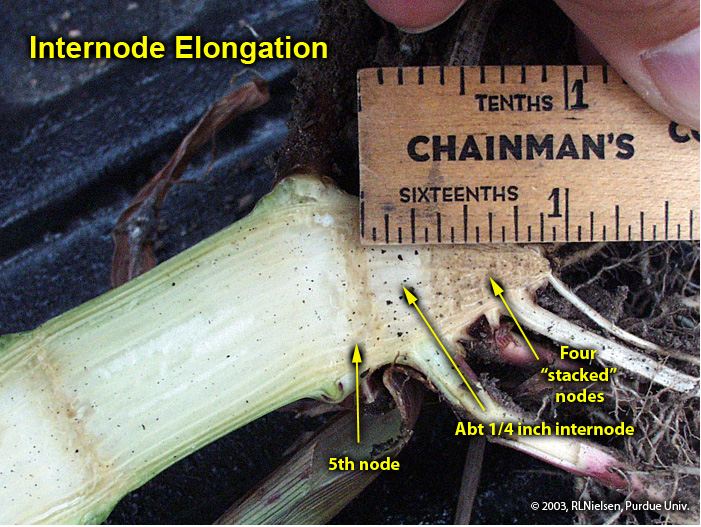
Internode elongation between fourth and fifth nodes of a corn plant
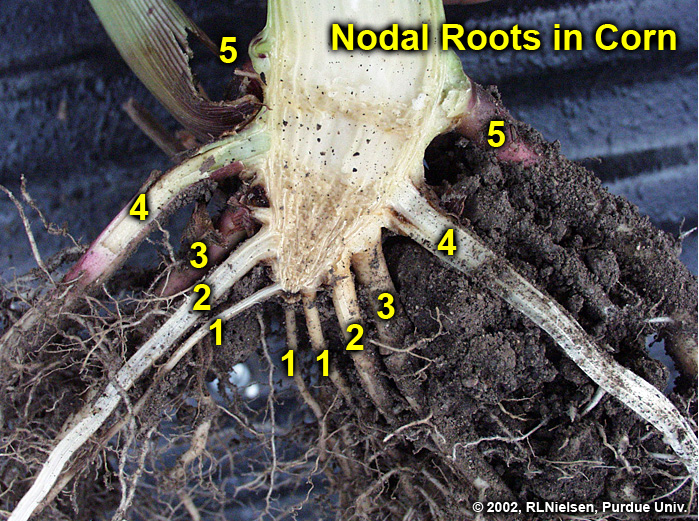
Five identifiable sets or "whorls" of nodal roots in a split stalk section
A somewhat uncommon, but dramatic, stunted root symptom is what is referred to as the “floppy corn” or “rootless corn” phenomenon. This problem occurs as a result of the detrimental effects of excessively dry surface soil near the time of initial nodal root elongation in young (V2 to V4) corn plants. Young nodal roots that emerge from the crown area of the plant will die if their root tips (and associated meristematic areas) desiccate prior to successful root establishment in moist soil. The crown of a young corn plant is typically located only 3/4 inch or so below the soil surface and so is particularly vulnerable to dry upper soil conditions.
Following is an example of a delayed emerger in a field where the “normal” emergers were already at late V1 to early V2. The radicle root was completely destroyed, though the lateral seminal roots were intact and healthy. The coleoptile on this seedling was split down the entire length of its side and would likely result in leafing out underground. The split coleoptile was likely due to the natural continued expansion of the enclosed leaves that would have otherwise emerged normally above ground.
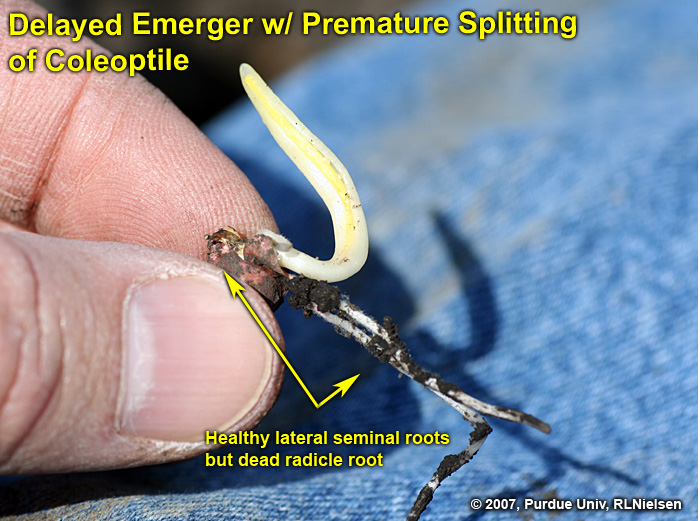
Delayed emerger with healthy lateral seminal roots but damaged radicle root
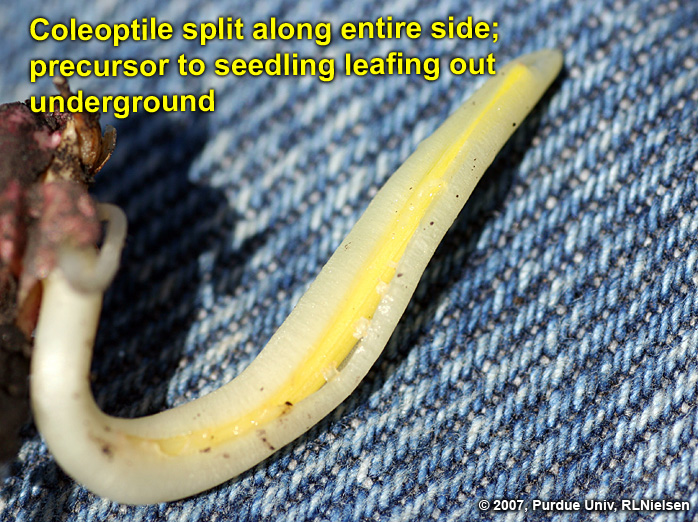
Split coleoptile; precursor to leafing out underground

Dead radicle root on a delayed emerger seedling
Following is another example of a delayed emerger in the same field where other seedlings were late V1 to early V2. The only visible damage to this delayed emerger was its radicle root whose apical meristem had been injured. The damage was less severe than the previous example and so the seedling was less severely stunted and managed to emerge above ground.
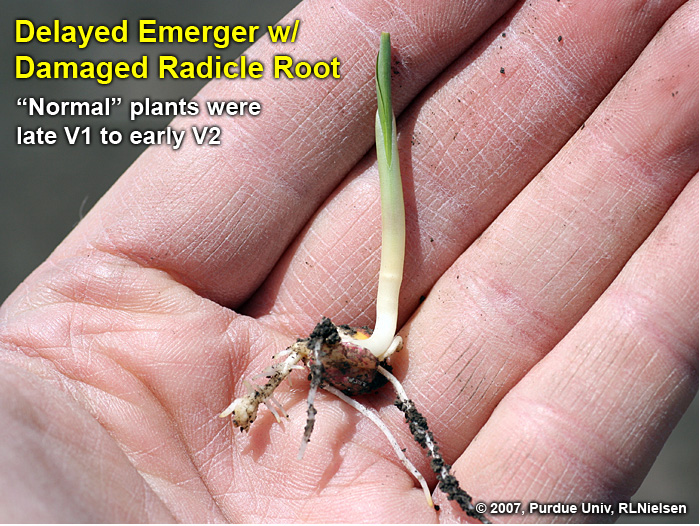
Delayed emerger with healthy lateral seminal roots and damaged, but alive radicle root
Related References
Cannon, William Austin. 1949. A Tentative Classification of Root Systems. Ecology 30[4], 542-548.
Gardner, Franklin P., R. Brent Pearce, and Roger L. Mitchell. 1985. Physiology of Crop Plants. Iowa State Univ. Press, Ames, IA.
Nielsen, RL (Bob). 2004. Over-Extended Mesocotyls and Floppy Corn Syndrome. Corny News Network, Purdue Extension. [On-line] at <http://www.kingcorn.org/news/articles.04/FloppyCorn-0624.html>. [URL accessed April 2010].
Nielsen, RL (Bob). 2010. Germination Events in Corn. Corny News Network, Purdue Extension. [On-line] at <http:/www.kingcorn.org/news/timeless/GerminationEvents.html>. [URL accessed April 2010].
Nielsen, RL (Bob). 2010. The Emergence Process in Corn. Corny News Network, Purdue Extension. [On-line] at <http://www.kingcorn.org/news/timeless/Emergence.html>. [URL accessed April 2010].
Nielsen, RL (Bob). 2010. Visual Indicators of Germination in Corn. Corny News Network, Purdue Extension. [On-line] at <http://www.kingcorn.org/news/timeless/GerminationGallery.html>. [URL accessed April 2010].
Nielsen, RL (Bob). 2010. Rootless or “Floppy” Corn Syndrome. Corny News Network, Purdue Extension. [On-line] at <http://www.kingcorn.org/news/timeless/FloppyCorn.htm>. [URL accessed April 2010].
![]()
Frosty Corn, Toasted Plants – (Bob Nielsen)
Early morning temperatures in the low to mid-30s (°F) coupled with clear calm conditions overnight certainly are favorable for frost formation on exposed surfaces, including leaves of young corn plants. The risk of a late spring frost is one of the downsides to planting corn earlier than normal, but is one growers often accept when early spring field conditions are otherwise suitable for planting.

Frost crystals on a corn leaf at sunup
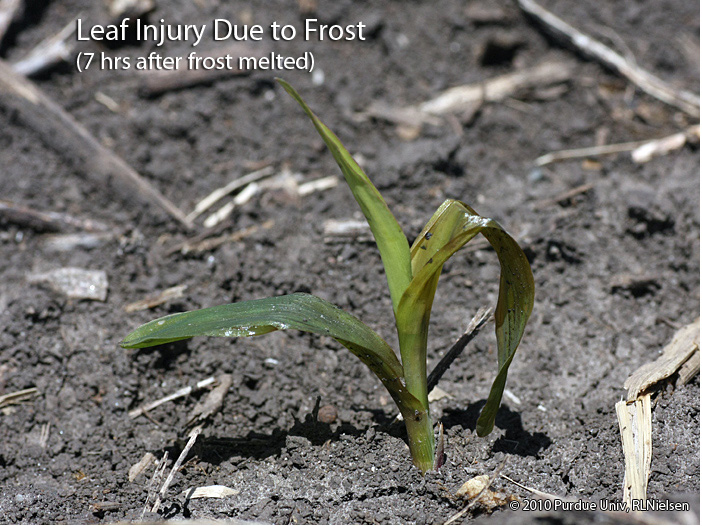
Leaf injury due to frost (7 hours after frost melted
When significant frost develops on young corn, it is tempting to jump to the conclusion that significant plant mortality will be a natural consequence. However, frost by itself is not a guaranteed “kiss of death” for young corn. What is more important is whether the temperature that accompanied the frost event was lethal or not. Most agronomists agree that “lethally cold” temperatures for young corn are those that dip to 28F or lower for some minimum length of time.
The effect of frost on young corn when it is accompanied by temperatures no lower than about 30°F is primarily damage and death of the exposed above ground leaf tissue. As long as the growing oint of the young plant (aka the apical meristem) is still protected below the soil surface, the injured plant usually recovers from the effects of the superficial leaf damage.
Within a number of days of the frost event (more quickly with warm temperatures, more slowly if cool), elongation of the undamaged leaf tissue in the whorl will become evident. As long as the recovery is vigorous, subsequent stand establishment should be not be affected.
The bottom line for diagnosing the severity of frost or low temperature injury to corn is that you generally need to wait three to five days after the weather event before you can accurately assess the extent of damage or recovery. Injury to the crop can look very serious the day after the event or even two days after the event, but recovery is likely if there is no injury to the growing points of the affected plants.
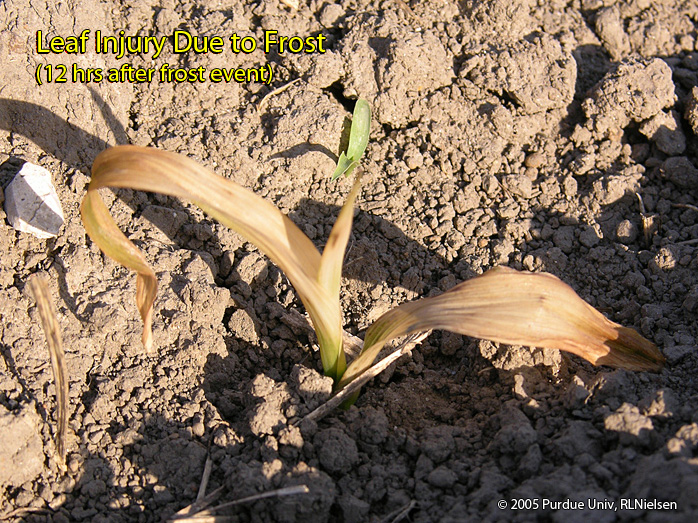
Leaf injury due to frost (12 hours after frost event)
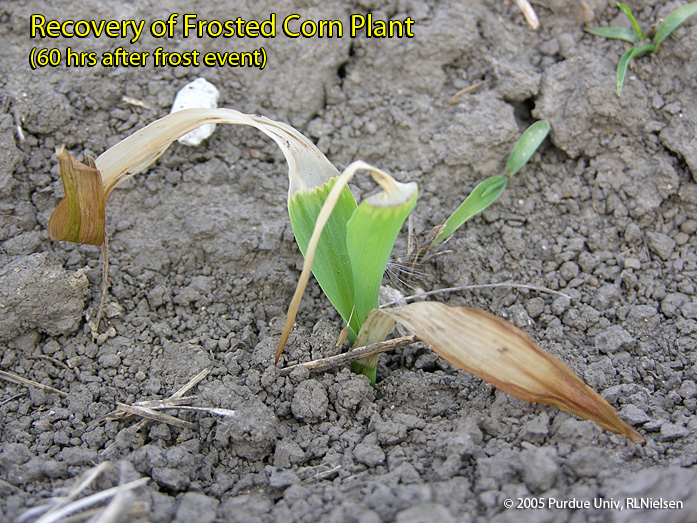
Recovery of frosted corn pant (60 hours after frost event)
Related References
Nielsen, RL (Bob). 2008. Growing Points of Interest. Corny News Network, Purdue Univ. [online] <http://www.kingcorn.org/news/timeless/GrowingPoints.html>. [URL accessed April 2010].
![]()