Pest & Crop Newsletter, Entomology Extension, Purdue University
Bean Leaf Beetle Pod Feeding - (Christian Krupke and John Obermeyer)
• Later maturing soybeans may attract bean leaf beetle.
• Pod damage may result in reduced yield and/or poor seed quality.
• Green pods are more attractive than yellow ones.
• Two approaches for management thresholds are given below.
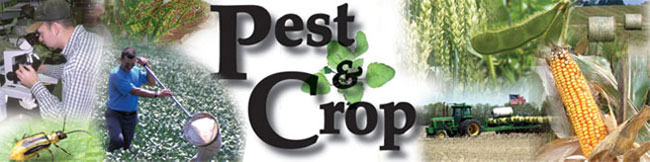
Soybeans, especially late-planted or late-maturing beans, should be monitored for bean leaf beetle feeding damage to pods. Pest managers have been noting bean leaf beetle feeding on foliage and are concerned about pods, especially with current prices. Bean leaf beetles scar the surface of pods, but only occasionally feed through the pod to the developing beans. During pod maturation, this scar may crack leaving an entry hole for plant pathogens that may cause discolored, moldy, shriveled, or diseased beans.
Bean leaf beetle and pod scarring
Pest managers would like to be able to predict whether economic damage will occur based on the numbers of beetles that are present and the stage of pod development (i.e., green, yellow, yellow-brown, or brown pods). Because the beetles are so mobile, there isn’t a correlation from leaf feeding to pod damage – one does not always lead to another. Part of the problem is that beetles may leave a senescing field for a neighboring one that is still green. The timing of harvest in relation to frosts also plays a role, although less so this year with early planting and harvest forecasts. Once the pods turn yellow to yellow-brown, they become less attractive and less susceptible to damage. Control is normally not warranted from this point on (see the following table).
Randomly select 2 plants in each of 5 areas of the field (minimum, more is better) and count the number of pods per plant and the number that show damage (10 total plants). Calculate the percentage of damaged pods per plant for the field as a whole. Note if the pods are green, beginning to turn yellow, or are yellow/brown.
At the same time, determine the number of beetles per sweep using an insect sweep net. Take 5 sets of 20 sweeps in the field. Determine the number of bean leaf beetles per sweep. Additionally, note whether beetles are still actively feeding while surveying the field.
Use the following table to determine when an insecticide treatment may be necessary. There are many compounds registered that will provide effective control of bean leaf beetle, but always remember to keep the pre-harvest interval in mind, many of these were listed in last week’s Pest&Crop. The original values of this table have been modified to reflect today’s higher commodity prices. These new, adjusted values are NOT time-tested, but certainly should be in the ballpark.

Plant with severe bean leaf beetle feeding damage
Erin Hodgson, Extension Entomologist at Iowa State University developed a dynamic calculator (Excel spreadsheet) which can be customized with commodity price and cost of treatment. It is based on beetles/sweep or row of foot. This too extrapolates from threshold data developed many years ago. You can download the calculator here: <http://www.extension.iastate.edu/CropNews/2011/0815hodgson.htm>.
| Revised: Bean Leaf Beetle Pod Feeding Threshold | |||
| Pod Injury Level | No. of Beetle Per Sweep In 30 Inch (7.5 Inch) Row Spacing | ||
| Less Than 2 (1) | 2(1) To 4 (2) | More Than 4 (2) | |
| 0 to 4% | Discontinue sampling | Sample again in 5 days | Control (preventive) if pods still green |
| 4 to 6% | Sample again in 5 days | Control if pods are still green | Control if pods are green to yellow |
| Over 6% | Control if pods are still green and beetles are present | Control unless pods are completely dry | Control unless pods are completely dry |
![]()
Corn Earworm Moth Flight Quite Impressive – (Christian Krupke and John Obermeyer)
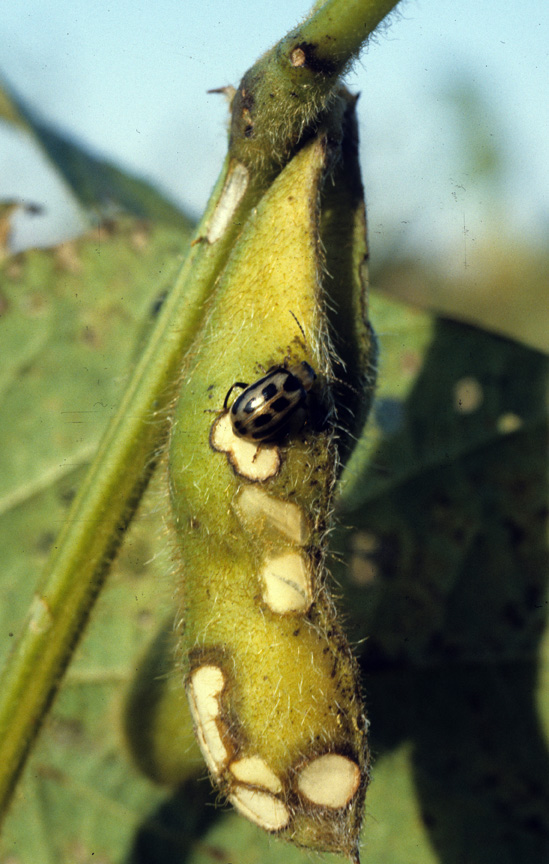
Corn earworm moth numbers have surged in black light and pheromone traps throughout the state. These moths will lay their eggs on numerous crops, with later planted field, sweet or seed corn being particularly vulnerable at this time. Tomato and pepper growers should also be aware of the potential for earworm (also called tomato fruitworm) damage, especially if these crops are surrounded by cornfields that are drying down that are no longer attractive for egg laying. We’ve had producers inquire about all the worms being found in their yellow-dent corn ear tips. Interesting, by calendar date, these damaged fields were planted around the “normal” time of year…this year they are exceptionally green (i.e., a trap crop) compared to surrounding fields.
Corn earworm moth on fresh side silks
![]()
Click here for the Blacklight Trap Catch Report
Short Husks & Exposed Ears – (Bob Nielsen) -
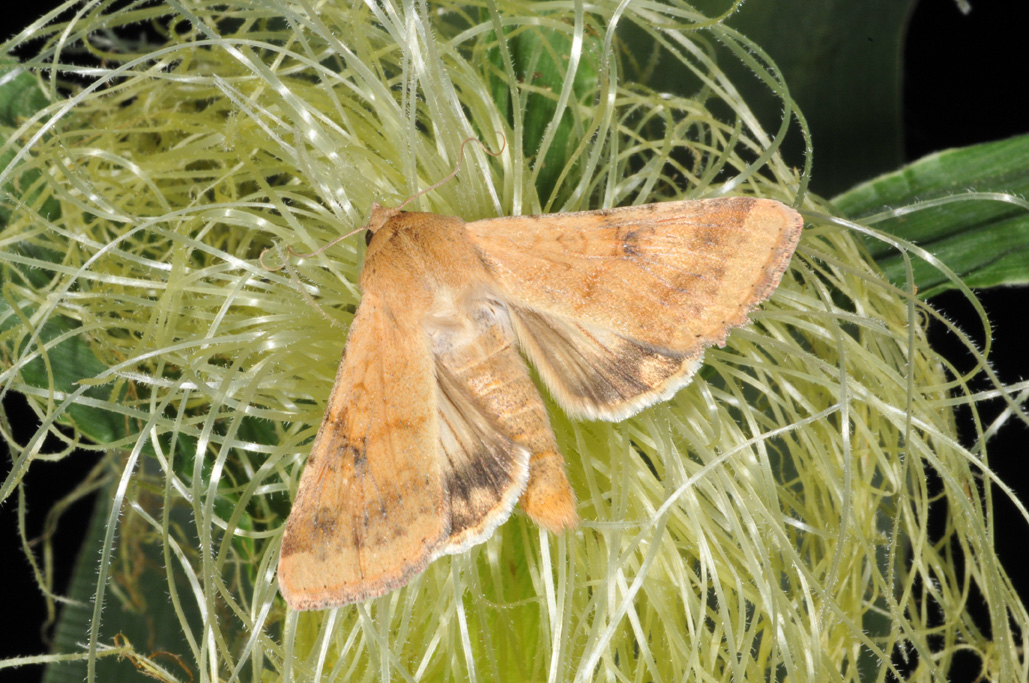
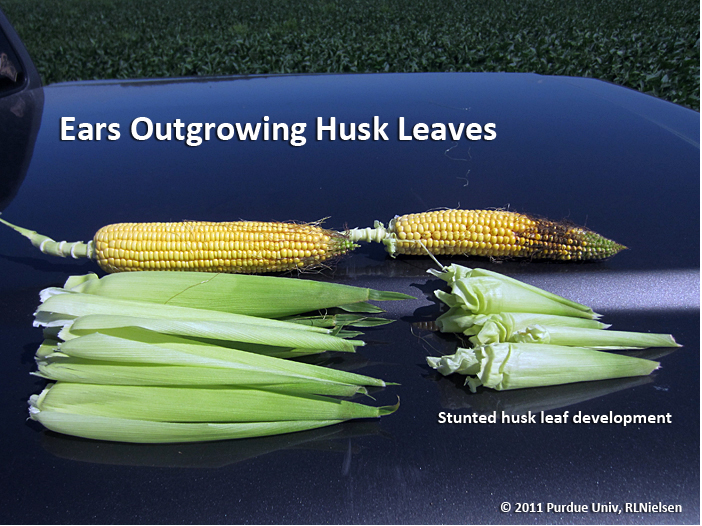
Periods of severe stress can do all sorts of strange things to crops. One oddity that has been reported by a number of folks this year is often described as “ears outgrowing their husks.” The phenomenon is the result of stunted husk leaf development combined with fairly normal ear (cob) elongation.
The primary symptom is that the ears elongate beyond the end of the stunted husk leaves, resulting in exposed kernels that are subject to insects, birds, and weathering effects. Kernels damaged by these factors are subject to fungal infection and the development of ear molds. If high percentages of ears are thus affected, then overall grain quality can be compromised to the point that grain buyers may discount or “dock” their prices accordingly.
The development of stunted husk leaves and exposed ears seems to be related to combination of severe stress before or during pollination that is then relieved in the initial weeks following pollination. The most common combination of conditions that results in this oddity is severe heat and drought stress that is then relieved by cooler temperatures and rainfall.
Ears outgrowing husk leaves
Ears outgrowing husk leaves
Ears outgrowing husk leaves
The stunting of the husk leaves is akin to that which can occur in the whole plant when subjected to lengthy periods of heat and drought stress. The potential for husk leaf expansion and elongation seems to be permanently restricted while the ear (cob) is able to continue elongation upon relief of the stress.While the combination of heat/drought stress relieved by cooler temperatures/rainfall seems to be the common thread among reports of ears outgrowing their husk leaves, other combinations of severe stress followed by sudden relief may also result in the stunting of husk leaves.
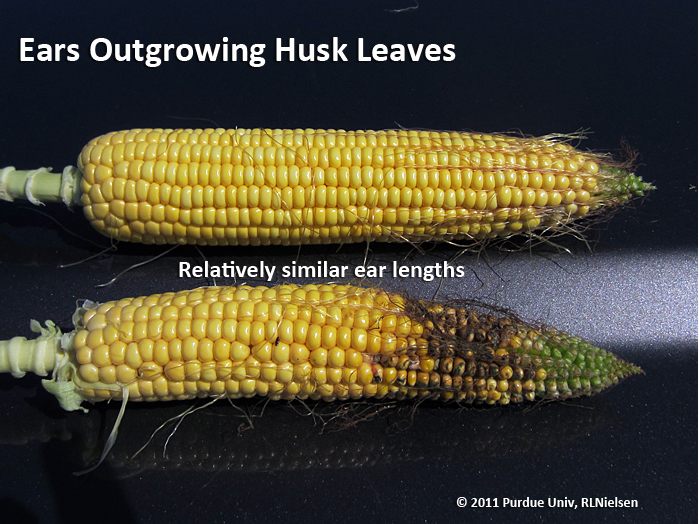
The photos illustrate an example of stunted husk leaves from an area of a field in eastern Indiana in 2011 that was particularly drought-stricken compared to other, less stressed areas of the field. This field had also experienced severe root lodging about 10 days prior to pollination, which likely added additional stress on the developing ears for a period of time. Husk leaves of affected plants were about 2/3 the length of the ear itself and about half that of the husk leaves of the “normal” ears. Ear (cob) lengths of the “normal” and “stressed” ears were relatively similar; though kernel number and size were smaller on the “stressed” ears.
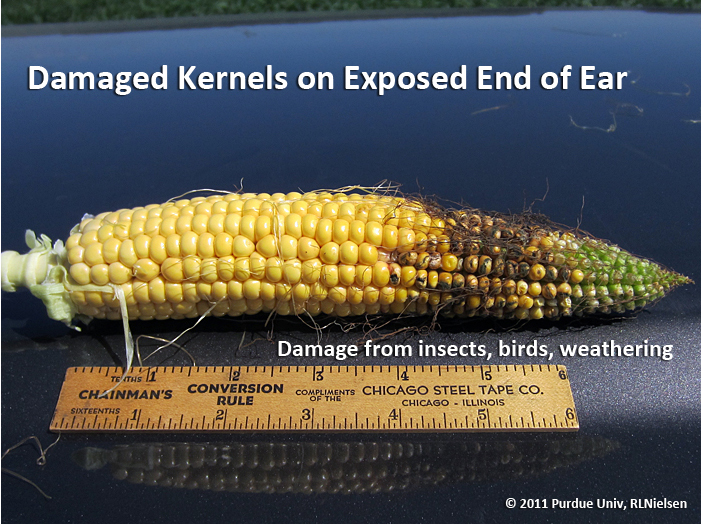
Damaged kernels on exposed end of ear
The ear below is from a field in northeast Indiana that experienced severe drought in 2012 that stunted husk leaves and cob length, but late rains were sufficient to allow the stunted ears to still elongate beyond the even more stunted husk leaves.
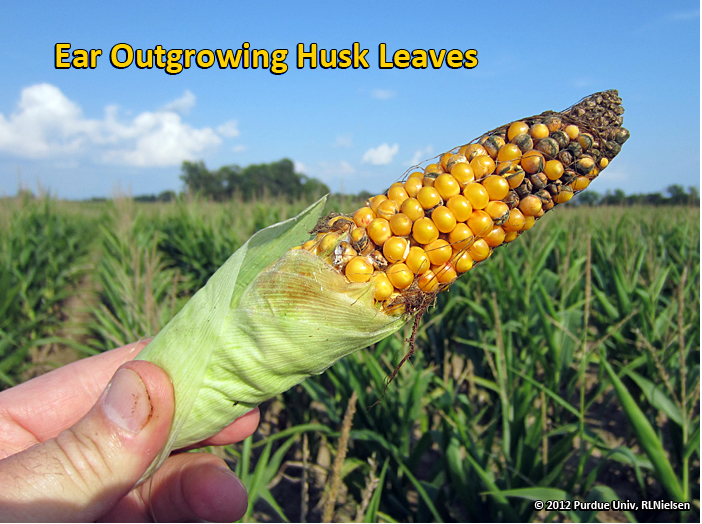
Ears outgrowing husk leaves
![]()
VIDEO: Estimating Soybean Yields - Simplified - (Shaun Casteel and John Obermeyer) -
Estimating soybean yields may be more critical this year than in the recent past. Late season rains have allowed many fields to turn a corner with pod retention, pod development, and now, seed fill. Drought-stressed fields tend to be short this season, but the yield potential could be close to normal. For instance, I estimated yield of 20 bu/ac in a field of 20 inch
tall soybeans, but 10 miles down the road 24-inch tall soybeans were heavily podded with an estimate of 40 bu/ac. This simplified approach to estimating soybean yields allows you the flexibility of scouting multiple areas quickly while observing any late season stressors such as bean leaf beetle feeding on pods. The video describes the simplified approach to estimating soybean yields and additional information can be found at: <http://www.agry.purdue.edu/ext/soybean/News/2012/2012_0814SOYSimplifiedYieldEstimates.pdf>. Please note that estimating soybean yield can begin after R5 (beginning seed, ~35 days away from R7) and the accuracy will improve as you scout fields that are into R6 (full seed, ~20 days from R7).
Harvesting and Storing the 2012 Corn Crop – (Matt Roberts and Richard Stroshine, Agricultural and Biological Engineering Dept.)
The extreme drought conditions that plagued much of Indiana during the 2012 growing season will create some unique challenges for producers as they harvest of this year’s corn crop. As with any year, proper harvesting, drying, cleaning, and aeration techniques are important. However, when harvesting and storing drought stressed corn these often routine tasks require more attention. In addition some areas of the state are finding fields with Aspergillus ear rot (which can produce Aflatoxin) and that means that additional care must be given to the crop that is going into storage.
Combine Settings
Producers will need to closely manage their combine settings in order to prevent excessive damage to kernels. In dry harvest conditions, kernels will be more prone to crack and break which can increase the amount of fine material in the stored corn unless fines are removed. It will be important to carefully adjust everything from deck plate gap, to rotor/cylinder speed, and concave clearance so as to minimize the percentage of broken kernels. Since stalk integrity has also been compromised this year, there may be lodging of the stalks or pieces of stalk may break off during harvesting. Combine operators will need to adjust their cleaning fan speed and sieve openings to remove as much of this additional fine and foreign material as possible.
Drying
Although it is likely that most corn harvested in Indiana this year will be at lower than usual moistures when it is harvested, it is still very important that the corn be dried to 15% moisture or lower. At moistures below 15% the likelihood of fungal growth is greatly reduced. Growers experiencing Aspergillus ear rot, should dry their corn to moistures 0.5% to 1.0% below normal, and definitely below 15% moisture to reduce the chances that the mold will continue to grow once the corn is placed in storage.
Removing Fine Material
It is better to clean the grain and remove the fine material before drying to improve airflow during drying, but corn can also be cleaned after drying but prior to being placing in storage.. Fine material and broken kernels and pieces of cob can promote fungal and insect growth. They also interfere with aeration and cooling of the grain mass. Levels of Aspergillus will usually be higher in the fine material. Kernels infected with Aspergillus are often weakened and therefore are more susceptible to breakage during handling and combine harvesting.
Removing fines by screening the grain prior to placement in storage would be ideal. However, if screening is not possible or if there is still some fine material remaining in the corn when it is placed in the bin, then the storage bin should be cored. Even if a good grain spreader is use to fill the bin, fine material tends to accumulate in the center or “core” of the bin. Coring a bin involves removing small amounts of grain while the structure is being filled or removing one large load (e.g., a semi) after the structure is completely filled.
Aeration
After the bin has been filled and cored, the top of the grain mass should be leveled to ensure good aeration. Air finds the path of least resistance so in order to evenly aerate the corn it should be at the same depth throughout. Aeration is a key step in maintaining good grain quality throughout the entire storage period. Once corn is placed in a bin it should be cooled to 55°F or below as soon as possible. When the grain temperature is below 55°F the chances for fungal growth and insect activity are greatly diminished. Depending on the size of the structure, the ambient temperatures and the fan capacity, it may take only a few days or several weeks to completely cool the grain mass to 55°F. As autumn and then winter arrive and ambient temperatures continue to drop, the corn should be cooled by means of one or two additional aeration cycles. Although Purdue generally does not recommend freezing of the grain, farmers who carefully manage the grain conditioning process have done so to kill adult insects and better preserve the quality of the corn. Moisture can condense when warmer moist air comes into contact with the frozen corn and the condensed moisture must be removed by aeration to prevent mold growth. The longer grain is kept uniformly cool into the following spring and summer months the less risk there is for fungal and insect development.
![]()


![]()