Pest & Crop Newsletter, Entomology Extension, Purdue University
- Pre-Applied Insecticide Corn Seed Treatments
- Watching for the Black Cutworm Moth Arrival
- Black Cutworm Adult Pheromone Trap Report
- Spraying for Soybean Rust: Fact vs. Fiction
- Identifying Wheat Growth Stage
- Asian Soybean Rust is Off the Selected Agent List
Pre-Applied Insecticide Corn Seed Treatments – (John Obermeyer, Larry Bledsoe, and Christian Krupke)
- Pesticides protect yield potential; they do not create yield.
- The brief systemic activity of some of these products may protect seed and seedling from some soil insect pests.
- Efficacy ratings given by produt and insect.
- If a soil insecticide for rootworm is being used at planting, seed-applied insecticides are not necessary.
- Treated seed should be handled with caution!
Though insecticide treated seed has been available on the market for several years, there’s confusion about the names, rates, and targeted insects. The most important understanding, regardless of product, is that these seed treatments ONLY protect potential yield, they DO NOT increase yield.
These pre-applied seed treatments are from the new insecticide chemistry, nicotinoids that have systemic activity during the early life of the corn seedling. Higher rates of Cruiser (1.125 mg/kernel) and Poncho 1250 (1.25 mg/kernel) are the only products labeled to “protect” seedlings against rootworm. Costs of these higher rates will be competitive with the granular insecticides ($15-18/acre) depending on plant population. Although performance of these products against rootworm were addressed in the 2004 November issue of the Pest&Crop, simplified ratings are given in the following table.
Low rates of Cruiser and Poncho (0.125, 0.25 mg/kernel respectively) have shown SOME seed/seedling protection from seedcorn maggot, wireworms, white grubs, and cutworms. The labels of these products state that they will “protect” or provide “protection” from these secondary insects. Because of lack of unbiased, replicated trial data for these secondary insects, our best “guess” ratings are given below. Producers need to consider whether this early seed/seedling protection is worth the $4-6/acre (depending on seed drop) expense. If using a soil insecticide for rootworm control, these seed treatments are not necessary. Granular and liquid soil insecticides will do as good, if not better, job of protecting early corn growth from the secondary soil insects.
| Insecticide Corn Seed Treratment Eficacy Ratings 1,2 | |||||
| CRW | WG | WW | SCM | BCW | |
| (thiamethoxam) Cruiser (0.125 mg) |
P |
F |
G |
E |
F |
| Cruiser (1.125 mg) | F | G | G | E | F |
| (clothianidin) Poncho 250 (0.25 mg) |
P |
F |
G |
E |
F |
| Poncho 1250 (1.25 mg) | G | G | G | E | F |
1 E= Excellent, G= Good, F= Fair, P= Poor |
|||||
In some situations plant stand reduction may occur regardless of the presence of pests. Labels warn that mechanically damaged seed or seed with low vigor may experience poor germination and reduced stands. Undoubtedly, there will be some hybrid interactions as well, especially if growing conditions are poor over extended periods of time.
Another consideration with these insecticide seed coatings that seems to be misunderstood or disregarded is that these products need to handled with care…they are insecticides! Even though the pre-treated seed is not a restricted use product, small amounts of active and inert ingredients will wear off the seed through friction and dusts will be created. Be cautious around air planters, as “plumes” of accumulated product dust and contaminated graphite/talc may be released. Treat the seed with caution. Wear personal protective equipment per the label instructions included with the seed bag and avoid breathing the materials. Spilled seed should be treated as a chemical spill and should be cleaned up to protect non-target organisms, especially aquatic invertebrates and birds. Dispose of the empty bags according to the directions on the label.
![]()
Watching for the Black Cutworm Moth Arrival – (John Obermeyer)
Again this year, we are grateful for the black cutworm pheromone trap cooperators. The traps have been placed in locations throughout the state…now we watch and wait for the cutworm’s arrival into Indiana. As you can see from the following table, moth arrivals on southerly wind flows from the Gulf States have not been occurring. Any moths that may have made it to the state on those few nice days that we’ve enjoyed are quite inactive, if not frozen to death! Thanks again trappers.
![]()
Click for Table.
Black Cutworm Adult Pheromone Trap Report.
![]()
Burcucumber Control – (Glenn Nice, Bill Johnson, and Tom Bauman)
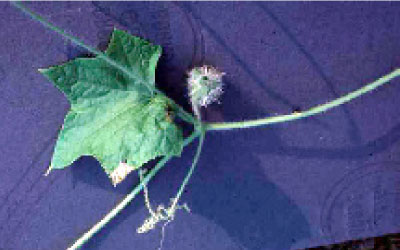
Burcucumber
According to several surveys conducted over the last 15 years, burcucumber (Sicyos anqulatus) was ranked as one of the 10 most difficult to control weeds in both corn and soybean2. When in direct competition with soybean, for example, burcucumber can reduce soybean yield up to 48%1. What makes burcucumber particularly troublesome is that it often grows aggressively late in the season when many postemergence herbicides can no longer be legally applied. Burcucumber can grow to cover soybean or corn, resulting in large portions of unharvested fields due to interference with a combine’s ability to harvest the crop.
Description
Native to the US, burcucumber is an annual, weedy vine in the same plant family as cucumber. When emerging, burcucumber’s cotyledons are spoon-shaped. Burcucumber vines can grow up to 10 feet long, and its stems can be either prostrate or climb what ever they contact, including corn and soybean. In some cases, the vine’s weight can lodge corn. The stem surface has sticky hairs, making it uncomfortable to the touch - an added bonus, when digging it out of your combine header. Forked tendrils, similar to a pea plant, can wrap around what ever burcucumber climbs. Its leaves are alternate with three- to five-pointed lobes (1 to 8 inches long, 1.5 to 8 inches wide). Flowers are white to pale yellow with separate male and female flowers (monoecious). The fruit are arranged in small bunches and are covered with prickly bristles or spines - adding to the pleasure of its handling. Each fruit contains one seed.
Ecology
Typically, burcucumber is found in low-lying areas near creeks and rivers, although it can be found on upland sites. Smeda and Weller (2001) looked at emergence, growth rate, seed yield, and seed viability of burcucumber in a field near Lafayette, Indiana3. The majority of emergence occurred early in the season, between May and June. Emergence patterns were dependent on rainfall, often increasing after rainfall events. In one year Smeda and Weller, observed emergence of burcucumber of up to 60 seedlings in a 32 square foot area after a rainfall event3.
Burcucumber emerging in June can accumulate up to 92 pounds of fresh weight3, a substantial load to hang on a corn or soybean plant. Smeda and Weller reported that plants emerging in June could produce an average of more than 42,000 seed per plant. When plants emerged in August, seed production was reduced; however, these burcucumber were still able to produce more than 250 seeds per plant. Seed harvested from plants that emerged in August did not germinate, having been scarified and soaked for two weeks, a common procedure to germinate burcucumber. Controlling burcucumber can be inconsistent because of the unpredictably of rainfall and the weed’s extended germination pattern.
Control
Cultural events, such as tillage or disking, and decreasing row spacing have inconsistent results in reducing burcucumber pressure. Considering burcucumber germinates in wet soils, increasing drainage may help to suppress seed germination.
Traditionally in corn, burcucumber was controlled by applying high rates of atrazine. The use of a soil residual product such as Balance Pro, Epic, Callisto, or Lumax or Lexar followed by a late application of a POST product is required to achieve effective control. For late POST treatments, drop nozzles onhigh-clearance sprayers often have to be used. Applying a product with some residual activity, (such as Exceed, atrazine, Spirit, or Callisto) is preferred.
In soybean, Classic late POST or in a split application, or Synchrony STS can be effective in controlling burcucumber. Glyphosate can control small burcucumber, but will not provide early residual control.
Studies conducted by Purdue University in 2004 investigated PRE plus POST combinations to control burcucumber. The results are summarized below.
In the corn study, PRE applications alone did not provide acceptable control as of August 19. However, Spirit, Northstar, or Callisto following a PRE application of either Dual II Magnum or Lumax provided over 90% control 70 days after POST applications. Balance Pro PRE followed by Liberty Plus Callisto also provided over 90% control.
In the soybean study, Roundup Weathermax provided effective burcucumber control; however, glyphosate does not have any residual activity and does not control later flushes. A split application of Roundup Weathermax would be more effective as would adding Classic to a POST Roundup treatment. Several glyphosate labels allow applications until 50% of the soybean plants have bloomed. These late applications may be necessary for effective control with glyphosate.
Conclusions
Burcucumber germinates frequently in response to rainfall events and is called a “flush weed” because new plants emerge throughout the growing season after rainfall events. These characteristics create management challenges and require growers to scout frequently to monitor new flushes and make timely applications of POST herbicides with residual activity.
1 Esbenshade, W.R. Curran, G.W. Roth, N.L. Hartwig, and M.D. Orxolek. 2001. Effect of tillage, row spacing, and herbicide on the emergence and control of burcucumber (Sicyos angulatus) in soybean (Glycine max). Weed Technology 15:229-235.
2 Childs, D.J., T.N. Jordan, R.L. Blackwell. 1996. Survey of problem weeds in Indiana:1996. Purdue University Cooperative Extension Service. WS-10.
3 Smeda, R.J. and S.C. Weller. 2001. Biology and control of burcucumber. Weed Science, 49:99-105.
![]()
Spraying for Soybean Rust: Fact vs. Fiction – (Robert Klein, Univ. of Nebraska, Shawn Conley, and Greg Shaner)
Application timing, coverage, and canopy penetration are three very critical components that growers and custom applicator can control when they apply fungicides to control rust in soybean. The applicator will probably need to change spray nozzle tips, carrier volume, spray pressure, spray tip orientation, and possibly travel speed, compared to what is done for most herbicide applications.
Currently there are two widespread misconceptions regarding fungicide application in soybean. The first misconception is that the smaller the particle size, the better the control. The mean spray particle volume diameter for effective rust control should be less than 220 µm, but not too much smaller than this. We suggest at this time that a sprayer be set up to deliver a particle size that is just at the boundary of fine and medium (Table 1). Very small spray droplets, while they can increase coverage, are susceptible to off target movement (drift) and evaporation.
The second misconception is that we must run all spray tips at 60 PSI or greater. For some spray tips this may be true; however in many instances increasing pressure beyond what is recommended will produce ineffective droplet sizes. The pressure required for the desired drop size depends on the nozzle. For example, with a Spraying Systems XR11003 nozzle you would use 30 psi, but for a XR11005 you would use 60 psi (Table 1).
| Table 1. The nozzle tip size and pressure to just move into fine classification from medium. | |||||||
XR TeeJet (XR) and XRC TeeJet (XRC) |
|||||||
Pressure (PSI) |
|||||||
15 |
20 |
25 |
30 |
40 |
50 |
60 |
|
| XR11002 | M |
F |
F |
F |
F |
F |
F |
| XR11003 | M |
M |
M |
F |
F |
F |
F |
| XR11004 | M |
M |
M |
M |
M |
F |
F |
XR11005M |
M |
M |
M |
M |
M |
M |
F |
For example |
with 02 use 20 psi |
| with 03 use 30 psi | |
| with 04 use 50 psi | |
| with 05 use 60 psi |
Most fungicide labels recommend that 10 to 20 gallons of water per acre be used for ground application and 5 gallons per acre for aerial application. It is critical that users follow these label recommendations to ensure fungicide efficacy. Higher carrier rates will improve coverage and penetration, especially late in the season. Understanding coverage at different soybean growth stages will impact carrier volume. For example 15 GPA may provide adequate coverage before the soybean canopy closes whereas 20 GPA or greater may be needed later in the season after the soybean canopy is closed.
There is also substantial discussion among clientele regarding which spray tips are the most effective for rust control. Currently there are several types of spray tips that are rated very good to excellent for application of fungicides. Applicators must make their decision based on several factors, including spray tip availability, acreage, sprayer ground speed, and desired output (GPA). Ceramic nozzle tips are probably the best investment because of their superior wear life. Lastly we would not recommend applicators using drop nozzles in soybean. These drops are likely to snap off during application, which can result in costly delays.
For additional assistance in sprayer set up please refer to NebGuide (G1548), Spray Boom Set-Up for Field Sprayers http://ianrpubs.unl.edu/farmpower/g1548.html.
![]()
Identifying Wheat Growth Stage - (Gregory Shaner, Shawn Conley, and Bill Johnson)
For effective management of wheat, it is important to recognize the stages of growth as the crop develops. Heading date is a common indicator of relative maturity, but the ability to recognize other growth stages is important for judging the progress of the crop and making management decisions, such as application of fertilizer, herbicides, or fungicides, and for predicting the consequences of disease or injury to the crop. The Feekes and Decimal (Zadoks) scales are the most common growth stage systems for wheat. The Feekes scale is older and has been used widely since the early 1950s. The Decimal scale is designed to make finer distinctions among stages of crop growth, and is probably used more in Europe than in the U.S., although pesticide labels in the U.S. are starting to use both scales.
The Feekes scale divides growth stages into 11 major categories. Head emergence, flowering, and grain filling (Feekes Growth Stages 10 and 11) are further subdivided. The Feekes Growth Stage scale is presented in Table 1, with a description of the crop development stage that corresponds to each number. The Decimal scale has 9 major divisions (1-9), with 10 possible subdivisions (0-9) for each major division. For example, the tillering stage is denoted by 2 in the Decimal scale, and the second digit indicates the number of tillers per plant. The Feekes scale simply notes whether tillers have begun forming (FGS 2), or whether tillering is essentially complete (FGS 3), without requiring the counting of tillers, although tiller number per plant could be appended after the “2”, e.g., FGS 2.4.
The most difficult task in describing crop growth stage is determining leaf number and tiller number. To determine leaf number, position the plant so that the first true leaf is on the left. Since winter wheat has an opposite leaf arrangement the next leaf will be on the right side of the plant. The next leaf would be counted only if that leaf was at least one-half the length of the preceding leaf. Continue counting leaves up the stem until the total number of leaves is determined. It is important that tillers be differentiated from leaves and counted separately. To distinguish tillers from a leaf look for the presence of an independent sheath, called a prophyll, which is located at the based of each tiller. Unlike leaves, tillers are counted as soon as they emerge. Once leaf number and tiller number have been identified, the subsequent key characteristics to be noted are node formation, flag leaf emergence, boot stage, head emergence, flowering, and finally grain development.
In winter wheat, the period from beginning of tillering to completion of tillering may extend for a considerable time, from autumn into the following spring. Likewise, the precise limits of FGS 4 and 5 are not clear. Depending on planting date, variety, and weather in the fall, plants may reach the pseudo stem erection stage in the fall, or only in the spring as the crop comes out of dormancy.
Jointing (FGS 6) can be clearly determined. The original Feekes scale simply defined stage 6 as when the first node was visible at the base of the shoot. The Decimal scale provides a more precise definition for this stage, namely when the distance between the crown and the first stem node is at least 1 cm (0.4 in.), and we have included this in the growth stage table. When the second aboveground node is at least 2 cm (0.8 in.) above the first node, the plant has reached FGS 7. The ability to recognize FGS 6 is important because it’s the cutoff for many herbicides, especially those that contain 2,4-D, dicamba (Banvel, Clarity), or MCPA. Application of these products after jointing can result in malformed heads, sterility, and reduced yield.
The stage when the flag leaf first appears (FGS 8) is important for application of a foliar fungicide. Soft red winter wheat in Indiana typically has 4 aboveground nodes when fully developed. The sheath of the uppermost leaf (flag leaf, F) arises from the top node. The leaf below the flag leaf (F-1) arises from the next node down, etc. Thus, leaf F-3 arises from the lowest aboveground node. The lowest aboveground node is near the ground when it first appears, but will move upward as the stem elongates. At FGS 8, there are usually two clearly differentiated nodes on the stem. The lower node will average about 7 cm (2-3/4 in.) above the soil line. The second node (from which leaf F-2 arises) will be about 15 cm (6 in.) above ground. The third node will usually be visible, but because it is only about 1 cm (0.4 in.) above node 2, it is not counted. As the wheat continues to grow, the distance between nodes increases and the fourth node becomes evident. Feekes 8 is the cutoff for Harmony Extra and Harmony GT, two products that are commonly used for control of wild garlic, and Express, commonly used for control of chickweed, Canada thistle and other winter annuals. Feekes growth stage 9 is the cutoff for Stinger and Buctril. Stinger is commonly used for Canada thistle, dandelion, and marestail control and Buctril for mustards, lambsquarters, ragweeds, and smartweeds.
Once the flag leaf blade has fully emerged, the flag leaf sheath extends. By this time, the head enclosed in this leaf sheath is swelling, and the plant enters the boot stage (FGS 10). The heads of all plants in a field will not emerge from the boot synchronously. Stages 10.1 through 10.5 are best assigned according to when heads on about half the plants have reached the indicated degree of emergence.
Flowering in wheat begins roughly in the middle of the head and progresses both upward and downward. Flowering at a given position in the head can be judged by the presence of extruded anthers.
Ripening is judged by removing developing kernels from the center of several heads and determining whether the contents are watery, milky, or at the soft or hard dough stages.
By the time wheat has reached FGS 8, leaves F-5 and below are usually withered from infection by Septoria, Stagonospora, and other fungi. The next leaf up (F-4) usually withers about the time heads have fully emerged. In the absence of Septoria and Stagonospora blotches, powdery mildew, or other foliar diseases, leaves F-3 through F should remain green until the wheat approaches maturity. Often, however, disease destroys leaves at each layer of the canopy prematurely. Fungicide control is aimed at maintaining these leaves, particularly F and F-1, in a healthy condition.
If a grower is planning to apply a fungicide at flag leaf emergence (FGS 8), it would be helpful to know when that stage will be reached, relative to some earlier, easily determined growth stage. The jointing (FGS 6) and 2-node (FGS 7) stages can be accurately determined if a wheat field is monitored frequently. The time required for a plant to progress from either of these stages to FGS 8 is not constant. It depends on weather conditions, particularly temperature. Over many years, we have monitored wheat crop development in various field trials, and the following observations can give some guidelines for the time required for plants to progress from one growth stage to another. We found that it takes about a week to progress from FGS 6 to FGS 7, and another 8 days to go from FGS 7 to FGS 8 (with a range of 5 to 10 days). It can take from 3 to 8 days for the flag leaf blade to fully expand (going from FGS 8 to FGS 9). It can take from 9 to 16 days to progress from FGS 9 to full head emergence (FGS 10.5) or the beginning of flowering (FGS 10.5.1).
To correctly determine crop growth stage, identify the following characteristics in order. Refer to Table 1 on the following page for the corresponding numerical assignment.
- Count the number of leaves on the main shoot
- Count the number of tillers
- Count the number of nodes
- Flag leaf emergence
- Boot stage initiated
- Head emergence
-
Flowering or anthesis
-
Grain developmental stage
![]()
Asian Soybean Rust is Off the Select Agent List – (Gregory Shaner)
The Asian soybean rust fungus, Phakopsora pachyrhizi, had been included on a list of “select agents” compiled by the Animal and Plant Health Inspection Service (APHIS) of USDA. This list contained plant pathogens that, at the time, were not currently in the United States but if they were introduced, either naturally or through an agroterrorism event, would have the potential to create significant losses and economic damage to our agriculture and food system. Recently, the Asian soybean rust fungus was removed from this list because of it’s recent introduction into the U.S. last fall by natural means. Spores of the fungus were most likely carried into the southern U.S. by winds from northern South America during the hurricane season last fall. The fungus is now established in the U.S. and it will survive each winter in southern areas where host plants remain green.
Removal of the fungus from this list by no means reduces the threat it poses to soybean. What it does mean is that when the rust is first detected in a state, such as Indiana, FBI agents and officials of the USDA will not be required to visit the field where it was found. When soybean rust is first found in Indiana, we are still required to follow certain procedures, including having our diagnosis confirmed by an APHIS lab, but this process should proceed quickly. As soon as we are certain of our diagnosis, we can put the word out that the disease has shown up in Indiana. Removal of the fungus from the select agent list also will make it easier for researchers in Indiana to work with this fungus, once it has arrived in the state naturally.
![]()
Purdue’s Plant and Pest Diagnostic Lab Plans for Timely ID of Soybean-Rust Sample Submissions – (Gail Ruhl and Karen Rane)
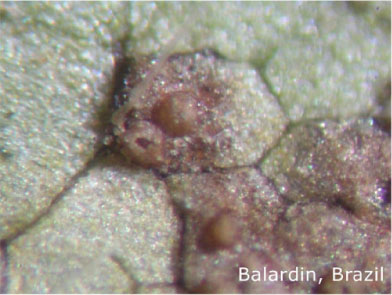
Volcano/cone shaped pustules before sporulation
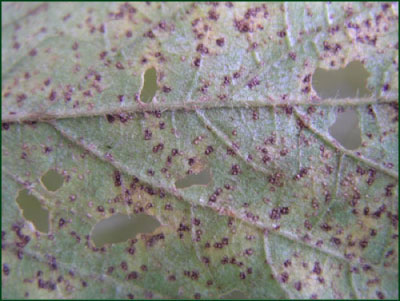
Sporulating soybean rust pustules on leaf.
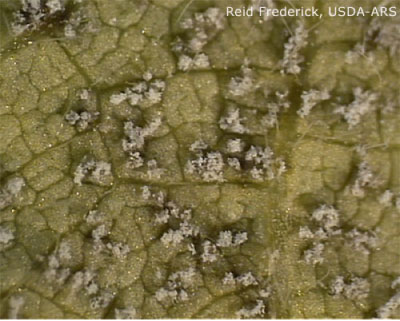
Close-up of sporulating pustules
Indiana farmers who suspect their crop has been infected by Asian soybean rust should submit samples to Purdue’s Plant and Pest Diagnostic Lab for accurate identification.
Because of soybean rust’s potential impact and the need for timely fungicide application when rust first becomes established in a field, it is critical that turn-around time from sample collection to identification be as short as possible. Identification of soybean rust in our lab is dependent on the presence of pustules on the leaf, thus the quality of the plant sample is of utmost importance. If a leaf sample displays only flecks, these could be the early stage of rust, but they could also be the result of infection by other organisms or a reaction to abiotic stress. In this case leaves will need to be incubated, possibly for 2-3 days, to see if pustules develop.
Rust requires moisture to develop, so be sure to scout the low areas and areas with minimal air movement where the canopy stays wet for extended periods of time. Part the foliage, and begin by first looking at the lower leaves in the canopy, especially the underside of the leaves. Use a hand lens (15X to 20X magnification) to examine any lesions for the characteristic ‘volcano-shaped’ pustules on the lower leaf surfaces. The undersides of leaves in the middle and upper canopy should also be examined. Photos of Asian soybean rust symptoms can be found on the P&PDL website: www.ppdl.purdue.edu/ppdl/pubs/soybean_
rust_symptoms_web.pdf.
Collect at least 20 leaves from plants showing symptoms
If you find something that looks like it could be soybean rust (cone-shaped pustules on the undersides of leaves), collect at least 20 leaves from several different plants that are displaying the suspected disease.
These leaves should be pressed flat between dry paper towels or newspaper and placed in a self-sealing plastic bag.
Do not wet the paper towels because extra moisture will promote mold growth that would compromise the sample.
Double-bag leaf samples wrapped in dry paper towels
The first self-sealing plastic bag should be placed inside a second self-sealing bag, as a precaution against inadvertently spreading rust spores during shipping. Be sure to label the bag with the date, the collector’s name, and a phone number and then attach a completed SOYBEAN RUST SUBMISSION FORM (available on our web site), with the additional required background information. All samples submitted must be accompanied by complete sample information, including the collector’s name and phone number, county, the nearest intersection, the type of plant sampled, the location of the field, and the collection location within the field.
The sample should be placed in a box or padded envelope with the completed form, sealed with tape along all seams, and then either shipped overnight or hand delivered to the diagnostic lab. The Purdue Plant and Pest Diagnostic Lab is located at 915 West State Street, in Room 101 LSPS. The P&PDL office is open 8am-noon and 1pm-5pm. The mailing address is:
Plant and Pest Diagnostic Lab
LSPS Room 101
Purdue University
915 West State Street
West Lafayette IN 47907-2054
A fresh sample is key; if it’s degraded, it’s useless. If it can’t be shipped immediately, don’t leave it on the dash of the truck on a hot, sunny day. Instead, store it in a cooler or refrigerator until it can be shipped.
Do not send samples on Fridays to avoid any potential weekend shipping delays.
If you notify us by phone or e-mail that a possible soybean rust sample is on the way, we’ll keep an eye out for it and get to it right away.
Forms and detailed collection information are available on the clinics’soybean rust web site www.ppdl.purdue.edu/PPDL/soybean_rust.html.
![]()
2005 Popcorn Agri-Chemical Handbook Now Available
The 2005 edition of the Popcorn Board’s Popcorn Agri-Chemical Handbook has been posted to their website at www.popcorn.org/handbook/index.cfm. The Popcorn Board produces the handbook to insure everyone in the popcorn industry is informed about pesticide products registered for use on popcorn or in popcorn storage facilities. The handbook lists agri-chemicals registered, special use restrictions and the status of a chemical under special review by the Environmental Protection Agency (EPA).
![]()
![]()