Pest & Crop Newsletter
|
|||||||||||||||||||||||||||||||||||||||||||||||||||||||||||||||||||||||||||||||||||
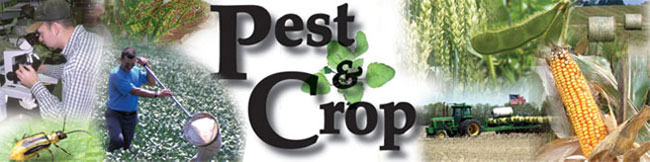
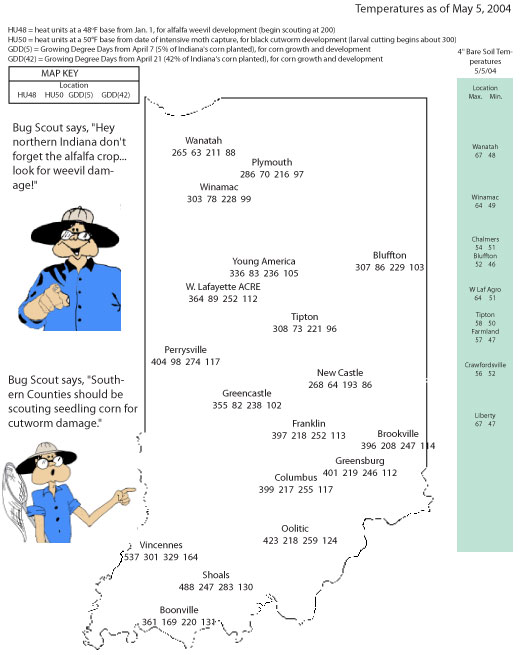
Black Cutworm Scouting Should Begin– (John Obermeyer and Larry Bledsoe)
A few reports of cutworm damage have been received from southern Indiana, most of those are likely dingy cutworm. The dingy cutworm overwinters as a partially grown larva, so early leaf feeding is not uncommon. Fortunately it is not the threat to stand losses that the black cutworm is. Black cutworm moth catches in pheromone traps have indicated several intensive flights into the state over the last several weeks. We have begun to track heat unit accumulations from those significant flights to predict black cutworm development and beginning of plant cutting, see “Weather Update” in this issue of the Pest&Crop. Monitoring for black cutworm damage should begin in southern counties. Scout by inspecting 20 consecutive plants in each of 5 areas of a field (100 plants) for cutworms and feeding activity. Count and record the number of plants cut or damaged and determine the percentage of plants affected. Also collect black cutworm larvae and determine the average instar stage. While sampling, also record how many leaves are fully unrolled (the collar of the leaf is visible on a fully unrolled leaf). Control of black cutworm may be necessary if 3 to 5% of the plants are damaged and the average larval instar is from 4 to 6. Use the following management guidelines and instar guide. Suggested foliar insecticides for control of economic infestations are listed below. To increase the probability that adequate control will be achieved when dry soil conditions are noted, a rotary hoe may prove useful. This should stir up the soil and increase the likelihood that the cutworms will come in contact with the insecticide. Additionally, the use of a higher rate of the insecticide in 20 gallons or more water per acre may help the level of control. On no-till fields, where hoeing is not possible, applying the insecticide in the early evening may increase control, as the worms more toward the soil surface during the nighttime hours.
Armyworm in Wheat– (John Obermeyer and Larry Bledsoe)
Jon Neufelder, Posey County CES, informs us that some armyworm damage is occurring in wheat. Armyworm moths have been making their way into the state for the last several weeks and females have been laying eggs on grassy-type plants. Hatching larvae then proceed to feed on grassy plants and crops. Fortunately the moth numbers captured in black light traps are nothing compared to the “memorable” 2001 season. Pest managers should examine wheat plants in different areas of a field, especially where plant growth is dense. Look for flag leaf feeding, clipped heads, and armyworm droppings (excrement) on the ground. Shake the plants and count the number of armyworm on the ground and under plant debris. On sunny days, the armyworm will take shelter under crop residue or soil clods. If counts average approximately 5 or more per linear foot of row, the worms are less than 1-1/4 inches long and not parasitized or diseased, and leaf feeding is evident, control may be justified. If a significant number of armyworm are present and they are destroying the leaves, or the heads, treat immediately.
|
|||||||||||||||||||||||||||||||||||||||||||||||||||||||||||||||||||||||||||||||||||
Poison Hemlock- The Toxic Parsnip– (Glenn Nice, Bill Johnson, Tom Bauman, and Thomas Jordan) We often get questions about wild carrot (Daucus carota L.) only to find out that the question is actually about poison hemlock (Conium maculatum L.). Although these two plants may look similar, poison hemlock is toxic to cattle, horses, swine, sheep, goats, dogs, and people when ingested. The plant produces volatile alkaloids coniine (an alkaloid similar in effect to nicotine) and gamma-conicine. The easiest way to tell the two plants apart is that poison hemlock will have purple spots or blotches on its smooth (hairless) ridged stems. Wild carrot will usually have a covering of hairs. Description: Poison hemlock can often be found along roadsides, edges of cultivated fields, railroad tracks, stream banks, waste areas, and sometimes along the fence rows of pastures. Like wild carrot, poison hemlock is a biennial. This means that it lives its life over two years. In the first year, poison hemlock goes through vegetative growth. In the second year, it will produce small white flowers arranged in umbrella-like cluster, similar to wild carrot. It is in the second year, when it bolts and flowers, that it tends to catch the eye. The flower stalks can grow 3 to 8 feet tall. The leaves are finely divided having a triangular shape. When comparing both poison hemlock and wild carrot leaves, wild carrot has a more rounded lobe in the leaf. Where as Poison hemlock’s leaf reminds me of a sharp arrow head. For more information and pictures of poison hemlock’s description go to www.ppws.vt.edu/scott/weed_id/coima.htm and www.vet.purdue.edu/depts/addl/toxic/plant28.htm. Symptoms of Poisoning: All parts of the plant can be toxic. Young leaves in the spring are the most toxic and the root the least toxic. The fruit is most dangerous in the fall. Lethal doses can be small, so it is important not to let animals graze or feed on poison hemlock. In the case of horses, 4 to 5 pounds of the leaves may be lethal. One to 2 pounds can be lethal for cattle and 4 to 8 oz for sheep. Young animals are more susceptible. Symptoms may appear within 1 hour of ingestion. This starts with a nervous stimulation and can progresses in 2 to 3 hours later into respiratory paralysis. In rare cases the animal may have convulsions. In many cases symptoms include, bloating, incoordination, intestinal irritation, dilation of pupils, rapid and weak pulse, loss of appetite, salivation, and blue coloration about the mouth. Ingestion of poison hemlock in days 55 to 75 of gestation may result in birth defects. Treatment: If an animal becomes poisoned by poison hemlock, a veterinarian may administer nerve and heart stimulants as soon as possible. Large doses of mineral oil and purgatives are also prescribed to empty the digestive tract. For more information about poison hemlock’s toxic characteristics please see www.vet.purdue.edu/depts/addl/toxic/plant28.htm. Control: Control of poison hemlock in grass pastures is more effective in the first year of its life cycle. In a grass pasture, 2,4-D, Banvel/Clarity (dicamba), or Crossbow (2,4-D and tryclopyr) provide control. Crossbow is slightly better than both 2,4-D and Banvel/Clarity. However, be aware that these herbicides will damage any legumes. Spot treatments of glyphosate products (Glyphomax Plus, Roundup WeatherMax, Touchdown, etc.) will also control poison hemlock, but be aware that this will also damage any desired vegetation. Always read and follow labels when using herbicides. We have also noted that poison hemlock is beginning to invade no-till corn and soybean fields. Herbicides that have activity on this weed and that can be used before planting soybeans are 2,4-D, dicamba, and glyphosate. Dicamba and glyphosate have shown slightly better efficacy than 2,4-D. The best overall control would likely be attained with a mixture of glyphosate and dicamba. Considerations Using Dicamba in Soybean: Use 1/2 pt./A on coarse soils and 1 pt./A on medium or fine soils with at least 2% organic mater. Not all dicamba products have PRE-plant labels in soybean: consult the label before buying for this purpose. Clarity can be applied 14 days before planting if 8 fl. oz./A or less is used and at least 1 inch of rainfall or over head irrigation occurs; however, if 16 fl. oz./A is used there is a 28 days waiting period before planting soybean. Considerations Using 2,4-D in Soybean: Use 1 to 2 pt./A of a LVE (Low Volatile Ester formulation). Before planting soybean, using 2,4-D at 1 pt./A requires a 7 day waiting period before planting and if more than 1 pt./A is used, a 30 day waiting period must be observed. These restrictions may be slightly different depending on the product, please read the specific products label before buying for this purpose. Considerations Using Glyphosate: Use 0.75 lb. ae/A.1 For more information on toxic plants of Indiana to livestock and pets see www.vet.purdue.edu/depts/addl/toxic/cover1.htm. For online pesticide labels go to www.cdms.net or www.greenbook.net. 1 ae stands for acid equivalent. This is the glyphosate weight in its acid form. Most labels will give ae per gallon to calculate amount to be used
|
|||||||||||||||||||||||||||||||||||||||||||||||||||||||||||||||||||||||||||||||||||
Update on Risk of Fusarium Head Blight of Southern Indiana - (Gregory Shaner) The predicted risk of Fusarium head blight of wheat, assuming a flowering date of 3 May 2004 depends on whether there is corn residue in a wheat field. Where there is no residue, the risk is low throughout Indiana. Where corn residue is present, the model shows moderate risk in a roughly rectangular area bordered on the west by Greene Co., on the east by Bartholomew Co., on the south by Washington Co., and on the north by Johnson Co. It is unlikely that any wheat in this area is flowering yet. Some wheat in far southwest Indiana may be flowering, but in that area the model indicates low risk. The model can be viewed at www.wheatscab.psu.edu.
|
|||||||||||||||||||||||||||||||||||||||||||||||||||||||||||||||||||||||||||||||||||
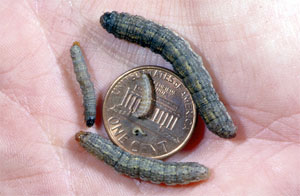
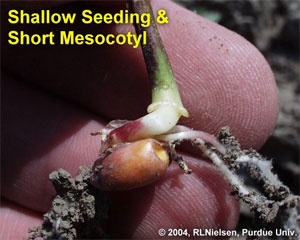
Fearmonger Alert: Freeze Injury Potential for Early-Planted Corn - (Bob Nielsen) Corn planting has been proceeding at a record pace in Indiana thus far in the 2004 growing season. Reasonably warm soil temperatures throughout April have also encouraged faster emergence than usually occurs with such early-planted corn. Such early planting and emergence of corn is always at higher calendar risk of injury by frost events or lethal cold temperatures. Of these two risk factors, lethal cold temperature is the more worrisome one since a corn plant’s growing point region is relatively protected from the effects of simple frost while it remains below the soil surface. Lethal cold temperatures (28°F or less) can penetrate the upper inch or two of soil, especially dry surface soils, and kill plant tissue directly, including coleoptiles and growing points. Non-lethal injury by cold temperatures may cause deformed elongation of the mesocotyl or physical damage to the coleoptile in non-emerged seedlings, resulting in the proverbial “cork-screw” symptom and subsequent leafing out underground. Air temperatures in northern areas of Indiana dipped to the low 30’s early in the morning of 3 May, with lower-lying areas likely less than 30°F. Given the risk of frost or chilling injury to young corn; it would behoove growers to monitor early-planted fields over the next week to determine whether such injury has occurred and whether replanting may be warranted. Select References:Nielsen, R.L. (Bob). 2004. Corkscrewed Corn Seedlings. Corny News Network, Purdue Univ. Available online at www.agry.purdue.edu/ext/corn/news/articles.04/Corkscrew-0501.html. (Verified 5/2/04).
Requirements for Uniform Germination and Emergence of Corn - (Bob Nielsen)
Rapid, uniform germination and emergence of corn help set the stage for maximum grain yield at the end of the season. Without such a successful start to the season, the crop is behind the proverbial “eight-ball” right from the beginning. The good news is that there are only three simple requirements for uniform germination and emergence of corn. The bad news is that one or more of the requirements are sometimes absent from one field to another. Adequate and uniform soil moisture at the seed zone. Adequate soil moisture is most simply defined as not too dry and not too wet. Most growers know what “adequate” looks and feels like. Uneven soil moisture in the seed zone can be caused by variable soil characteristics, tillage patterns, unusual weather conditions and uneven seeding depth. Uneven soil moisture in the seed zone is the primary cause of uneven emergence, the results of which can easily be yield losses of 8 to 10 percent. Useful Tip: When seedbed conditions are dry, make sure that your choice of seeding depth ensures uniformly adequate soil moisture for the germination of the seed. Even though a 1.5 to 2 inch seeding depth is a good choice for many conditions, don’t hesitate to increase seeding depth to 2.5 to 3 inches if that is where the uniform soil moisture is located. Planting shallower than 1.5 inches increases the risk of poor or uneven germination during subsequent drying of surface soils. Adequate and uniform soil temperature at the seed zone. Adequate soil temperature is most simply defined as being greater than 50oF at the 2-inch depth. Corn will not germinate or emerge quickly or uniformly when soil temperatures are less than 50oF. When soils warm to the mid-50oF or greater, emergence will occur in seven days or less if soil moisture is adequate. Uneven soil temperature can be caused by soil characteristics, uneven residue cover in reduced tillage systems and uneven seeding depth control. Temperature variability is most critical when average soil temperatures are barely within the desired minimum 48 to 50oF range for corn germination. Useful Tip: Dark-colored soils will typically warm more quickly than light-colored soils. If soils dry differently across the field, the drier areas will typically warm faster than the wet areas. Uneven residue cover in reduced tillage systems causes significantly lower soil temperatures under the heavier cover than under barer spots in the field. Uneven seeding depth exposes deeper planted seeds to slightly cooler seed zones than seeds placed shallower. Adequate and uniform seed-to-soil contact. In order for the kernel to absorb moisture quickly and uniformly, soil must be firmed completely around the kernel. Seed-to-trash contact results from “hair-pinning” of surface trash into the seed furrow during no-till planting when soil and/or trash are too wet for adequate coulter cutting action. Seed-to-clod contact results from planting into cloddy fields created by working soil too wet. Seed-to-rock contact is, needless to say, not good for proper germination either. Seed-to-air contact results from open planter furrows when no-till planting into excessively wet soils. Germination of kernels lying in open planter furrows is dependent on rainfall keeping the open furrow environment moist. Useful Tip: Whippers, wipers, movers, fingers, and other similar trash management gadgets for the planter are most beneficial when you are challenged with rocky, cloddy, or trashy surface soil conditions. They help clear the way (literally) for the planter’s double-disc openers to more easily do their job of creating an optimum seed furrow. Other planter attachments that help press the kernels into the seed furrow can improve seed-to-soil contact and seeding depth uniformity when seedbed conditions are otherwise challenging.
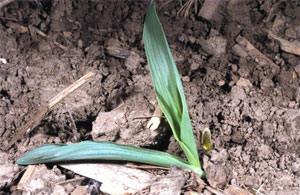
The Emergence Process in Corn - (Bob Nielsen)
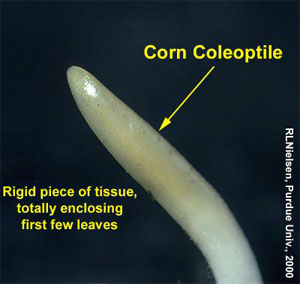
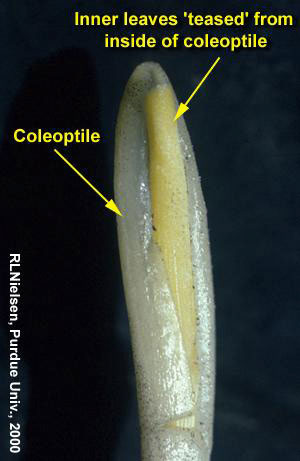
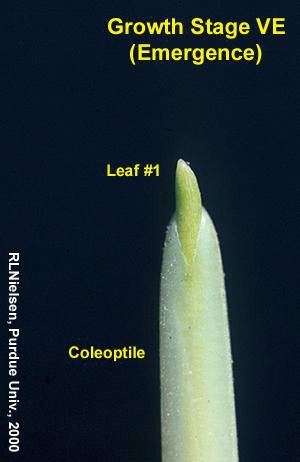
As with all of corn growth and development, germination and emergence are dependent on temperature, especially soil temperature. Corn typically requires from 100 to 150 GDD (growing degree days) to emerge. Under warm soil conditions, the calendar time from planting to emergence can be as little as 5 to 7 days. Under cold soil conditions, it can easily take up to four weeks to emerge. Elongation of the mesocotyl elevates the coleoptile towards the soil surface. The mesocotyl is the tubular, white, stemlike tissue connecting the seed and the base of the coleoptile. Technically, the mesocotyl is the first internode of the stem. Useful Tip: Physiologically, mesocotyls have the capability to lengthen from at least a 6-inch planting depth. Realistically, corn can be planted at least three inches deep if necessary to reach adequate moisture. As the coleoptile nears the soil surface, exposure of the mesocotyl to the red light portion of the solar radiation spectrum halts mesocotyl elongation. Continued expansion of the leaves inside the coleoptile ruptures the coleoptile tip, allowing the first true leaf to emerge above the soil surface. Since the depth at which the mesocotyl senses red light is fairly constant, the resulting depth of the crown (base) of the coleoptile is nearly the same (1/2 to 3/4 inch) at seeding depths of one-inch or greater. Useful Tip: When corn is seeded very shallow (less than about 1/2 inch), the crown of the coleoptile will naturally be closer to the soil surface if not right at the surface. Subsequent development of the nodal root system can be restricted by exposure to high temperatures and dry surface soils. Troubleshooting ConsiderationsSeveral factors can cause the coleoptile to split prematurely, allowing the leaves to emerge underground. Usually, more than one of the following factors are present when this problem occurs, making it difficult to place the blame on any one factor. Exposure to light at deeper soil depths than usual due to cloddy seedbeds, dry seedbeds, sandy soils, or open slots in no-till. Injury from certain herbicides, particularly under stressful environmental conditions. Symptoms include corkscrewed coleoptile, swollen mesocotyl and true leaves emerged from side of coleoptile. Surface crusting, cloddy seedbeds, rocky seedbeds, planter furrow compaction, or otherwise dense surface soil that physically restricts mesocotyl elongation and coleoptile penetration. The pressure of the expanding leaves within the coleoptile eventually ruptures the side of the coleoptile. Symptoms include corkscrewed coleoptile, swollen mesocotyl and true leaves emerged from side of coleoptile. Note the similarity to those symptoms from herbicide injury. Cold temperature injury, either from exposure to long periods of soil temperatures around 50°F or from exposure to wide daily swings (25 to 30°F) in soil temperatures. Symptoms include absence of emerged coleoptile, corkscrewed mesocotyl or coleoptile and true leaves emerged from side of coleoptile. Note the similarity to those symptoms from herbicide injury. Useful Tip: The mesocotyl should remain firm, white and healthy through at least the 6-leaf stage, if not longer. If it is mushy, discolored, or damaged prior to this stage, then it is likely part of the crop problem being investigated.
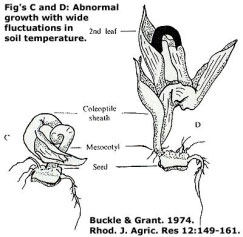
Corkscrewed Corn Seedlings - (Bob Nielsen)
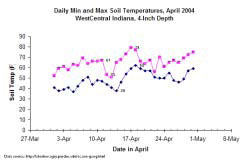
Emergence of corn occurs by the elongation of the mesocotyl that elevates the coleoptile (or “spike”) to the soil surface. The mesocotyl is that white stem-like plant part located between the kernel and the crown of the coleoptile. Mesocotyl elongation of early-planted corn occasionally veers from its usual upwardly mobile path and instead corkscrews below ground. The end result of such spiraling sub-surface seedlings is either underground leaf emergence or eventual death of the seedling. The good news is that the extent of the problem is usually limited to a few fields each year and a small number of plants (several thousand or less per acre) within an affected field. As is usual with crop problems, several possible causes of corkscrewed seedlings exist. The challenge is to identify which is the most likely cause for any given situation. Restricted Emergence: Corkscrewed mesocotyl/coleoptile development can result when the coleoptile encounters resistance as the mesocotyl elongates. Severe soil crusting or otherwise dense soil surface and cloddy soil surfaces can cause such resistance. A combination of severe sidewall compaction plus press wheel compaction over the furrow can also restrict coleoptile emergence. Kernel Position in Furrow: The position of the kernel in the furrow with respect to the embryo face directly influences the initial location where the coleoptile emerges. The coleoptile, the protective covering for the plumule leaves, emerges from the embryo side of the kernel and moves toward the dent end of the kernel by virtue of the elongation of the mesocotyl. If the kernel lands with the embryo face down in the furrow, the coleoptile emerges on the bottom side of the kernel, elongates horizontally until the mesocotyl ‘clears’ the end of the kernel, then finally begins its upward ascent. Such an “upside-down” beginning might contribute to a seedling’s susceptibility to other corkscrewing causal factors. Herbicide Injury: Certain herbicides, notably cell growth inhibitors, can affect seedling shoot development especially if weather or soil conditions are not conducive for rapid growth. Quite often when herbicide is part of the blame, cool soils and significant soil crusting are also contributing factors. Temperature Response: Some years ago, I came across an article from Rhodesia (Buckle & Grant. 1974. Rhod. J. Agric. Res. 12: 149-161) that described the same phenomenon and attributed it to large fluctuations between day and night soil temperatures. In their research, abnormal mesocotyl and/or coleoptile development occurred most frequently when soil temperatures fluctuated from daytime highs of about Reports of corkscrewed seedlings in Indiana are usually few and far between, but occasionally correspond to situations when unusually cool soil temperatures or a dramatic fluctuation in soil temperatures occur in fields prior to seedling emergence. Some might ask how often do such dramatic fluctuations occur during the germination/emergence period? I don’t have an answer for that, but can document that such a fluctuation occurred in the past several weeks. Over a six day period, beginning April 11, soil temperatures at the Purdue Agronomy Farm ranged from a daily high of 67°F to a daily low of 38°F three days later to a daily high of 79°F three days after that. Oh, by the way, I’ve also received my first report of corkscrewed seedlings from an early April planted field of corn in central Indiana...
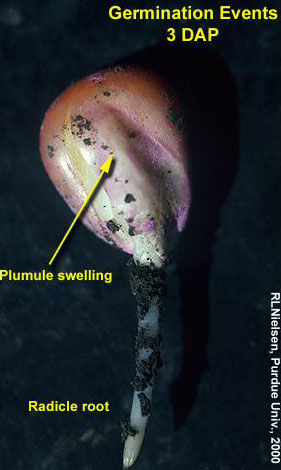
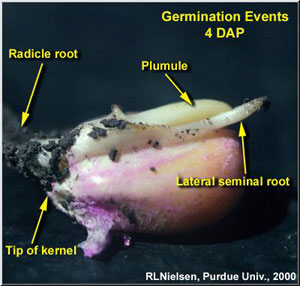
Germination Events in Corn - (Bob Nielsen)
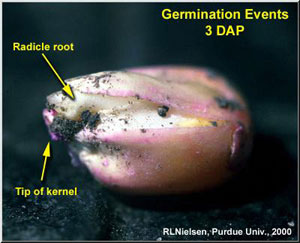
Germination is the renewal of enzymatic activity that results in cell division and elongation and, ultimately, embryo emergence through the seed coat. Germination is triggered by absorption of water through the seed coat. Corn kernels must absorb (imbibe) about 30 % of their weight in water before germination begins. Less than optimum absorption of water (perhaps due to a rapidly drying seed zone) may slow or stop germination. Repeated wetting/drying cycles can decrease seed viability. By comparison, soybeans must imbibe about 50% of their weight in water. But since soybeans are approximately 2/3 the weight of corn kernels, the total amount of absorbed water required for germination is relatively similar. The visual indicators of germination occur in a distinct sequence. The radicle root emerges first, near the tip end of the kernel, within two to three days in warm soils with adequate moisture. In cooler or drier soils, the radicle root may not emerge until one to two weeks after planting. The coleoptile (commonly called the ‘spike’) emerges next from the embryo side of the kernel within one to many days of the appearance of the radicle, depending on soil temperature. The coleoptile initially negotiates its way toward the dent end of the kernel by virtue of the elongation of the mesocotyl. The coleoptile is a rigid piece of plant tissue that completely encloses the four to five embryonic leaves (plumule) that formed during grain development of the seed production year. The plumule leaves slowly enlarge and eventually cause the coleoptile to split open as it nears the soil surface. The lateral seminal roots emerge last, near the dent end of the kernel. Troubleshooting ConsiderationsWhen temperatures are optimum, these three parts of the seedling may emerge from the kernel on nearly the same day. Excessively cool soils may delay the appearance of the coleoptile and lateral seminal roots for more than a week after the radicle root emerges. It is not uncommon in cold planting seasons to dig seed two weeks after planting and find only short radicle roots and no visible coleoptiles. When excessively cold and/or wet soils delay germination and/or emergence, the kernel and young seedling are subjected to lengthier exposure to damaging factors such as soil-borne seed diseases, insect feeding and injury from pre-plant or pre-emergent herbicides and carryover herbicides from a previous crop Select References:Hardman, L.L. and J.L. Gunsolus. 1998. Corn Growth and Development & Management Information for Replant Decisions. Univ. of Minnesota Ext. Service Pub. No. FO-05700. Available online at www.extension.umn.edu/distribution/cropsystems/ Don’t forget, this and other timely information about corn can be viewed at the Chat ‘n Chew CafÈ on the Web at www.kingcorn.org/cafe. For other information about corn, take a look at the Corn Growers’ Guidebook on the Web at www.kingcorn.org.
Wheat Condition and the Potential of Cold Injury to the Wheat Plant – (Ellsworth P. Christmas and Charles W. Mansfield)
On the morning of May 3 and/or 4, 7 stations across northern and central Indiana reported low temperatures between 26 and 31oF. Six stations reported temperature of 26 or 31oF on May 3 and five on May 4, 2004. The stage of growth of the wheat varied from head stage in southwestern Indiana to early joint stage in northern Indiana. Once wheat has reached the boot stage, temperatures at or below 280 F for a period of two or more hours can result in freeze damage to the wheat plant. Symptoms of this injury may include floret sterility, head entrapment, stem damage or leaf discoloration. From emergence of the head until early milk stage, temperatures at or below 300F for a period of two or more hours can result in freeze damage to the wheat plant. This damage can be characterized by floret sterility, white awns or heads, stem damage or leaf discoloration. The extent of the injury is dependent on the actual temperature and length of time the plant was subjected to the low temperature. The temperatures reported above may not represent the actual temperatures in the field at the level of the developing wheat heads. It is not unusual for the temperature at the level of the heads to be 4 to 5 degrees colder than the temperatures at the official height of the recording thermometer. It is not possible to confirm freeze damage to wheat until the plant has had at least 5 days to continue to grow and develop. Table 1 below gives a summary of the temperature required to cause freeze injury to the wheat plant at various stage of growth and the symptom most likely to be evident.
|
|||||||||||||||||||||||||||||||||||||||||||||||||||||||||||||||||||||||||||||||||||
|
|||||||||||||||||||||||||||||||||||||||||||||||||||||||||||||||||||||||||||||||||||

![]()