Pest & Crop Newsletter
|
||||||||||||||||||||||||||||||||||||||||||||||||||||||||||||||||||||||||||||||||||||||||||||||||||||||||||||||||||||||||||||||
Insecticide Treated Corn Seed - (John Obermeyer and Larry Bledsoe)
Year-in and year-out, corn rootworm is the state’s most serious soil insect pest to corn, however the risk of damage varies throughout the state. Continuous corn (corn following corn) has a high risk of rootworm damage throughout the state. Whereas, with first-year corn (corn following soybean), a moderate to high risk exists throughout northern Indiana, and a low risk exists in the southern counties. Prescribe and ProShield insecticide treated seed are labeled for rootworm at low to moderate infestation levels. This concurs with university efficacy trial results, therefore we don’t recommend the use of these products in high-risk rootworm areas of Indiana. (additional information in Pest&Crop No. 27, November 22, 2002, http://www.entm.purdue.edu/entomology/ext/targets/p&c/P&C2002/P&C27_2002.pdf) Wireworms, grubs, maggots and seedcorn beetles occasionally damage corn seed and seedlings. Obviously, the longer that germination is delayed, the greater the chance for insect damage to occur. Generally, the earlier planted corn is most prone to these occasional insect pests. Last season, because of extreme delays in planting, we didn’t receive calls concerning these seed and seedling nibblers. A seed protectant may be a good investment against seed attacking insects when planting in fields with less than adequate drainage, in set-aside acreage (such as CRP land), or fields with high crop residue or where high rates of manure have been applied. Seed protection will be critical if soil temperatures remain at less than ideal levels for rapid seed germination and plant growth. The following table lists the available insecticide seed treatments and our expected control of given pests. Because replicated and statistically sound efficacy data is limited for most, if not all, of these products, the assigned ratings are from the product’s label, limited research data, and anecdotal observations.
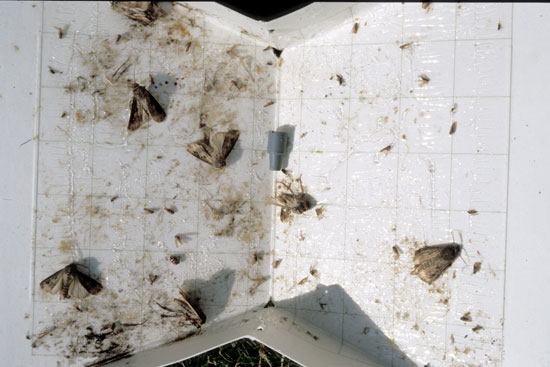
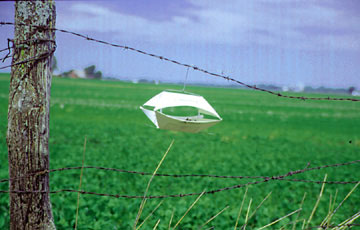
Black Cutworm Moths Are Beginning to Arrive – (John Obermeyer and Larry Bledsoe)
Although at low numbers, black cutworm are beginning their movement into the Midwest from sites in south Texas and northern Mexico. Warm, moist air currents sweeping up from the Gulf Coast literally lifts these moths up into the upper atmosphere and carries them into Midwestern states. The direction that these weather systems track and the number of moths that are carried within them will determine whether they are brought into our area and whether or not they will pose a threat to our crops.
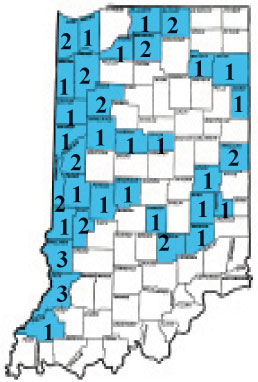
As in the past, we will be trapping for this insect throughout the state (see "2003 Black Cutworm Pheromone Trap Locations"). As we approach the more critical times for moth activity, that being later April and beyond, we will be watching for what we refer to as an “intense capture.” This is when 9 or more moths are caught in a trap over a two-day period. When and if this occurs, we will begin accumulating heat units (HU base 50°F) to determine when the first cutting of corn by the larvae should occur. This occurs approximately 300 HU after the intense capture. Watch for this information and Bug Scout’s alerts in future Pest&Crop’s Weather Update.
2003 Black Cutworm Pheromone Trap Locations (#/County)
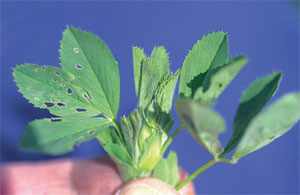
Alfalfa Weevil Damage Beginning in Southern Indiana–
Surveys of southwestern Indiana alfalfa fields this past week (see “Alfalfa Weevil Larval Survey”) showed that alfalfa weevil feeding has begun, though slowly. Survey fields showed that the number of plants with tip feeding reached as high as 20% (range 0 to 20%) with up to 1.08 weevil larvae per stem (range 0.00 to 1.08). Alfalfa in these fields ranged from 6.8 to 8.4 inches in height. Alfalfa grown on sandy soils had the highest growth and most weevil activity.
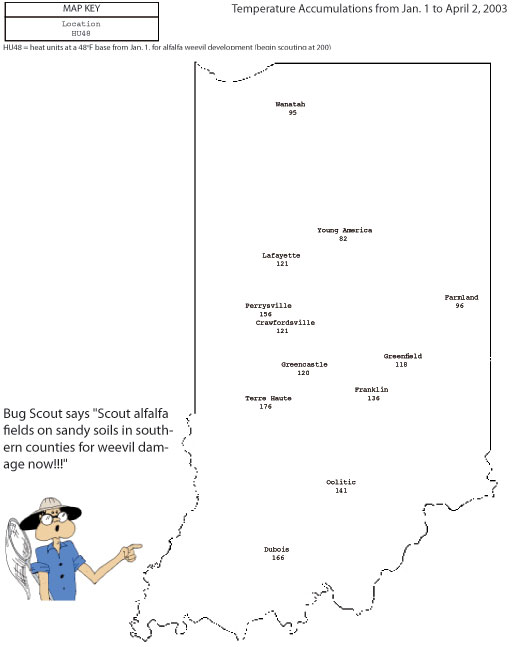
Field scouting for alfalfa weevil damage should begin when approximately 200 heat units, base 48?F, have accumulated from January 1 (see “Weather Update” for locations near you). Sampling a field to determine the extent of alfalfa weevil damage and average stage of weevil development is best accomplished by walking through the field in an “M-shaped pattern.” Five alfalfa stems should be examined in each of 5 areas of the field for a total of 25 stems from the entire field. Each stem should be examined for: (1) evidence of tip feeding by alfalfa weevil larvae; (2) maturity of the stem, i.e. pre-bud, bud and/or flowers; and (3) stem length. The average size (length) of weevil larvae should also be noted. Although large alfalfa weevil larvae are relatively easy to find, small larvae are difficult to see; thus, very close examination of leaves may be required to detect “pin-hole” feeding and small larvae.
Click for Table.
|
||||||||||||||||||||||||||||||||||||||||||||||||||||||||||||||||||||||||||||||||||||||||||||||||||||||||||||||||||||||||||||||
Burndown Herbicide Decisions - (Bill Johnson, Glenn Nice, and Tom Bauman) We have been able to get out of the office and observe some of our fall applied research plots and travel across the state. We have observed a number of fields starting to turn green, planters in the barnyard, and fertilizer applications. It must be time to think about early season weed control and crop planting! Here are a few items to consider.
Although we have had a cold winter and a relatively dry spring, warm weather between now and the beginning of planting season will result in robust winter weed growth that is difficult to control and utilizing valuable soil moisture. Since we are about 3 to 4 weeks before planting season, one should consider making a herbicide application to control vegetation in no-till fields if winter weed growth is 6 inches tall and likely to be 12 inches or taller by late April. If there are primarily broadleaf weeds present, economical products to use for an early April burndown include
Should you include a residual herbicide with the burndown treatment in early April?
Clearfield Sunflower Technology Approved for Use - (Bill Johnson, Glenn Nice, and Tom Bauman) Clearfield sunflowers are hybrid sunflowers bred to be resistant to a specific herbicide in the imidazolinone family. Imidazolinone herbicides inhibit the ALS enzyme and include such products as Pursuit, Scepter, Raptor and Lightning. The herbicide labeled for use on Clearfield sunflowers is Beyond (imazamox) which has the same active ingredient as Raptor. Beyond is formulated as a 1 AS and is packaged in 1 gallon containers. The label indicates that 1 application of Beyond at 4 oz/A can be applied to sunflowers in the V2 through V8 stage of growth. Applications should be made before broadleaf weeds exceed 3 inches and grass weeds exceed 4-5 inches. Beyond controls a number of weeds common to Indiana including chickweed, cocklebur, lambsquarter, nightshade species, smartweeds, volunteer sunflower, velvetleaf, barnyardgrass, crabgrass, wooly cupgrass, foxtails, fall panicum, shattercane and a few others. More information on Beyond/Raptor can be obtained at the crop data management systems website (www.cdms.net) or greenbook on line websites (www.greenbook.net). The Clearfield trait for sunflowers was discovered in 1997 by Weed Scientists at Kansas State University who identified a population of wild sunflower resistant to ALS inhibitors. Sunflower geneticists crossed the resistant wild sunflower with cultivated sunflowers and were able to maintain the tolerance through backcrosses. Since this naturally occurring gene is incorporated into cultivated germplasm via traditional plant breeding procedures, it is not considered a genetically modified organism (GMO). Oilseed type Clearfield sunflower hybrids will be available for use during the 2003 season, and confection type sunflower hybrids may be available in 2004.
|
||||||||||||||||||||||||||||||||||||||||||||||||||||||||||||||||||||||||||||||||||||||||||||||||||||||||||||||||||||||||||||||
Growth Stages of Wheat - (Gregory Shaner and Bill Johnson)
For effective management of wheat, it is important to recognize the stages of growth as the crop develops. Heading date is a common indicator of relative maturity, but the ability to recognize other growth stages is important for judging the progress of the crop and making management decisions, such as application of fertilizer, herbicides, or fungicides, and for predicting the consequences of disease or injury to the crop. Two scales are commonly used to record the growth stage of wheat: the Feekes scale and the Decimal (Zadoks) scale. The Feekes scale is older and has been used widely since the early 1950s. The Decimal scale is designed to make finer distinctions among stages of crop growth, and is probably used more in Europe than in the US, although pesticide labels in the US are starting to use both scales. In the Feekes scale, growth stages are divided into 11 major categories. Head emergence, flowering, and grain filling (Feekes Growth Stages 10 and 11) are further subdivided. The Feekes Growth Stage scale is presented below, with a description of crop development stage that corresponds to each number. Corresponding Decimal Growth Stages are given in brackets. There are 9 major divisions (1-9) in the Decimal scale, with 10 possible subdivisions (0-9) for each major division. For example, the tillering stage is denoted by 2 in the Decimal scale, and the second digit indicates the number of tillers per plant. The Feekes scale simply notes whether tillers have begun forming (FGS 2), or whether tillering is essentially completed (FGS 3), without requiring the counting of tillers, although tiller number per plant could be appended after the “2”, e.g., FGS 2.4. In winter wheat, the period from beginning of tillering to completion of tillering may extend for a considerable time, from autumn into the following spring. Likewise, the precise limits of FGS 4 and 5 are not clear. Depending on planting date, variety, and weather in the fall, plants may reach the pseudo stem erection stage in the fall, or only in the spring as the crop comes out of dormancy. Jointing (FGS 6) can be clearly determined. The original Feekes scale simply defined stage 6 as when the first node was visible at the base of the shoot. The Decimal scale provides a more precise definition for this stage, namely when the distance between the crown and the first stem node is at least 1 cm (0.4 in.), and we have included this in the growth stage table. When the second aboveground node is at least 2 cm (0.8 in.) above the first node, the plant has reached FGS 7. The ability to recognize FGS 6 is important because it’s the cutoff for many herbicides, especially those that contain 2,4-D or dicamba (Banvel, Clarity). Application of these products after jointing can result in malformed heads, sterility, and reduced yield. The stage when the flag leaf first appears (FGS 8) is important for application of a foliar fungicide. Soft red winter wheat in Indiana typically has 4 aboveground nodes when fully developed. The sheath of the uppermost leaf (flag leaf, F) arises from the top node. The leaf below the flag leaf (F-1) arises from the next node down, etc. Thus, leaf F-3 arises from the lowest aboveground node. The lowest aboveground node is near the ground when it first appears, but will move upward somewhat as the stem elongates. At FGS 8, there are usually two clearly differentiated nodes on the stem. The lowest will average about 7 cm (2-3/4 in.) above the soil line. The second node (from which leaf F-2 arises) will be about 15 cm (6 in.) above ground. The third node will usually be visible, but because it is only about 1 cm (0.4 in.) above node 2, it is not counted. As the wheat continues to grow, the distance between nodes increases, and the fourth node becomes evident. Feekes 8 is the cutoff for Harmony Extra and Harmony GT, two products that are commonly used for control of wild garlic. Once the flag leaf blade has fully emerged, the flag leaf sheath extends. By this time, the head enclosed in this leaf sheath is swelling, and the plant enters the boot stage (FGS 10). The heads of all plants in a field will not emerge from the boot synchronously. Stages 10.1 through 10.5 are best assigned according to when heads on about half the plants have reached the indicated degree of emergence. Flowering in wheat begins roughly in the middle of the head and progresses both upward and downward. Flowering at a given position in the head can be judged by the presence of extruded anthers. Ripening is judged by removing developing kernels from the center of several heads and determining whether the contents are watery, milky, or at the soft or hard dough stages. By the time wheat has reached FGS 8, leaves F-5 and below are usually withered, from infection by Septoria, Stagonospora, and other fungi. The next leaf up (F-4) usually withers about the time heads have fully emerged. In the absence of Septoria and Stagonospora blotches, powdery mildew, or other foliar diseases, leaves F-3 through F should remain green until the wheat approaches maturity. Often, however, disease destroys leaves at each layer of the canopy prematurely. Fungicide control is aimed at maintaining these leaves, particularly F and F-1, in a healthy condition. If a grower is planning to apply a fungicide at flag leaf emergence (FGS 8), it would be helpful to know when that stage will be reached, relative to some earlier, easily determined growth stage. The jointing (FGS 6) and 2-node (FGS 7) stages can be accurately determined if a wheat field is monitored frequently. The time required for a plant to progress from either of these stages to FGS 8 is not constant. It depends on weather conditions, particularly temperature. Over many years, we have monitored wheat crop development in various field trials, and the following observations can give some guidelines for the time required for plants to progress from one growth stage to another. We found that it takes about a week to progress from FGS 6 to FGS 7, and another 8 days to go from FGS 7 to FGS 8 (with a range of 5 to 10 days). It can take from 3 to 8 days for the flag leaf blade to fully expand (going from FGS 8 to FGS 9). It can take from 9 to 16 days to progress from FGS 9 to full head emergence (FGS 10.5) or the beginning of flowering (FGS 10.5.1).
Yellowing of Wheat - (Gregory Shaner)
The fluctuating temperatures of the past couple of weeks can promote development of symptoms of two common diseases of wheat. Wheat that has greened up and started producing new leaves may show a yellow mosaic on young leaves. These symptoms can result from infection by either of two soilborne viruses: Soilborne wheat mosaic virus and Wheat spindle streak mosaic virus. Both viruses persist in a common soilborne fungus. This fungus infects wheat roots in the fall. Infection by the fungus itself is of little consequence, but it does allow transmission of the viruses to the plant. Symptoms of virus infection don’t appear until the following spring. The timing of symptom development depends on weather. Intermittent periods of warm and cold weather favor symptom development. Both viruses cause a yellowing of foliage. Soilborne wheat mosaic virus, as its name implies, causes a mosaic – narrow, pale green to yellow, wavy-margined streaks on the leaf blade. Symptoms caused by Wheat spindle streak mosaic virus infection are similar, but the streaks tend to taper at both ends, hence the name “spindle.” From a distance, fields or parts of fields are pale green or yellow, as though they are deficient in nitrogen. In practice, it is very difficult to distinguish these two diseases based on symptoms. Both viruses may be found in the same field, and both viruses may infect a single plant. Wheat spindle streak virus tends to be more uniformly distributed throughout fields than is Soilborne wheat mosaic virus. Most varieties of soft red winter wheat grown in Indiana have some degree of resistance to these viruses. They may show some yellowing during periods of fluctuating temperatures during the spring, but once the cold weather is past, these varieties tend to outgrow the symptoms on lower leaves and there is probably little damage. A few varieties are more susceptible. The intensity of yellowing is greater, and is accompanied by stunting, reduced tillering, and death of some plants in the field. These varieties will suffer economic damage from these diseases. Some varieties show a rosette symptom when infected by Soilborne wheat mosaic virus. They produce numerous, stunted tillers. There is no remedial action that can be taken at this stage. If a variety develops severe symptoms, don’t plant it again next year. There are plenty of varieties with good resistance.
|
||||||||||||||||||||||||||||||||||||||||||||||||||||||||||||||||||||||||||||||||||||||||||||||||||||||||||||||||||||||||||||||
![]()