Pest & Crop Newsletter
|
||||||||||||||||||||||||||||||||||||||||||||||||||
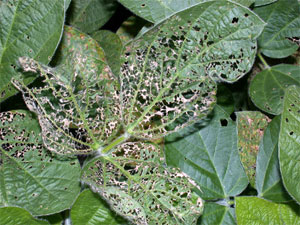
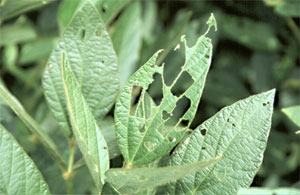
Hyper-linked Corn Seedling Insect Diagnostic Guide– (John Obermeyer and Larry Bledsoe) The following diagnostic guide has been developed to facilitate field identification of soybean insect pests early in the season. Possible pest cause(s) are listed for each symptom below. Insect names are hyper-linked, clicking on them will link to pages for further information about pest, plant damage, scouting methods, and management guidelines. Recommended soybean insecticides can be found by clicking HTML or PDF. Happy and accurate scouting!
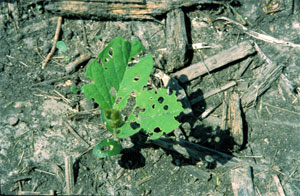
Corn Planting Conditions in Southern Indiana Ideal for Stink Bugs– (John Obermeyer and Larry Bledsoe)
Late corn planting into soils that are too wet leaves the door open for stink bug damage. Southern Indiana counties are at greatest risk from this little seen pest. The situation that seems to favor the development of stink bug problems the most is where corn is no-tilled following small grains used as a winter cover crop or where planted into very weedy fields. When the cover crop or weeds are killed by herbicides, the stink bugs shift their feeding to the emerging corn.
Stink bugs feed on corn by inserting their straw-like beak into the stalk while injecting an enzyme, which helps digest plant tissue. They prefer to feed in the area of the growing point. When seed slots are not properly closed during planting, stink bugs may feed on this vital tissue. It is important to remember that spiking corn plants are most vulnerable to attack and damage. By the time feeding symptoms appear, the damage has been done and the stink bugs are long gone. Symptoms vary from linear holes in the leaves, twisted or deformed stalks, plant suckering, and occasionally plant death. This damage can often be confused with many other causes, e.g., herbicide injury, rotary hoe, billbugs, etc. Sampling for stink bugs is difficult and time-consuming. High-risk fields with prior history of stink bug damage and/or where stink bugs are noted during corn emergence, especially if seed-slots are not properly closed, may require a rescue treatment of a foliar insecticide. Baythroid 2 (1.6 – 2.8 fl. oz/A), Mustang Max (2.7 – 4.0 fl. oz/A), Penncap-M (1-3 pt./A) or Warrior (2.5-3.8 fl. oz/A) are labeled for stink bug control in corn. Read and follow label directions and restrictions!
Replanting Corn and Soil Insecticide Restrictions– (John Obermeyer and Larry Bledsoe)
Last week we discussed that overwintering rootworm eggs are able to survive in ponded conditions, whereas the insecticides might lose their effectiveness. Should replanting corn be necessary, soil insecticides have restrictions as to the amount of product that can be applied per season as stated on the label. Because the label is the law, this is not to be exceeded. Of all the soil insecticides, Lorsban 15G is the only one you can legally reapply, if you do not exceed the 16-ounce restriction. The bottom line is that, if you choose to reapply a soil insecticide during replanting, it should be a different active ingredient from what you used the first time (exception is Lorsban 15G). Remember, your granular insecticide boxes will have to be recalibrated for the new product since all products are formulated differently. If areas of the field are drowned out, then planting into, or as close to, the original row is a possibility. The potency of the original soil insecticide may or may not provide sufficient control of rootworm larvae. How much of the original insecticide remains is at best a guess. Flooding can cause physical movement, leaching, hydrolysis, and hasten degradation of the insecticide. Much of this is dependent upon how long the water stands in the field, how fast the water moves out of the field or through the soil profile, and soil temperatures. So, if you’re “feeling lucky,” and you are confident of placing the new seed in the old treated row, relying on the original insecticide prevents another $15+ investment in replanting costs.
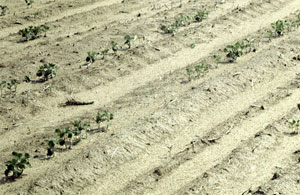
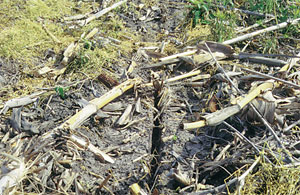
Planting Into Ugly Fields– (John Obermeyer and Larry Bledsoe) Many insect and insect-like critters find high-residue, weedy fields hospitable during the spring months. Flying insects may find the tall and flowering weeds the perfect place to lay eggs, whereas some will thrive in the moist, undisturbed residues on the soil surface. Most of these critters do not injure field crops. However, these misplaced insects are sometimes forced to feed on emerging crops when residues are disturbed and/or weeds are killed. Their presence or feeding will often catch the attention of those monitoring fields and provide some excitement. However, these occasional invasions are often short-lived as they starve to death or migrate to greener “pastures.”
Click for Table
|
||||||||||||||||||||||||||||||||||||||||||||||||||
Postemergence Control of Grass Weeds in Field Corn- (Bill Johnson, Glenn Nice, and Tom Bauman) With the recent wet, rainy weather, the performance of soil applied herbicides on grass weeds will be less than optimal because of dilution by all of the precipitation. Grass weed escapes will be common and it is important to control early-season grass in corn to minimize competition and subsequent yield losses. Although several of the postemergence grass herbicides are effective on large weeds, an important point to keep in mind is that most of these herbicides should be applied before the grass weeds are 4 inches tall (except for shattercane and johnsongrass) to assure the most effective control and to minimize yield losses due to weed interference. If soil-applied herbicides are not adequately controlling grassy weeds or if one is utilizing postemergence strategies for grass control, several herbicides are available that are labeled for postemergence grass control in corn.
|
||||||||||||||||||||||||||||||||||||||||||||||||||
Scab (Fusarium Head Blight) of Wheat– (Gregory Shaner)
The persistent wet weather of the past 3 weeks may result in more scab on wheat than we have seen for several years. The critical time for infection is during flowering and early kernel development. Depending on the area of the state and the maturity of the cultivar, wheat began flowering more than a week ago or is just reaching the flowering stage now. Crops that are just now entering the flowering stage, as cooler and drier weather moves into Indiana, are probably at less risk than crops that flowered anytime during the past 10 days. Scab is fairly easy to recognize. A week to 10 days after flowering, some or all of the spikelets on a head will turn white. Typically when the disease first appears in a field, only a portion of the head is affected. The white spikelets may be in the middle of the head, at the tip, or at the base. Over the next several days, the entire head will turn white. The sequence of flowering in a wheat head accounts for this pattern of symptom development. A wheat head begins flowering near the middle. Over the next 2 or 3 days, flowering progresses toward the base and the tip of the head. Anthers shed some of their pollen within the floret, and then extrude. These extruded anthers are thought to be the main site of infection by the pathogen. If infection occurs when a head begins flowering, the symptoms will first appear in the middle of the head. If infection occurs later in the flowering period, symptoms will appear first at the tip or the base. I have occasionally seen a head with bleached spikelets at both the tip and the base of the head, probably the result of infection at the tail end of the flowering process. Wheat that has completed flowering is not entirely safe from infection. The fungus can infect the developing kernel directly, provided spores can gain entrance to this organ. The number of heads in a field that are blighted depends on how much inoculum is present and how favorable conditions are for infection. Once infection is established in a head, the fungus invades the rachis and grows internally toward the peduncle, invading other spikelets along the way. A head that initially may have had only one or two blighted spikelets will become totally blighted within 2 weeks of when symptoms first appear. Scab is caused by any of several species in the fungal genus Fusarium. In North America, Fusarium graminearum seems to be most often responsible for scab. This same fungus, often referred to by its other name, Gibberella zeae, is a common stalk rot and ear rot pathogen of corn. Even though a corn crop may not have shown any stalk rot or ear rot, the fungus is very common in dead corn stalks. In the spring, the fungus produces small, black, spherical fruiting bodies on corn residue, especially near the nodes of stalks. Wind disperses microscopic spores produced in these fruiting bodies. Spores that land on wheat heads, especially during flowering, can infect and cause head blight. Last year, researchers at Ohio State University developed a weather-based wheat scab forecast, based on epidemiological data collected in several states, including Indiana. This model requires hourly temperature and precipitation data. Now that the Purdue regional agricultural centers have automated weather stations that collect the required data, I was able to run the model for several locations in Indiana. The model uses the number of hours per day that temperature falls within the range of 15 to 30 ?C and the number of hours of precipitation per day, for a period of 7 days before anthesis. For each location, I ran the model using anthesis dates of 14 to 18 May (some wheat fields in central and northern Indiana had not reached flowering by these dates). The model gives the probability of a “severe” epidemic of scab. A severe epidemic is defined as one in which more than 10% of the heads are blighted. The model suggests that wheat in the southern third of Indiana is at greater risk than wheat in the central or northern part of the state. Even in the south, it’s about a toss-up as to whether scab will be severe or not, but it is likely that some scabby heads will appear over the next week or two. I must emphasize that this model is still in the testing stages, and these predictions should only be considered as rough indications of what to expect. We are continuing the multi-state epidemiological research this year and hope to refine the prediction model, as more data are available.
|
||||||||||||||||||||||||||||||||||||||||||||||||||
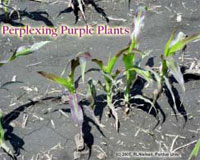
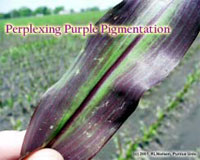
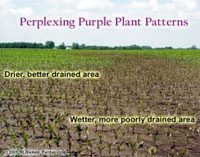
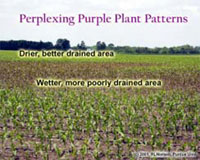
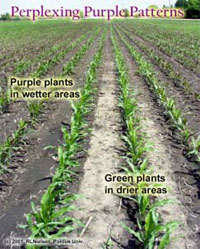
Possibility for Prevalence of Purple Plants- (Bob Nielsen)
Don’t be surprised if some of your early-planted fields of corn begin to exhibit noticeable shades of red and purple over the next week or so. The short-range weather forecast calls for conditions that favor the development of a preponderance of perplexing purple plants. There’s no question that many early-planted cornfields throughout the state have suffered through soggy soil conditions during the past several weeks. The additional stresses imposed by the forecasted cool nights (40’s F) and bright sunny days (high levels of visible and UV radiation) may be the final “triggers” that result in fields of pretty purple plants over the coming days. Since the anthocyanin occurs in the form of a sugar-containing glucoside, the availability of high concentrations of sugar in the leaves (photosynthesis during bright, sunny days) further encourages the pigment formation. If fields are stressed by other factors such as soil compaction, herbicide injury, disease damage, or insect injury, the purpling will likely be even more pronounced. It has been my experience that the combination of bright, sunny days and cool nights when corn ranges from V3 to V6 in development (3- to 6-leaf collar stages) most commonly results in plant purpling. Hybrids with more anthocyanin-producing genes will purple more greatly than those with fewer “purpling” genes. In most cases, the purpling will slowly disappear as temperatures warm and the plants transition into the rapid growth phase (post-V6). I have rarely diagnosed phosphorus deficiency as the primary cause of purple plants early in the season. Nonetheless, cold or wet soils inhibit root development and can aggravate a true phosphorus deficiency situation, frequently causing even more intense leaf purpling. What About Yield Losses? Does the leaf purpling lead to yield losses later on? The cause of leaf purpling, not the purpling itself, will determine whether yield loss will occur by harvest time. If the main cause is the combination of bright, sunny days and cool nights, then the purpling will disappear as the plants develop further with no effects on yield. If the stress of restricted root systems is a major contributor to the purpling, then the potential effects on yield depend on whether the root restriction is temporary (e.g., cool temperatures & wet soils) or more protracted (e.g., soil compaction, herbicide injury). Plants can recover from temporary root restrictions with little to no effect on yield. If the root stress lingers longer, the purpling may continue for some time and some yield loss may result if the plants become stunted. Remember that the effects of early season damage to the seed or root system can be magnified when corn is already developing slowly due to cool, cloudy weather. One point of possible good news about purpling in young corn plants is that some speculate that the formation of anthocyanin pigments in the leaf tissue may in fact confer a level of cold temperature hardiness by virtue of osmotic control. The result being that purple plants may be less likely to suffer injury from an unexpected late frost. Kim, Jae Hak. 1998. Maize Anthocyanin Pathway. Pennsylvania State Univ. Available online at http://scripts.cac.psu.edu/courses/plphy/plphy597_hef1/mpath.html. [URL verified 5/21/03]. Editorial note: This link is for biochemistry fans!
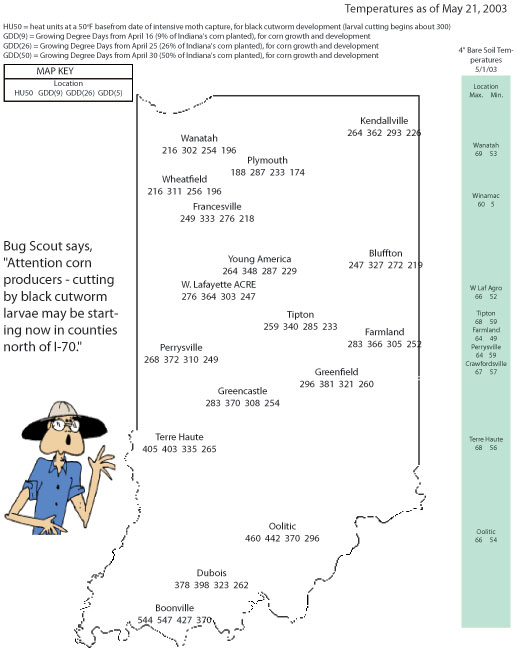
Use Thermal Time to Predict Leaf Stage Development in Corn - (Bob Nielsen) Being able to predict when a field of corn will reach particular leaf stages can be useful for scheduling post-emergence applications of certain herbicides and sidedress N fertilizer, especially if your farming operation is so large that field inspections are difficult to work into your busy schedule. Research by one of my former graduate students helps fine-tune our ability to predict the portion of corn phenology that we call leaf stage development. Review of Concepts. For a refresher on how corn leaf staging is done, be sure to read my accompanying article “Determining Corn Leaf Stages” (Nielsen, 2003a). Another topic that probably needs reviewing is the concept of heat units (HUs) or growing degree days (GDDs). The concept is important because corn phenology is very dependent on temperature. Heat unit or GDD calculation for corn phenology is described in another accompanying article “Heat Unit Concepts Related to Corn Development" (Nielsen, 2003b). Predicting Corn Phenology. Given an understanding of corn leaf stage development and heat unit calculation, you are now prepared to predict the leaf stage of development for a particular field given its planting date and temperatures since planting. It is useful if you know when the crop emerged, but if not you can estimate that event also. Corn emergence typically requires about 125 GDDs from planting. Based on the research by my former student (Wuethrich, 1997), we know that corn leaf development rates can be accurately described by two linear response curves. From emergence to leaf stage V10 (ten visible leaf collars), leaf collar emergence occurs at about one leaf every 85 GDDs. From leaf stage V10 to the final leaf, leaf collar emergence occurs more rapidly at approximately one leaf every 50 GDDs. Example 1: A field was planted on April 28 and emerged on May 5. Since May 5, approximately 535 GDDs have accumulated. Based on our research data, the estimated leaf stage for the crop (without looking at the field, mind you) would be between V6 and V7 (6 leaves x 85 GDDs = 510 GDDs; 7 leaves x 85 GDDs = 595 GDDs). Example 2: A field was planted on April 28, but you do not know exactly when it emerged. Since planting, approximately 785 GDDs have accumulated. If you assume that the crop emerged in about 125 GDDs, then the estimated leaf stage for the crop would be between V7 and V8. This estimate is calculated by first subtracting 125 from 785 to account for the thermal time to emergence, then dividing the result (660) by 85 (equal to 7.8). Example 3: A field was planted on April 28 and emerged on May 5. Since May 5, approximately 1200 GDDs have accumulated. Your familiarity with these calculations tells you that the crop is likely beyond V10 (equal to 10 x 85 or 850 GDDs since emergence). So, first subtract 850 from 1200 (knowing the crop is at least at V10). Divide the result (350) by 50 to equal 7 additional leaves; for a total estimated leaf stage of V17. Keep in mind that estimates of leaf stage development are only that, estimates. One of the factors that most influences the accuracy of these estimates is the existence or not of other growth-limiting stresses. Severe plant stress will generally retard stem and leaf sheath elongation, thus delaying the appearance of leaf collars. However, what I have described here will put you in the proverbial ballpark in determining which fields are at which leaf stages on a given day. Related References
Heat Unit Concepts Related to Corn Development- (Bob Nielsen) Growth and development of corn are strongly dependent on temperature. Corn develops faster when temperatures are warmer and more slowly when temperatures are cooler. For example, a string of warmer than normal days in late spring will encourage faster leaf development than normal. Another example is that a cooler than normal grain filling period will delay the calendar date of grain maturity. The phrases “string of warmer than normal days” and “cooler than normal grain filling period” can be converted mathematically into measures of thermal time by calculating the daily accumulations of heat. Commonly used terms for thermal time are Growing Degree Days (GDDs), Growing Degree Units (GDUs), or heat units (HUs). Different methods exist for calculating heat units depending on a) the crop or biological organism of interest and b) the whim or personal preference of the researcher. The calculation method most commonly used throughout the U.S. for determining heat unit accumulation relative to corn phenology is the formula first suggested by the National Oceanic and Atmospheric Administration in 1969 and labeled as the ‘Modified Growing Degree Day’ formula in 1971. This method calculates daily accumulation of GDDs as the average daily temperature (°F) minus 50. The “modification” refers to the limits imposed on the daily maximum and minimum temperatures allowed in the calculation. Daily maximums greater than 86°F are set equal to 86 in the calculation of the daily average temperature. Similarly, daily minimums less than 50°F are set equal to 50 in the calculation. Example 1: If the daily maximum temperature was 80°F and the minimum was 55°F, the GDD accumulation for the day would be ((80 + 55)/2) – 50 or 17.5 GDDs. Example 2 (Illustrating the limit on daily maximums): If the daily maximum temperature was 90°F and the minimum was 72°F, the GDD accumulation for the day would be ((86 + 72)/2) – 50 or 29 GDDs. Example 3 (Illustrating the limit on daily minimums): If the daily maximum temperature was 68°F and the minimum was 41°F, the GDD accumulation for the day would be ((68 + 50)/2) – 50 or 9 GDDs. In late April to early May, normal daily GDD accumulations for central Indiana are about 10 GDDs. By late July, the normal daily accumulation rises to about 23 GDDs. For a typical corn growing season in central Indiana, say from late April to late September, the total seasonal accumulation of GDDs is about 2800 GDDs. Historical normal GDD accumulations on a weekly basis for Indiana’s nine Crop Reporting Districts are available in Purdue’s Corn & Soybean Field Guide, Extension publication # ID-179. Daily or monthly normal GDD accumulations for Indiana are also available at the Indiana Climate Page Web site (Scheeringa, 2003). Obviously, the ability to calculate daily heat unit accumulations is dependent on your having access to daily maximum and minimum temperatures. If you do not have your own max/min recording thermometer, you can guesstimate the daily highs and lows by manually recording the temperatures shortly after sunrise (approximate daily low) and late in the afternoon (approximate daily high). Daily temperature data for specific locations throughout Indiana are also recorded and reported at the Indiana Climate Page Web site (Scheeringa, 2003). In lieu of recording your own daily temperatures, you can use those of the nearest reporting station. Finally, the weekly Purdue Pest & Crop Newsletter lists accumulated GDDs for selected sites across the state based on various start dates.
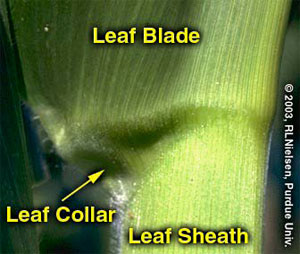
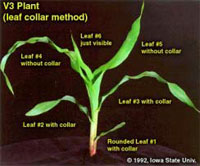
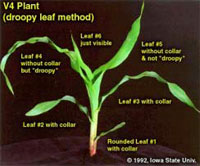
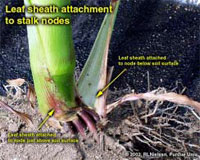
Determining Corn Leaf Stages- (Bob Nielsen)
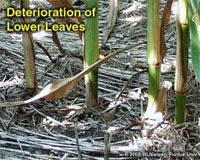
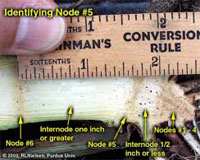
Many of us remember standing against the doorframe in our early years and our parents marking our height with a pencil to measure how much we had grown. Maybe some of you spent more time standing in the corner in your youth, but I won’t comment on that. Because it is difficult to transport corn plants from the field to that doorframe to measure their growth, agronomists developed other means to measure the phenology or development of corn. Counting the number of leaves would seem to be a simple way to document corn development, but folks still tend to become confused over this simple strategy. There are two basic methods for leaf staging corn in use today. Leaf Collar Method. This method determines leaf stage in corn by counting the number of leaves on a plant with visible leaf collars, beginning with the lowermost, short, rounded-tip true leaf and ending with the uppermost leaf with a visible leaf collar. The leaf collar is the light-colored collar-like “band” located at the base of an exposed leaf blade, near the spot where the leaf blade comes in contact with the stem of the plant. Leaves within the whorl, not yet fully expanded and with no visible leaf collar are not included in this leaf staging method. Leaf stages are usually described as “V” stages, e.g., V2 = two leaves with visible leaf collars. The leaf collar method is generally the most widely used method by university and industry agronomists in the U.S. “Droopy” Leaf Method. Crop insurance adjusters, when assessing damage to a corn crop from weather events such as hailstorms, use this leaf staging method. Like the leaf collar method, this method of leaf staging begins with the short first leaf. Leaf counting then differs, though, by ending not with the uppermost leaf with a visible collar, but at that leaf that is at least 40 to 50 percent exposed from the whorl. In knee-high corn or older, the tip of this “indicator” leaf typically also “droops” or hangs down, hence the name “droopy” leaf method. The Two Methods Compared. Up to the 5- or 6-leaf collar stage, the leaf collar method will typically result in a leaf stage value that is one less than the “droopy” leaf method. After corn reaches 18 to 24 inches in height, the leaf collar method will typically result in a leaf stage value that is two less than the “droopy” leaf method. The usefulness in understanding the differences between these two leaf staging methods lies in the fact that the defoliation/yield loss chart used by hail insurance adjusters is based on the “droopy” leaf method. That chart is reproduced in the Purdue Extension publication ID-179, Corn & Soybean Field Guide. Identifying true “droopy” leaves on shredded, hail-damaged corn plants can be quite difficult, whereas leaf collars are often still identifiable. Thus, you can usually stage a damaged crop by the leaf collar method and then add one or two more leaves to the count in order to use the defoliation chart. What About Herbicide Labels? Growers’ confusion with leaf staging often originates with poorly described growth stage restrictions listed on herbicide labels. Label restrictions of older post-emergence herbicides typically ignored the short first leaf with the rounded tip and ended with the uppermost leaf that was at least 50% exposed from whorl. In essence, this was a bastardized “droopy leaf” method that resulted in roughly the same numerical leaf stage as the leaf collar method. Newer labels purport to define leaf stages according to the leaf collar method, but there is still some question about whether the short first leaf with the rounded tip is included. If in doubt with these newer herbicides, check with your chemical technical representative to verify which leaf staging method is appropriate for the herbicide you intend to use. Staging Older Plants. As corn plants develop, the lower few leaves typically die or rip away from the stem by expansion of the stalk or by developing roots. Consequently, growth stage identification can be difficult on older plants when you aren’t sure which leaves to begin counting first. But, not to worry, growth staging can still be accomplished! First, dig or pull a plant without breaking the stalk. With a knife, carefully split the stalk down the middle, completely through the root ball. Look for the lowermost obvious internode (the whitish area between the “woody” horizontal stalk nodes) above the triangular “woody” base of the stalk. This first internode’s length is typically only 1/2 to 3/4 inch. Determine which leaf corresponds with the node immediately above the first noticeable internode by carefully identifying which leaf sheath attaches to the node. This leaf is usually Leaf #5. Once Leaf #5 is identified, then stage the plant by continuing to count the remainder of the leaves with visible leaf collars above Leaf #5. For example, assume you’ve identified Leaf #5 and there are six more leaves above that one with visible leaf collars, then the plant is at leaf stage V11 (11 leaves with visible leaf collars). Don’t forget, this and other timely information about corn can be viewed at the Chat ‘n Chew Café on the Web at http://www.kingcorn.org/cafe. For other information about corn, take a look at the Corn Growers’ Guidebook on the Web at http://www.kingcorn.org.
|
||||||||||||||||||||||||||||||||||||||||||||||||||
Diagnostic Training Workshops – (Corey Gerber, Interim Director, Diagnostic Training Center) The Purdue University Crop Diagnostic Training and Research Center is known across the Midwest for its unique “hands-on” approach for teaching the art and science of accurately diagnosing agricultural crop problems. The purpose of a diagnostic training workshop is two-fold. First, a workshop is an excellent way to improve agronomic field trouble-shooting skills. Second, a workshop is designed to increase the knowledge of management skills necessary to provide technical information to clientele. At this Center, many small plot demonstrations illustrate insect, nematode, weed, disease, soil fertility, and cultural problems associated with corn, soybean, forage, and wheat production. Extension, research, and teaching staff from Purdue University’s departments of Agricultural and Biological Engineering, Agronomy, Botany and Plant Pathology, and Entomology, as well as other leaders in the agricultural community across the U.S., conduct each workshop. The Diagnostic Training Workshops provide pertinent information on interacting factors of nutrient, pest, and environmental stresses. Due to the “hands-on” nature of these workshops, enrollment is limited to 60 people per day. Concurrent sessions of 20 to 30 registrants will limit class size and provide a better learning atmosphere. Additional information on the Purdue Crop Diagnostic Training and Research Center can be found at: http://www.agry.purdue.edu/dtc. You can also download the workshop registration form http://www.agry.purdue.edu/dtc/regist.html and review the DTC calendar of events.
|
||||||||||||||||||||||||||||||||||||||||||||||||||
|
||||||||||||||||||||||||||||||||||||||||||||||||||


![]()