
Pest & Crop Newsletter
|
|||||||||||||||||||||||||||||||||||||||||||||||||||||||||||||
Winter Temperatures, Corn Flea Beetle Survival, Stewart's Wilt, and Management Tactics– (John Obermeyer, Rich Edwards, and Rick Foster)
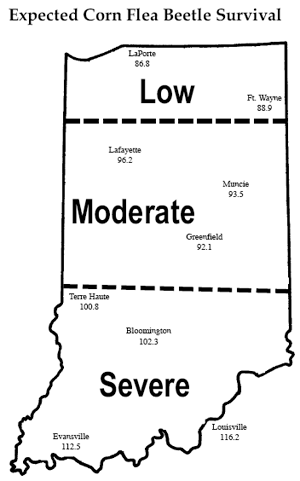
Winter temperatures have a direct impact on how well the corn flea beetle overwinters. This is especially important since this insect can vector and transmit the bacterial disease, Stewart’s wilt. The severity of the disease correlates well with winter temperatures, because the bacteria survives in the gut of the overwintering beetle. Warmer temperatures result in higher beetle survival, and greater potential disease problems. To determine the potential severity of Stewart’s disease, add the average daily temperatures for the months of December, January, and February. If the sum is below 90, the potential for disease problems to develop is low. If between 90 and 100, moderate disease activity is a possibility. Sums above 100 indicate a high probability that severe problems will develop for some types of corn. To help you better gauge the potential for corn flea beetle activity in your area, and thus the potential severity of the threat of the disease, we have created the following state map. As you can see, there is a high probability of corn flea beetle activity and subsequent disease transmission in southern Indiana. There are two phases of Stewart’s: a wilt phase and a leaf blight phase. In the wilt phase, plants wilt rapidly, usually at an early stage of growth. Sweet corn hybrids are especially susceptible. Some dent corn inbreds, an occasional dent corn hybrid, and some popcorn lines are susceptible as well. Dent corn hybrids rarely wilt after growth stage V5. Leaves emerging from the whorl of infected plants are often the first to wilt. Internal tissues at the growing point are discolored or hollowed out. Faint green to yellow streaks containing corn flea beetle feeding marks are visible on one or more leaves. If stalks of wilted plants are cut, it may be possible to see yellow, moist beads of bacterial ooze. The leaf blight phase can occur at any time during the growing season, but often does not appear until after tasseling. Lesions are long and narrow, with pale green to yellow streaks and irregular or wavy-margins. Streaked areas die and become straw-colored. Severely infected leaves may die prematurely. Management decisions, when high numbers of beetles are anticipated, are based on the corn’s susceptibility. Low susceptibility - concern is not of disease transmission but rather from severe feeding that may kill the plant, though this is rare. Flea beetle “scrape” the green tissue from the leaf surface, giving a gray or frosted appearance to the plant. Wind causes the leaves to separate and take on a tattered appearance. A foliar rescue treatment may be needed if damage is severe, there are 5 or more beetles per plant, and the seedling is growing slowly (e.g., cool temperatures). High susceptibility - sample field edges (i.e., overwintering sites) before or immediately following planting to assess the potential beetle movement into the field. A sweep net is the ideal sampling tool. If beetles are discovered, then a prophylactic insecticide application is warranted. Two soil systemic insecticides that should give good control of flea beetle are available at planting, Counter CR and Furadan 4F. Counter will provide rootworm control but may cause inbred damage where sulfonylurea herbicides are used. Furadan may require re-tooling the planter for a liquid formulation and rootworm control, when applied at planting, will be minimal. If a systemic soil insecticide is not an option, use broadcasted foliar insecticides at corn emergence that provide 7 to 10 days of residual protection from beetle movement into the field. CAUTION: treating field edges and waterways for the beetle may not only be off label, but is also a threat to aquatic environments should rains move the soil-bound insecticide. Last year, Indiana received a Section 18 emergency exemption for the use of Gaucho 480 Flowable for corn flea beetle control in seed corn. This exemption expired July 1, 1999. According to the Office of Indiana State Chemist’s records, no Gaucho was used last year for this purpose. Therefore, it is doubtful that a similar request will be made to the EPA for the 2000 growing season.
Capture 2 EC and Rootworm Larval Control– (John Obermeyer, Rich Edwards, and Larry Bledsoe)
FMC Corporation recently labeled Capture 2 EC, a foliar synthetic pyrethroid, for corn rootworm larval control when applied at planting. This certainly took us by surprise! Interestingly, we were supplied with an updated label but no efficacy data to support its use. After searching, we found a few university trials that had been done in states on the fringe of the Corn Belt. In those trials Capture provided “middle-of-the-road” root ratings. Capture 2 EC must be applied in a 5-7 inch T-band over an open seed furrow in front of the press wheel. Planters will need to be rigged for a liquid application, although this product can be mixed and applied with pop-up fertilizer. Urban entomologists, that use this same chemistry (Biflex®) for a soil-applied termiticide, caution us to use plenty of carrier. The rootworm label states, “apply in a minimum of 3 gallons of finished spray per acre.” Though Capture and Regent are both liquid soil insecticides, they MUST be applied differently … Capture in a T-band and Regent in-furrow. Purdue University, and surrounding states, will get their first opportunity to evaluate this product as a soil-applied rootworm insecticide in the upcoming season. We are just beginning to collect rootworm efficacy data on this and other products, i.e. Regent 4 SC, ProShield, and transgenics. We will share with you updates on these products, but we are firm believers that products need to be tested for several years over a large geographical area before dependable recommendations can be made. Case-in-point, remember Amaze® granular soil insecticide in the early 1980’s? This product looked promising for a season in university/on-farm trials, then failed so poorly in widespread use the second year that it was pulled from the market.
|
|||||||||||||||||||||||||||||||||||||||||||||||||||||||||||||
Growth Stages of Wheat– (Gregory Shaner)
For effective management of wheat, it is important to recognize the stages of growth as the crop develops. Heading date is a commonly-recognized indicator of relative maturity, but the ability to recognize other growth stages is important for judging the progress of the crop and making management decisions, such as application of herbicides or fungicides, and for predicting the consequences of disease or injury to the crop. The Decimal Growth Stage equivalent to each Feekes Growth Stage is given in brackets at the end of the description of that stage. There are nine major divisions (1-9) in the Decimal scale, with ten possible subdivisions (0-9) for each major division. For example, the tillering stage is denoted by 2 in the Decimal scale, and the second digit indicates the number of tillers per plant. The exact number of tillers per plant prior to jointing is more detail than usually required. The Feekes scale simply notes whether tillers have begun forming (FGS 2), or whether tillering is essentially completed (FGS 3), without requiring the counting of tillers.
In winter wheat, the period from beginning of tillering to completion of tillering may extend for a considerable time, from fall into the following spring. Likewise, the precise limits of FGS 4 and 5 are not clear. Depending on planting date, variety, and weather in the fall, plants may reach the pseudostem erection stage in the fall, or only in the spring as the crop comes out of dormancy.
Virus Diseases of Wheat– (Gregory Shaner) Two diseases caused by soilborne viruses commonly appear on wheat in Indiana during the spring. These are soilborne wheat mosaic and wheat spindle streak mosaic. Both viruses persist in a fungus that is common in the soil. This fungus infects wheat roots in the fall. This infection is of little consequence, but it does allow these viruses to enter the plant. Symptoms of virus infection don’t appear until the following spring. The timing of symptom development depends on weather. A long, cool spring with intermittent periods of warm and cold weather seems to favor symptom development. The unusually warm weather we experienced during the first week of March, followed by a return to more typical March weather, will probably bring symptoms on during the next several days.
|
|||||||||||||||||||||||||||||||||||||||||||||||||||||||||||||
Minimizing Pollen Drift & Commingling of GMO and non-GMO corn Grain– (Bob Nielsen)
GMO: Genetically Modified Organisms The great debate over GMO crops, also known as transgenic crops, continues in many circles of both the consumer and scientific worlds. Regardless of where you stand on this issue, farmers will be directly affected this fall if some grain buyers establish a strict threshold for minimum GMO content in the grain they purchase. Because the potential exists, albeit uncertain, for some grain buyers to limit their purchases of GMO corn grain this fall, Indiana corn farmers should make plans now for minimizing the potential for GMO “contamination” of any non-GMO corn grain that they intend on producing. Seed Purity Obviously, production of “pure” non-GMO grain begins with the seed. Seed of non-GMO hybrids may not be completely GMO-free because of less than perfect quality control during the seed production and processing operations. For your subsequent protection, ask for assurances of purity of the non-GMO seed you purchase and plant. If your seed company will not share the exact purity levels, ask them to at least tell you what their own seed purity standards are. Volunteer corn Avoid the possibility of volunteer GMO corn plants in your non-GMO corn fields this year by avoiding planting into last year’s GMO corn field. Pollen drift from such volunteer plants will result in some level of contamination in this year’s grain production. Planting operations To avoid the risk of GMO seed carryover in the planter when switching hybrids, organize your planting schedule to plant your non-GMO hybrids first and GMO hybrids last. This advice also applies to your planting of GMO and non-GMO soybean varieties. Planting date & hybrid maturity To a limited degree, it is possible to manipulate planting date and relative hybrid maturity to minimize the potential for pollen drift or cross-pollination between adjacent fields of GMO and non-GMO corn hybrids. Planting early maturity non-GMO hybrids first, followed with later maturity GMO hybrids last will reduce the chance for pollen from a GMO field to “contaminate” the silks of an adjacent non-GMO field. Bear in mind that this strategy is not perfect because of interactions of corn development with weather patterns and because the range of hybrid maturities you have purchased may not be that great. Obviously, this strategy is difficult to implement if you do not have control of the adjacent corn fields. Consequence of insect refuge areas Remember that the EPA recently mandated that farmers who plant Bt corn hybrids in 2000 must also agree to plant at least twenty percent of the land area to a non-Bt corn hybrid to minimize the genetic selection pressure for Bt resistance in the European corn borer population. The non-Bt refuge areas will, by default, cross-pollinate with the Bt hybrid planted in the same field and, therefore, produce grain “contaminated” with the Bt presence. Not much you can do about this. Other pollen drift avoidance strategies Any strategy that you develop to minimize the potential for pollen drift will be particularly useful for the south and west edges of non-GMO corn fields. This is because our prevailing winds in Indiana during the summer are from the southwest. Remember, the greater the distance between GMO and non-GMO corn fields, the less likely cross-pollination will occur.
Pollen drift risk assessment If you are really ambitious, you can make the effort to monitor the pollination timing of your fields and adjacent fields during this coming season. Consequently, you can then rank or prioritize your non-GMO fields in terms of their likely contamination susceptibility to GMO pollen drift from adjacent fields. For example, let’s say that your field of non-GMO BinBuster 1400 begins silking on 10 July and therefore becomes susceptible to fertilization by any corn pollen in the neighborhood. As you walk and watch your neighbor’s adjacent fields of Bt corn, you note that they began shedding pollen on 5 July. Given your knowledge of the pollination process (http://www.kingcorn.org/news/articles.99/articles.99/990705a.html), you know that there is a strong likelihood that some contamination by GMO pollen drift from those adjacent fields can still occur. If you also monitor wind direction during the pollination period, you can further refine your assessments by predicting which adjacent field is most likely to “cross over the line” in terms of pollen drift. Harvesting, drying and storage operations Plan to harvest all of your non-GMO hybrids first and finish with the GMO hybrids to minimize the risk of commingling of the grain in the combine and/or trucks and wagons. Similar advice can be given for soybean. You can further prioritize your corn harvest if you took pollination notes described above and ranked each field by its likely level of seed purity. Ensure your drying and storage facilities are absolutely clean of any GMO grain possibly left over from the 1999 crop. Consider moving or selling your GMO grain directly off the farm to avoid any possibility of grain commingling in your drying and storage facilities. Final comment Be aware that grain buyers who limit or segregate GMO corn grain purchases this fall will have quick test kits available to them for the detection of the Bt Cry1A(b) gene in the two major Bt events in the marketplace (Monsanto Mon810 and Novartis Bt11). Other tests for other genes/events may become available by fall. For more information on these kits, look at the Web site for Strategic Diagnostics, Inc. at http://www.sdix.com/.
Condition of the Indiana Winter Wheat Crop– (Ellsworth P. Christmas and Chuck Mansfield)
Unseasonably warm temperatures occurred across Indiana from February 15 until March 10, 2000. Maximum temperatures ranged from 78°F across northern Indiana to 80°F across southern Indiana. Over a three day period, the temperatures dropped to lows of 12°F at the Agronomy Research Center and 18°F at Vincennes. The high temperatures were very similar across the entire state, while the low temperatures were 6 to 10 degrees lower in northern Indiana. On the morning of March 12, low temperatures across Indiana ranged from 12°F at the Agronomy Research Center to 22°F at Dubois. Temperatures at most sites ranged from 12 to 18°F. We have received a few calls from individuals concerned about the possible damage to this year’s wheat crop. Based on the temperatures listed above and the length of time that the temperatures remained low, I would not expect to see much, if any, damage to the wheat crop. Leaf burn may be noticeable in some areas of the state, but is not evident in the Lafayette area since we had snow cover during the period when temperatures dropped below 20°F. A sudden drop in temperatures from the 70°F range to 12°F, for a period of at least two hours without snow cover, can result in slight to moderate leaf burn or chlorosis. We would not expect to see any of this type of damage anywhere in Indiana where snow covered the wheat on the night of March 11, and damage symptoms are unlikely to be evident even without snow cover. At this point in time, the 2000 Indiana wheat crop looks quite good with no obvious signs of winter injury. If wheat has not yet been top dressed, this would be a good time to apply the nitrogen. The one word of caution would be to use streamer bars when applying UAN 28% solution to minimize leaf burn. Once wheat starts to re-grow, leaf injury can further reduce root reserves and weaken the plant. If cool wet conditions occur when the wheat plants are in a weakened state, Rhizoctonia can attack the plants and significantly reduce the stand. For those of you in southern Indiana, keep an eye on the growth of the garlic. Many labels recommend that, for best control, herbicide application be made before garlic reaches 12 inches in height with 2 to 4 inches of new growth, as well as before the flag leaf appears on wheat. Be sure to read and follow the label directions for the product that you are using.
Planning for the 2000 Soybean Crop– (Ellsworth P. Christmas)
Managing the 2000 Soybean Crop With Weather in Mind Much of the coffee shop talk these days revolves around the potential impact of La Nina on the 2000 Indiana soybean crop. Since the first of the year, several individuals have contacted me regarding modifications in their plans for the 2000 soybean crop based on bad weather fears. From what I have heard and read, there is less than unanimous agreement on La Nina’s impact on the 2000 growing season. The one fact that is certain today is the unusually dry soil conditions that exist across northern and central Indiana for this time of year. Will these conditions continue? Let’s hope that they don’t. The National Weather Service issued a statement on Monday March 13 that no relief is in sight at the present time. Normally, much of our subsoil recharge occurs with the March and April rains. The 2000 growing season could be very similar to normal, or it could vary significantly from normal. Therefore, to try to plan for a growing season quite different from normal is a major gamble. We must remember that a normal growing season is nothing more than the average of all growing seasons of all the years for which weather data is available. Each growing season could, and in most cases does, vary from normal. Our big concern today is to what extent will it vary from normal in 2000. In my opinion, since we do not have a clear view of the 2000 weather pattern, we should treat this year as any other normal year. Furthermore, I suggest that the soybean production system adopted for this year be one designed to utilize best management practices to maximize an economic yield of the crop. I hear three things being discussed as possible areas where farmers may attempt to make modifications in their production system. These include changing maturity group, planting date, and seeding rate. The variety selected should be a full season variety for your geographic area with good disease resistance and yielding ability. An attempt to change to an earlier or later maturing variety could spell disaster. An early maturing variety does not have the ability to fully compensate for late July and August rains while a full season variety can respond nicely to these late rains. The 1997 growing season is a good reminder of the risk of using early season varieties. In many instances, the early maturing varieties had greatly reduced yields because they had ceased flowering when the late August 1997 rains came and could not compensate. The 1999 growing season is a good illustration of the impact of a drier than normal July, August, and September on the performance of varieties that mature later than full season varieties. In general, the later maturing varieties yielded less than full season varieties in 1999. If you can guess correctly on the timing of a dry period during the growing season, then you could change the maturity group to your advantage. The period between May 5 and May 20 is the ideal window to plant soybeans most years in Indiana. Planting earlier than April 25 or later than June 5 usually results in a significant yield reduction. We need to remember that full season varieties planted on or before May 20 will usually begin flowering on approximately the same day whether planted in April or May. The idea that planting early will result in significantly earlier reproductive development of the soybean plant is false. When the time arrives for planting and the soil is unusually dry, I would still recommend that you go ahead and plant and wait for the rain. This approach is superior to waiting for rain, and then waiting even longer for the soil to dry before soybeans can be planted. Seeding rate should not be altered in anticipation of weather events. A population of 165,000 plants per acre in drilled soybeans is considered a perfect stand and would require a seeding rate of 200,000 seeds per acre. With a 30 inch row spacing, a perfect stand would be 105,000 plants per acre with a seeding rate of 130,000 seeds per acre. A 15 inch row spacing will require a seeding rate of 165,000 seeds per acre to give a perfect stand of 130,000 plants per acre. Much of the 2000 soybean seed supply was produced in areas with rainfall deficits in 1999 and therefore has a higher seed count per pound than normal. It will pay to calibrate drills and planters with the seed that you will be planting this year, and to check the calibration as you move from one seed lot to the next. Remember that over seeding by 5 pounds per acre on 100 acres is equal to 10 units of soybean seed. Proper calibration and seeding rates can result in input costs savings. The bottom line is that with the forecast information available today, we should plan for a near-normal growing season and develop our production system accordingly. Continuous Soybean Another issue receiving wide discussion this winter revolves around the desire to grow soybean following soybean or the production of continuous soybean. A number of factors need to be considered before that decision can be made. The first very important piece of information that you need is your cost of production of both corn and soybeans. With these figures, you can now begin to determine the most profitable mix of crops for 2000. Factors that must be considered include: 1) yield loss from continuous vs rotational soybean, 2) input costs for both corn and soybean, and areas where these costs can be reduced, 3) local loan rate for soybean, and 4) potential impact of continuous soybean on future production problems. Long-term yield data from the Purdue Agronomy Research Center, for a 25 year period, indicate that the average yield of rotational soybean for this period was 50.8 bu/ac while continuous soybean yielded 46.2 bu/ac or a reduction of about 10%. In the last 10 years of this study, the rotational vs continuous soybean yielded 52.03 and 45.61 bu/ac respectively or a reduction of 12%. The last 5 years show rotational vs continuous soybean yields of 51.2 and 43.62 bu/ac respectively or a reduction of 15%. During this 26 year period, only 5 years gave a yield reduction of 5% or less for the continuous soybean when compared to rotational soybean. From this data, I conclude that a yield reduction of at least 10% can be expected if a continuous soybean production system replaces a rotational system, and that for the last 5 years the reduction has averaged 15%. Input costs for soybeans are usually less than for corn. If cash flow is a concern and costs need to be kept to a minimum, then continuous soybean may look attractive. If soil fertility levels are high, an application of fertilizer could be omitted this year. However, you must keep close tabs on the soil test levels and don’t let them fall below the critical level or yields could tumble. Soil pH levels should be corrected if soil tests indicate an acid condition. If you draw down the level of nutrients in the soil, then you will need to build them back in the future. Remember, avoiding the application of fertilizer for one or two years is not a free meal. The local loan rate for soybean is the floor under the local soybean market price. Knowing your input costs, yield reduction from continuous soybean, and the soybean loan rate you can begin to get a better feel for your crop mix. A major concern that I have regarding the production of continuous soybean, is the potential for a rapid build-up in the population of soybean cyst nematode. If a small number of soybean cyst nematodes are present in a field, continuous production of soybean will result in a rapid increase in the population to a level that could have a negative impact on yield for a number of years to come. Is this gamble worth the long-term risk? If a decision is made to produce soybean for a second year, I would urge you to take a soil sample and have it analyzed for soybean cyst nematode. Then manage the field accordingly. You local extension office has information on taking and submitting soil samples for nematode determination. Bin-Run SeedA number of producers have inquired regarding the use of bin-run seed in 2000. My first word of caution relates to the use of patented herbicide tolerant seed, such as the glyphosate tolerant varieties. These varieties cannot legally be saved for use as seed. Other varieties registered under the plant variety protection act may be saved and used ONLY by the original producer and cannot be sold as seed to others. In most years, the use of bin-run seed, if handled properly, saves very little money. The initial cost of the seed is the price at which you could have sold it at harvest. You then must add to this the costs of storage, seed cleaning, testing for germination and clean out. An additional cost that should be considered is the potential for reduced yields. A study conducted in the 1980’s at Purdue, using two public varieties, showed that bin-run seed resulted in a yield reduction of one bushel per acre compared to certified seed of the same varieties. If one is determined to use bin-run seed in 2000, the following points should be considered: a.) the seed should have been harvested at 12 to 13% moisture to minimize mechanical damage to the seed, b.) secure a warm germination test before and after cleaning and, if possible, also obtain either a cold germination test or an accelerated aging test to evaluate vigor, c.) clean the seed to remove splits, weed seed, and foreign material, d.) handle the seed as gently as possible to avoid additional mechanical damage, and e.) DO NOT save and replant seed of patented varieties.
Seedbed Moisture Conservation in 2000– (Tony J. Vyn) Current dry soil conditions in Central and Northern Indiana have been a cause for concern for many producers. Above-normal air temperatures are compounding the problem of low precipitation levels since evaporation losses were also well above average in the past month. Although late March and April could still bring sufficient or even excessive precipitation, as well as some recharge of dry subsoil conditions, current management efforts must focus on preserving what soil moisture we can. Some tips for conserving seedbed moisture are the following: 1.In a no-till program, make sure that burndown herbicides (with or without residual activity) are applied early enough to ensure that weeds or volunteer crops aren’t resulting in significant transpiration loss of soil moisture. 2.Delay secondary tillage until just before planting in all fields where full width tillage occurred in the fall of 1999. Evaporation losses of soil moisture increase after spring tillage, and more seedbed moisture will be preserved if soil loosening and surface leveling occur just before planting. 3.Consider planting no-till corn on soybean stubble that was not tilled last fall, even if the original intention was to cultivate or disk the soil before planting in spring. No-till adoption will tend to conserve more moisture close to the surface and may improve seed germination if dry conditions persist. However, on certain soil types any residual effects of soil compaction in the top 4" will tend to restrict corn seedling root growth more in very dry soils during May and early June because of increased soil resistance to root penetration. 5.Early secondary tillage (i.e. well before planting) to accomplish soil leveling should only be considered if fall chisel plowing left the soil very rough. Deep valleys and raised ridges will result in more moisture loss because of increased surface area available for evaporation. However, recognize the trade-offs involved. Tillage to level the surface where ridge peaks are 6 to 8" higher than valleys will also increase moisture loss from loosened soil versus unloosened soil. Even in normal springs, fall chisel plowed soil can sometimes result in more inconsistency in seedbed moisture conditions than after other tillage systems. 6.Recognize that moisture loss with continuing dry weather will be greater after soybeans than after grain corn because of the much higher residue cover left after grain corn, and differences in surface boundary layer. 7.Do not attempt any deep soil loosening this spring if dry conditions persist. Deep loosening can result in increased moisture loss from deeper in the soil profile. In certain wet springs that might be an advantage; this year deep loosening could be a disadvantage. 8.Consider adding harrows or other firming devices to secondary tillage tools to result in finer, firmer seedbeds since this condition will slow moisture loss relative to coarse and excessively loose seedbeds. Trailing packers, if available, behind secondary tillage implements will also help conserve moisture. Overall moisture conserving benefits of residue cover, however, are more important. Therefore any tillage combination should still try to retain as much surface residue cover as possible. 9.Carefully monitor planting depth. Make sure that the seeding depth is as uniform as possible, and into moist soil if possible. Depth gauge wheels and seed firming wheels should be adjusted with more down pressure, if possible, in dry springs. 10.Plant fields with the coarsest soil textures first, since these soils inherently retain less seedbed moisture than soils that are fine-textured.
|
|||||||||||||||||||||||||||||||||||||||||||||||||||||||||||||

![]()